Airmar, Replacing the valve assembly – Airmar S650 & Valve Kit User Manual
Page 2
8. Attach the safety wire to prevent the insert from backing out in
the unlikely event that the cap nut fails or is screwed on
incorrectly..
Plastic housing—Attach the safety wire to one eye in the hull nut.
Thread the emergency plug onto the wire. Keeping the wire taut
throughout, lead it in a counterclockwise direction and thread it
through one eye in the cap nut. Thread the wire through the eye a
second time. Then lead the wire through the pull ring and the
second eye in the cap nut. Twist the wire securely to itself.
Metal housing—Wrap one end of the safety wire tightly around
the housing and twist it together with the long end. Thread the
emergency plug onto the wire. Keeping the wire taut throughout,
lead it straight up and through one eye in the cap nut. Loop the
wire through the pull ring and twist it securely to itself.
Replacing the Valve Assembly
1. On the replacement short emergency plug, inspect (replace if
necessary) and lubricate the o-rings with silicone lubricant or
petroleum jelly (Vaseline®) (see Figure 2). O-rings must be
intact and well lubricated for a watertight seal.
2. Remove the old emergency plug from the safety wire and
discard it.
3. Unscrew the cap nut. With the replacement short emergency
plug ready in one hand, remove the paddlewheel insert and
valve assembly as one unit by pulling upward on the pull ring.
Rapidly install the short emergency plug to minimize the flow of
water into the boat.
NOTE: The plug is not secure until the cap nut is in place.
4. To free the cap nut, remove the paddlewheel insert from the
valve assembly by removing one safety ring and the retaining
pin. Grasp the insert by the pull ring and pull slowly upward.
NOTE: If the paddlewheel insert is caught in the valve
assembly trapping the cap nut, TEMPORARILY hold the short
emergency plug in place with the safety wire. Then, separate
the paddlewheel insert from the valve assembly. If they cannot
be separated and the sensor must be left unattended, cut the
cable [a minimum of 1m (3') from the insert] to free the cap nut.
Later splice the cable with Airmar’s Junction Box 33-035.
5. Secure the short emergency plug with the cap nut. Hand-
tighten only. Do not over-tighten. Reattach the safety wire.
6. Separate the valve assembly from the paddlewheel insert.
Discard the old valve assembly (see Figure 1).
7. Check the replacement valve assembly to be sure the flap valve
moves freely and seats against the valve housing. Inspect
(replace if necessary) and lubricate the o-rings with silicone
lubricant or petroleum jelly (Vaseline®). The o-rings must be
intact and well lubricated to make a watertight seal.
8. Remove the safety wire and cap nut from the emergency plug.
With the valve assembly ready in one hand, remove the
emergency plug. Rapidly slide the valve assembly into the
housing with a pushing twisting motion to engage the key in the
notch. Screw the cap nut in place. Hand-tightening only. Do
not over tighten.
9. Re-install the paddlewheel insert (with lubricated o-rings) with
the arrows on the top pointing forward toward the bow. Seat it
into place with a pushing twisting motion until the keys fit into
the notches. Secure the insert with the retaining pin and safety
rings (see Figure 1).
10.Attach the safety wire to prevent the insert from backing out in
the unlikely event that the cap nut fails or is screwed on
incorrectly (see Figure 2).
Plastic housing—Attach the safety wire to one eye in the hull nut.
Thread the emergency plug onto the wire. Keeping the wire taut
throughout, lead it in a counterclockwise direction and thread it
through one eye in the cap nut. Thread the wire through the eye a
second time. Then lead the wire through the pull ring and the
second eye in the cap nut. Twist the wire securely to itself.
Metal housing—Wrap one end of the safety wire tightly around
the housing and twist it together with the long end. Thread the
emergency plug onto the wire. Keeping the wire taut throughout,
lead it straight up and through one eye in the cap nut. Loop the
wire through the pull ring and twist it securely to itself.
2
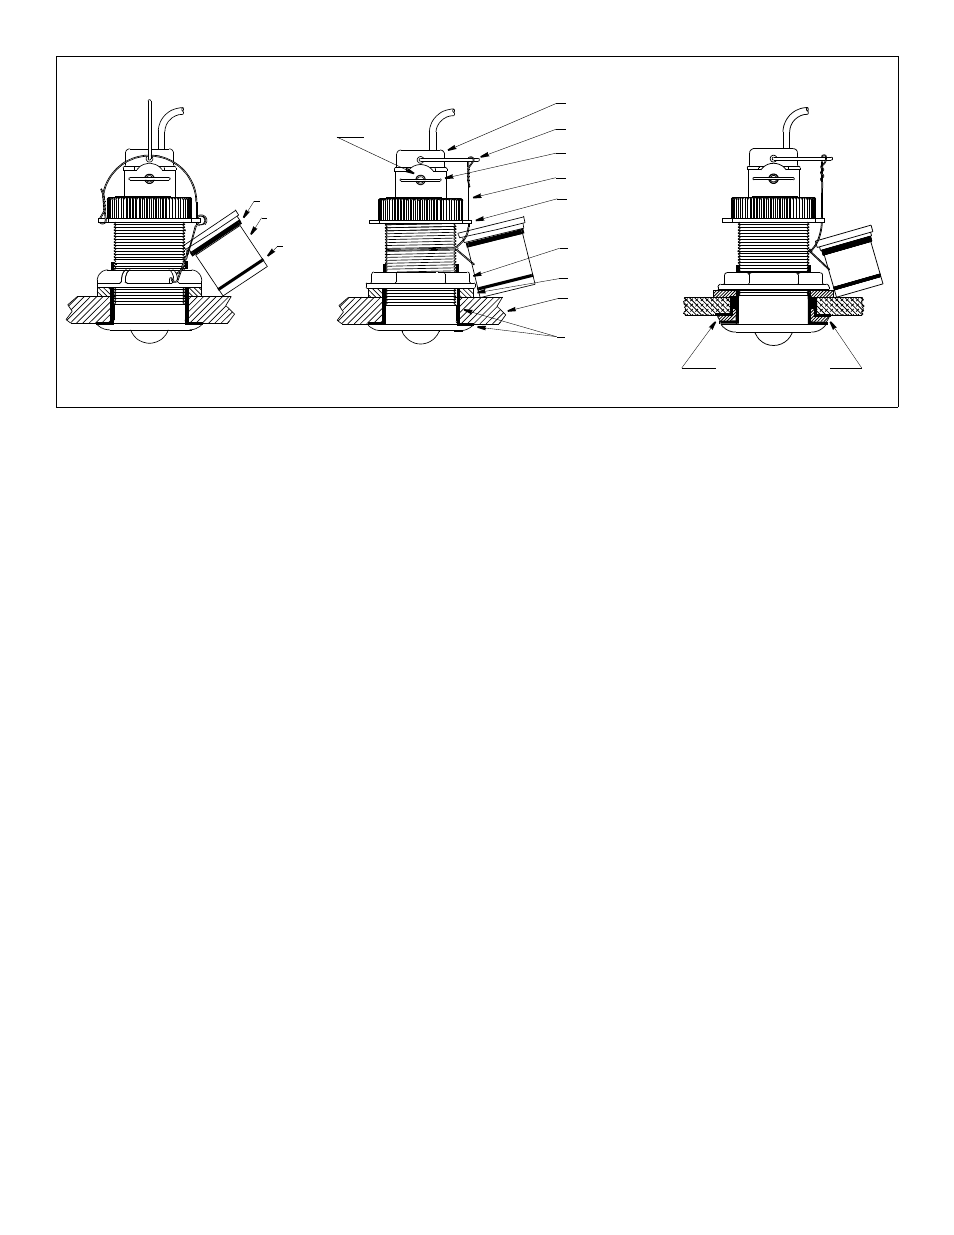
Figure 2. Installation (low profile housings shown)
retaining
metal housing
pin
safety ring (2)
marine sealant
paddlewheel insert
pull ring
safety wire
cap nut (plastic)
hull nut
washer
hull
on lip and sidewall
plastic housing
stainless steel housing
with marine sealant
isolation bushing
plug
in metal hull
emergency
large o-ring
medium o-ring
Copyright © 1999 - 2011 Airmar Technology Corp. All rights reserved.
AIRMAR
®
TECHNOLOGY CORPORATION
35 Meadowbrook Drive, Milford, New Hampshire 03055-4613, USA
www.airmar.com
Copyright © 1999 - 2010 Airmar Technology Corp.
in non-metal hull