Yaskawa CM092 User Manual
Option kit cm092
Yaskawa Electric America, Inc. –
www.yaskawa.com
IG.G5HHP.26 Page 1 of 13
Date: 10/12/09 Rev: 09-10
Example label:
MAC ID: 00-20-B5-24-11-13
Insulated
This document applies to the Yaskawa G5HHP drive.
Unpack the CM092 EtherNet/IP Option kit and verify that all components are present and undamaged.
Connect power to the Yaskawa AC drive and verify that the drive functions correctly. This includes running the drive from the operator keypad. Refer to the appropriate drive
technical manual for information on connecting and operating the drive
Remove power from the drive and wait for the charge lamp to be completely extinguished. Wait at least five additional minutes for the drive to be completely discharged.
Measure the DC bus voltage and verify that it is at a safe level.
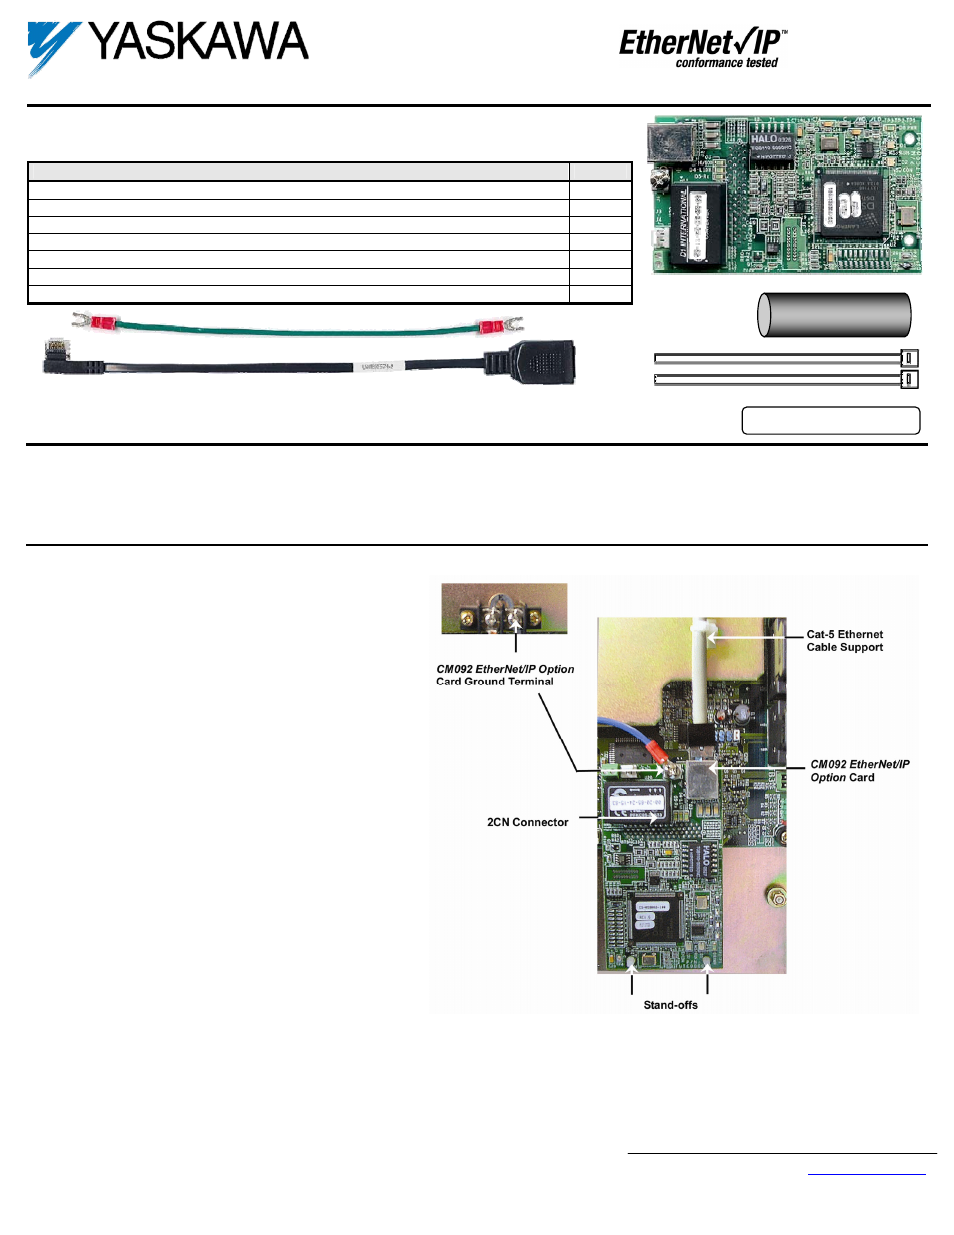
Attach the CM092 EtherNet/IP Option card to the master control
board.
Attach the CM092 EtherNet/IP Option ground wire to the
ground terminal as shown. Make sure that the terminal is
connected to a reliable, noise free ground.
Connect the CM092 EtherNet/IP Option card to the 2CN
connector on the master control board.
Secure the Cat-5 Ethernet cable to the support with a tie wrap
to provide strain relief for the connector.
Attach the Ethernet cable to the CM092 EtherNet/IP Option
card as shown.
Fully engage the stand-offs in the mounting holes on the card.
Route the Ethernet cable away from any power wires within the
cabinet. When outside of the cabinet, run the Ethernet cable in
its own conduit. However, it may be run along with low voltage
signals such as feedback wiring.
Option Kit
CM092
CM092 EtherNet/IP Option Kit Parts List
Qty.
EtherNet/IP Option Card
1
Shielded RJ-45 M-F Cable
1
Ground Wire
1
4”x1” Insulated Tubing
1
Cable Ties
2
MAC ID Label (Unique for each EtherNet/IP Option Card) 1
Installation Guide (IG.G5HHP.26)
1
Attaching the CM092 EtherNet/IP Option on a G5HHP master control board.