Auriol H14044 User Manual
Auriol Clock
GB
GB
GB
GB
GB
GB
Milomex Ltd.
c/o Milomex Services
Hilltop Cottage, Barton Road
Pulloxhill, Bedfordshire
MK45 5HP, UK
WEEE:
IAN 52115
Stifthalter mit Uhr / Pen holder with clock
Modell-Nr. / Model No.: H14044
Batterietyp / Battery type: 1 x 3 V CR2025
Version: 04/2010
B
A
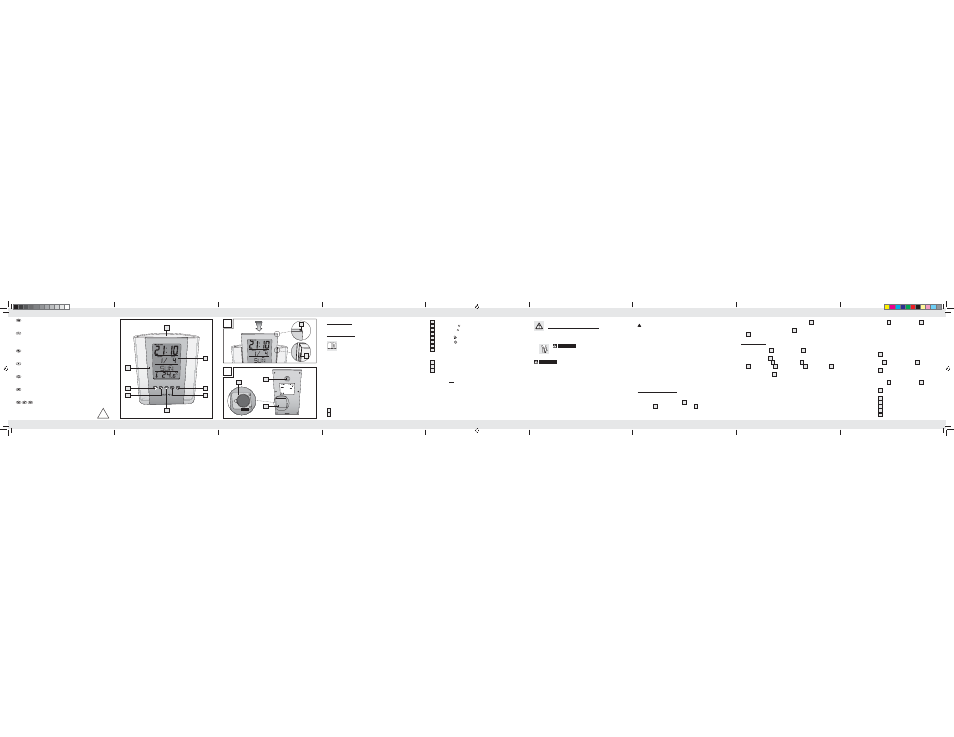
2
Liquid crystal display
3
Decrease button “ “
4
Increase button “ “
5
Set-up button “SET“
6
Alarm button “ “
7
Mode button “ “
8
LCD clock
8a
Guide rail
Back of clock:
9
Loudspeaker
10
Battery compartment lid
11
Battery compartment
©
Technical data
Battery: 3
V Lithium (CR2025-button cell)
©
Scope of delivery
1 Pen Pot Clock
1 Lithium battery (CR2025-button cell)
1 Directions for use
Pen Pot Clock
©
Introduction
Familiarise yourself with the product before using it for the fi rst
time. In addition please refer carefully to the operating instruc-
tions below and the safety advice. Use the product only as
described and for the indicated purpose. Keep these instructions in a safe
place. If you pass the product on to anyone else, please ensure that you
also pass on all the documentation.
©
Proper use
The product is designed to display the time, date, day as well as the current
indoor temperature. The product has an alarm and countdown function. In
addition, the product is designed to store writing implements. Other uses
or modifi cation of the product shall be considered as improper use and
may lead to injury or damage. The manufacturer will not accept liability
for loss or damage arising from improper use. The product is not intended
for commercial use.
©
Description of Parts
1
Pen holder
1a
Slot
H14044
1
11
5
1a
9
10
8a
2
3
4
7
8
6
General Safety Instructions
KEEP ALL THE SAFETY ADVICE AND INSTRUCTIONS IN A SAFE PLACE
FOR FUTURE REFERENCE!
½
WARNING!
DANGER TO LIFE AND RISK OF
ACCIDENTS FOR INFANTS AND CHILDREN!
Never
leave children unattended with the packaging material.
Packaging material can cause suff ocation.
WARNING!
DANGER TO LIFE! Batteries can be swallowed, which
can prove fatal. Consult a doctor immediately if anyone swallows a
battery.
½
Children or other individuals who do not know or have no experience
of handling this device, or whose physical, sensory or mental abilities
are restricted, must not use the device without supervision or instruction
by an individual responsible for their safety. This product is not a toy.
Children must be supervised in order to ensure that they do not play
with the device.
½
Never take the product apart on any account. Improper repairs could
cause considerable danger for the user. Only let qualifi ed people
carry out any repairs.
©
Battery Safety Instructions
CAUTION! RISK OF EXPLOSION! Never recharge the batteries.
Have a spent battery removed from the instrument immediately. There
is an increased risk of leakage.
½
Batteries must not be disposed of in household waste.
½
Consumers are under a legal obligation to dispose of batteries in the
proper way.
½
Keep the battery out of the reach of children, do not dispose of the
battery in fi re, do not shortcircuit it, and do not take it apart.
½
Failure to observe these instructions may result in the battery discharg-
ing beyond its end voltage, which poses a risk of leakage. If the bat-
tery in your instrument has leaked, have it removed immediately to
prevent damage to the instrument.
½
Avoid contact with skin, eyes and mucous membrane. In the event of
contact with battery acid, rinse the aff ected area with plenty of water
and / or consult a doctor.
©
Start of operation
©
Replacing/inserting the battery
˽
Open the battery compartment
11
. Carefully lift the battery compart-
ment lid
10
off the battery compartment
11
with the aid of a pointed
object (e.g. a fl at-blade screwdriver).
˽
Remove the old battery. You may have to use a pointed object to help you.
˽
Insert a new battery into the battery compartment
11
, ensuring correct
polarity.
˽
Replace the battery compartment lid
10
onto the battery compartment
11
and press it fi rmly down. You should feel and hear it click into place.
©
Operation
˽
Pull the LCD clock
8
out of the pen holder
1
.
˽
Pull the insulating strips out of the battery compartment in order to start
up the LCD clock
8
. A 6-second sequence will sound.
˽
Push the LCD clock
8
into the pen holder
1
. Make sure that the slot
1a
of the pen holder
1
grips the guide rails
8a
of the LCD clock
8
.
Note: The LCD clock
8
has various modes:
Normal mode:
The time, data and ambient temperature are displayed.
12/24-hour mode:
12/24-hour mode can be chosen and time and
date set.
Alarm mode:
You can set a time for the alarm to go off .
Birthday reminder mode:
The alarm can be set to remind you of
someone‘s birthday.
Countdown mode:
You can set a countdown of a maximum of
23 hours and 59 minutes.
LCD-UHR-STIFTEHALTER
Bedienungs- und Sicherheitshinweise
PEN POT CLOCK
Operation and Safety Notes
POJEMNIK NA PRZYBORY DO PISANIA Z
ZEGARKIEM LCD
Wskazówki dotyczące obsługi i bezpieczeństwa
LCD ÓRA ÉS CERUZATARTÓ
Kezelési és biztonsági utalások
LCD URA IN DRŽALO ZA SVINČNIKE
Navodila za upravljanje in varnostna opozorila
PŘIHRÁDKA NA TUŽKY S LCD HODINAMI
Pokyny pro obsluhu a bezpečnostní pokyny
LCD-HODINY S DRŽIAKOM NA CERUZKY
Pokyny pre obsluhu a bezpečnostné pokyny
Note:
Press the decrease button
3
or the increase button
4
to make
adjustments in the various modes.
Tip:
Hold the button in question down. This way, you can speed up the
adjustment of the values you wish to set. This rapid set-up process can be
used for all adjustment procedures. If you do not press any buttons within
60 seconds, the LC display will automatically return to the standard display.
©
Setting the 12/24-hour mode
˽
Press the mode button
7
once to get to the selection range of the
12/24-hour mode.
˽
Press the decrease button
3
or the increase button
4
to set the
12 or 24-hour mode.
˽
Press the mode button
7
four times to return to normal mode.
©
Setting the time/date
Note:
Press the decrease button
3
or the increase button
4
to make
adjustments in the various modes.
˽
Press the mode button
7
once to get to the 12 or 24-hour selection
range.
˽
Press the set-up button
5
in order to be able to set the hours.
˽
Press the set-up button
5
in order to be able to set the minutes.
˽
Press the set-up button
5
in order to be able to set the year.
˽
Press the set-up button
5
in order to be able to set the current month.
˽
Press the set-up button
5
in order to be able to set the current date.
4
64406_aur_LCD-Uhr-Stiftehalter_LB4.indd 1-9
16.03.11 08:27