Ernesto Espresso Maker User Manual
Page 2
Cleaning
Allow to cool completely the espresso maker after use. Then unscrew the parts and rinse
with clear water. After cleaning the espresso maker let dry completely, best, not even screw
together the parts until the next use.
Depending on the frequency of use may also be necessary once a thorough cleaning of
the espresso maker. Use for this hot rinse water. For this cleaning, you can remove the fi ne
screen (7) from the boiler upper part (1) after removing the silicone seal carefully. Then you
can clean the riser tube (9) and the screen from both sides. Do not clean the parts in the
dishwasher.
Disposal
Please dispose of the packaging and the product in an environmentally acceptable way,
taking care to sort the materials for recycling.
Guarantee
The product was produced with great care and under constant supervision. You receive
a 2-year guarantee for this product from the date of purchase. Please retain your receipt.
The guarantee applies only to material and workmanship and does not apply to misuse
or improper handling. Your statutory rights, especially the warranty rights, are not affected
by this guarantee. With regard to complaints, please contact the following service hotline
or contact us by e-mail. Our service employees will advise as to the subsequent procedure
as quickly as possible. We will be personally available to discuss the situation with you.
Any repairs under the guarantee, statutory warranty or through goodwill do not extend
the guarantee period. This also applies to replaced and repaired parts. Repairs after the
guarantee are subject to a charge.
Please visit www.lidl-service.com to download this and many other manuals, product
videos and software.
Service Centre / Supplier
Allibert Hovac NV
Brugstraat 25
8720 Oeselgem
Belgium
Tel.: +33 9 69 36 87 40
E-Mail: [email protected]
GB
1
GB
2
IT
2
IT
1
IT
CH
GB
IAN 106115
Caffettiera per caffè espresso
Congratulazioni per aver acquistato questo prodotto di qualità! È opportuno conoscere
il prodotto e capirne il funzionamento prima di utilizzarlo per la prima volta. Leggere
attentamente queste istruzioni per l’uso. Utilizzare il prodotto soltanto nel modo descritto
e per lo scopo specifi cato. Conservare queste istruzioni in un luogo sicuro. Se si cede il
prodotto ad un’altra persona, accertarsi di consegnarle anche tutta la documentazione
acclusa.
Istruzioni di sicurezza
Prima di usare la caffettiera, lavarla accuratamente senza usare detergenti e detersivi
abrasivi.
• Per ottenere un caffè con un buon aroma, si raccomanda di gettare la prima tazza di
caffè.
• Tenere lontani i bambini dalla caffettiera quando la si usa.
• Accertarsi che il getto di vapore che esce dalla valvola di sicurezza non sia diretto verso
l’utilizzatore.
• Utilizzare la caffettiera per lo scopo per cui è destinata.
• Accertarsi che la caffettiera sia ben chiusa prima di metterla sul fuoco.
• Lasciar raffreddare la caffettiera prima di aprirla dopo averla tolta dal fuoco.
• Non toccare le superfici calde, ma usare il manico e il pomolo.
• Non usare la caffettiera senza acqua nella caldaia.
• Usare un fuoco adatto in base alle istruzioni per l’uso.
• Usare solo parti di ricambio originali in base al modello.
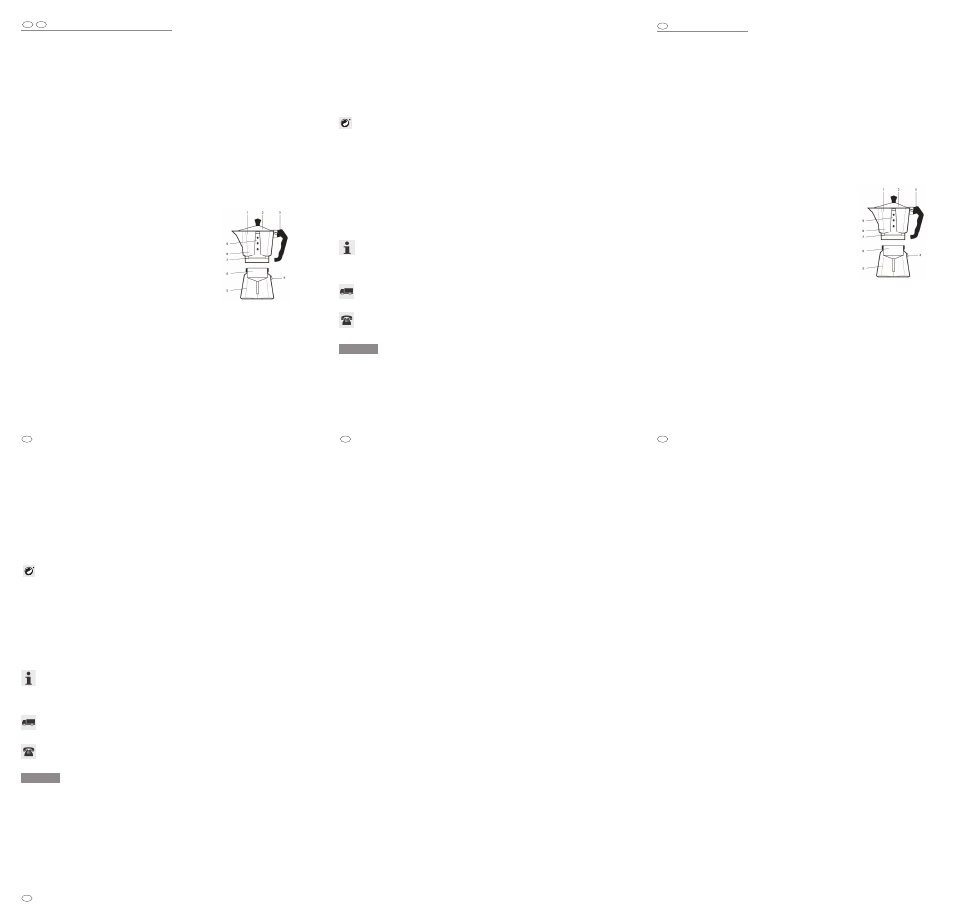
Scopo del prodotto/Descrizione dei componenti
1) parte superiore
2) coperchio
3) manico
4) valvola di sicurezza
5) base (caldaia)
6) filtro a imbuto
7) piastrina filtro
8) raccoglitore
9) colonnina di erogazione
10) istruzioni per l’uso (senza immagine)
Modalità d’uso
1)Svitare la parte superiore (1) dalla base (5) e togliere il filtro a imbuto (6).
2) Riempire la caldaia (5) con acqua fredda fino a 1 mm sotto il livello della valvola di
sicurezza (4). Fare attenzione a non oltrepassare la valvola.
3) Inserire il filtro a imbuto (6) e riempirlo con caffè macinato (non pressare).
4) Avvitare saldamente la parte superiore (1) alla base (5) e chiudere il coperchio (2).
5) Mettere la caffettiera su un fuoco da basso a medio (piano di cottura a gas, elettrico, in
vetroceramica e a induzione). Se si usa un piano di cottura a gas, regolare la fiamma in
modo che non risalga sui lati della base.
6) Dopo alcuni minuti, quando l’acqua bolle, il caffè risale nella colonnina di erogazione (9)
e fuoriesce nel raccoglitore (8).
7) Servire il caffè appena fatto.
Pulizia
Lasciar raffreddare completamente la caffettiera dopo l’uso. Svitare le parti e risciacquarle
sotto acqua corrente. Dopo aver pulito la caffettiera, lasciarla asciugare completamente; la
cosa migliore è tenere le parti separate fino al prossimo uso.
A seconda della frequenza con cui si usa la caffettiera, potrebbe essere necessario di
tanto in tanto una pulizia più accurata. In questo caso, risciacquare con acqua calda. Per
pulire in profondità, togliere la piastrina filtro (7) dalla parte superiore (1) dopo aver tolto
con precauzione la guarnizione di silicone; in questo modo è possibile pulire la colonnina
di erogazione (9) e la piastrina su entrambi i lati. Non lavare le parti della caffettiera in
lavastoviglie.
Smaltimento
Smaltire l’imballo e il prodotto rispettando l’ambiente; fare la raccolta differenziata dei
materiali per il riciclaggio.
Garanzia
Questo prodotto è stato fabbricato con grande attenzione e sottoposto a costanti controlli. La
garanzia è di 2 anni dalla data di acquisto. Si prega di conservare lo scontrino d’acquisto.
La garanzia si applica solo a difetti di materiale e di fabbricazione e non si applica ad un
uso improprio o non conforme. Questa garanzia non limita i diritti legali dell’acquirente,
in particolare il diritti di garanzia. Per eventuali reclami, chiamare la seguente hotline di
assistenza oppure contattarci via e-mail. I nostri addetti all’assistenza ti comunicheranno
il prima possibile la procedura da seguire. Siamo a tua disposizione per discutere
personalmente con te la situazione. Le riparazioni in garanzia, durante la garanzia legale
o per correntezza commerciale non prolungano il periodo di garanzia. Questo si applica
anche a parti sostituite o riparate. Le riparazioni dopo la scadenza della garanzia sono a
pagamento.
Vai su www.lidl-service.com per scaricare queste istruzioni per l’uso e quelle di tanti
altri prodotti, i video dei prodotti e i software.
Centro Assistenza / Fornitore
Allibert Hovac NV
Brugstraat 25
8720 Oeselgem
Belgio
Tel.: +33 9 69 36 87 40
E-Mail: [email protected]
IAN 106115
Espresso maker
Congratulations! You just purchased a quality product. Please familiarize with the product
before using it for the fi rst time. Carefully read the following operating instructions. Use the
product only in the manner as described and for the areas of application as stated. Store
these instructions in a safe place. When passing the product to a third party be sure to also
supply all documents.
Safety notes
Before using the coffee maker, wash it carefully, avoiding detergents and abrasive cleaners.
• To improve the coffee flavor, it is recommended to waste the first coffee cup.
• Do not let children near the coffee maker when in use.
• Ensure that the steam jet from the safety valve is oriented away from the user.
• Use the coffee maker for the purpose it has been designed for.
• Ensure that the coffee maker is properly closed before using it.
• Do not operate the closing/opening system before cooling the coffee maker after removing
it from a hot cooker.
• Do not touch hot surfaces, use handle and knob.
• Do not use the coffee maker without water in the boiler.
• Use the appropriate heat source(s) according to the instructions for use.
• Only use manufacturer’s spare parts in accordance with the relevant model.
Scope of delivery / Parts description
1) boiler upper part
2) lid
3) handle
4) safety valve
5) boiler base
6) filter
7) fine screen
8) coffee collecting container
9) riser tube
10) instruction manual (no figure)
Use
1) Unscrew the boiler upper part (1) from the boiler base (5) and remove the filter (6).
2) Fill the boiler base (5) with cold water 1 mm below the level of the safety valve (4). Be
careful not to overfill.
3) Insert the filter (6) and fill it with ground coffee (must not be pressed).
4) Screw the boiler upper part (1) firmly to the boiler base (5) and close the lid (2).
5) Place the coffee maker on a low to medium heat (gas, electric, glass ceramic and halogen
hobs). If gas is used please adjust the flame so that it does not heat the side of the pot.
6) After a few minutes, when the water boils, the coffee rises from the riser tube (9) into the
coffee collecting container (8).
7) The fresh coffee is ready to serve.