Sealey PC300SDAUTO User Manual
Page 2
Original Language Version
PC300SDAUTO.V3 Issue No.2 20/10/09
3. CONTENTS
3.1
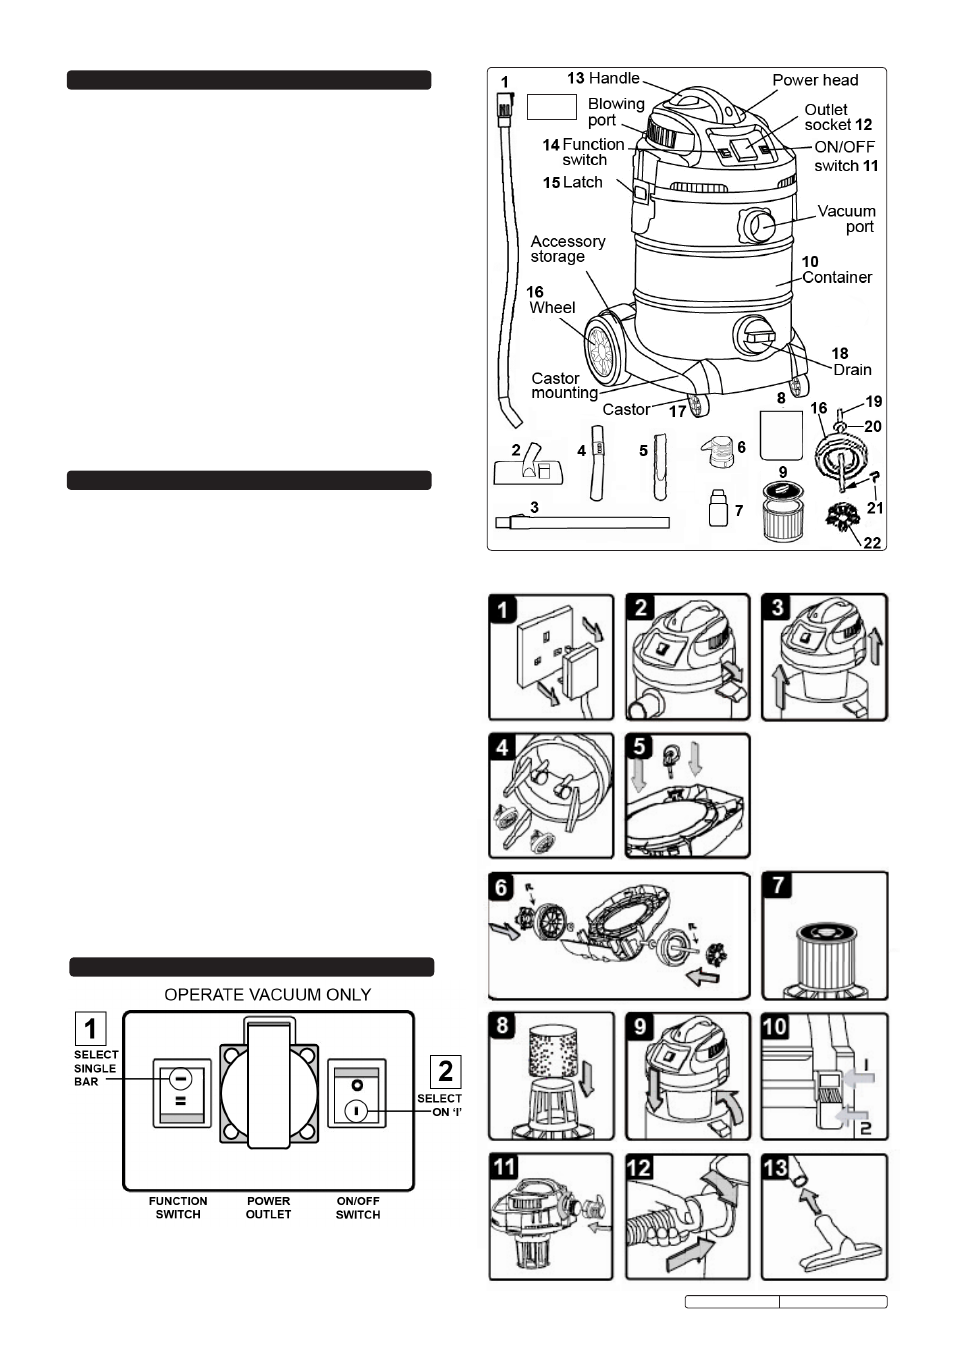
Carton content
3.1.1 Carefully unpack the carton.
3.1.2 Locate the two side latches (fig. 1.19) which hold the power
head in place.
3.1.3 Undo the latches, remove the top section and take out the
items in the container.
3.1.4 Check and identify each component as listed below. If anything
is missing or damaged please contact your supplier immediately.
Item Description
1
Flexible vacuum hose
2
Combination nozzle
3
Telescopic suction tube
4
Vacuum hose connection
5
Crevice nozzle
6
Noise diffuser
7
Dust free tool adaptor
Part No:PC200SDAV3.43
8
Foam filter
9
Locking Cartridge filter
(fitted as standard)
10 Container, (Stainless Steel)
11 ON/OFF switch
Item Description
12 Dust free tool socket
13 Handle
14 Function switch
15 Latch (2)
16 Wheel (2)
17 Castors (2)
18 Drain cap
19 Axle
20 Washers (4)
21 'R' clip (2)
22 Hub caps (2)
fig 1
4. ASSEMBLY
4.1
Ensure the mains plug is disconnected.
4.2
Undo latches that secure the power head to the stainless
container.
4.3
Lift off the power head and put carefully to one side.
4.4
Locate the castors and wheels ready for assembly.
4.5
Turn the container upside down. Push the castor spindles
fully home into the mounting collars provided on the
underside of the lower moulding.
4.6
Push the rear axle tube through the mounting points provided
at the back of the lower moulding so that it protrudes equally
at either end. Slide a washer over each end of the axle
followed by a wheel and another washer. Retain the wheels
and washers by inserting an 'R' clip through the holes in
each end of the axle tube. Snap a hub cap into place on
each wheel.
4.7
For dry vacuum cleaning use the locking cartridge filter
supplied.
NOTE: Do not operate the cleaner without a
cartridge filter fitted as this will damage the machine and
invalidate your warranty. Ensure the filter is correctly
fitted before every use.
4.8
If wet vacuuming remove the cartridge filter and push the
foam filter over the filter basket instead.
4.9
Replace the top section onto the container.
4.10 Align up the top section with the latches and snap into place,
by applying pressure at the mid point of the clasps.
4.11
For quiet operation insert the noise diffuser (fig.1-6) into the
blower port and push it firmly home.
4.12 Screw the large end of the vacuum hose into the front inlet
of the container.
4.13 Choose the desired nozzle and push it onto the telescopic
suction tube.
5. SWITCH OPERATION
5.1
OPERATE VACUUM ONLY.
5.1.1 Select single bar position on function switch.
5.1.2 Move the ON/OFF switch
to ('I') position to start the cleaner.