Fig.12, Maintenance – Sealey G1050I User Manual
Page 4
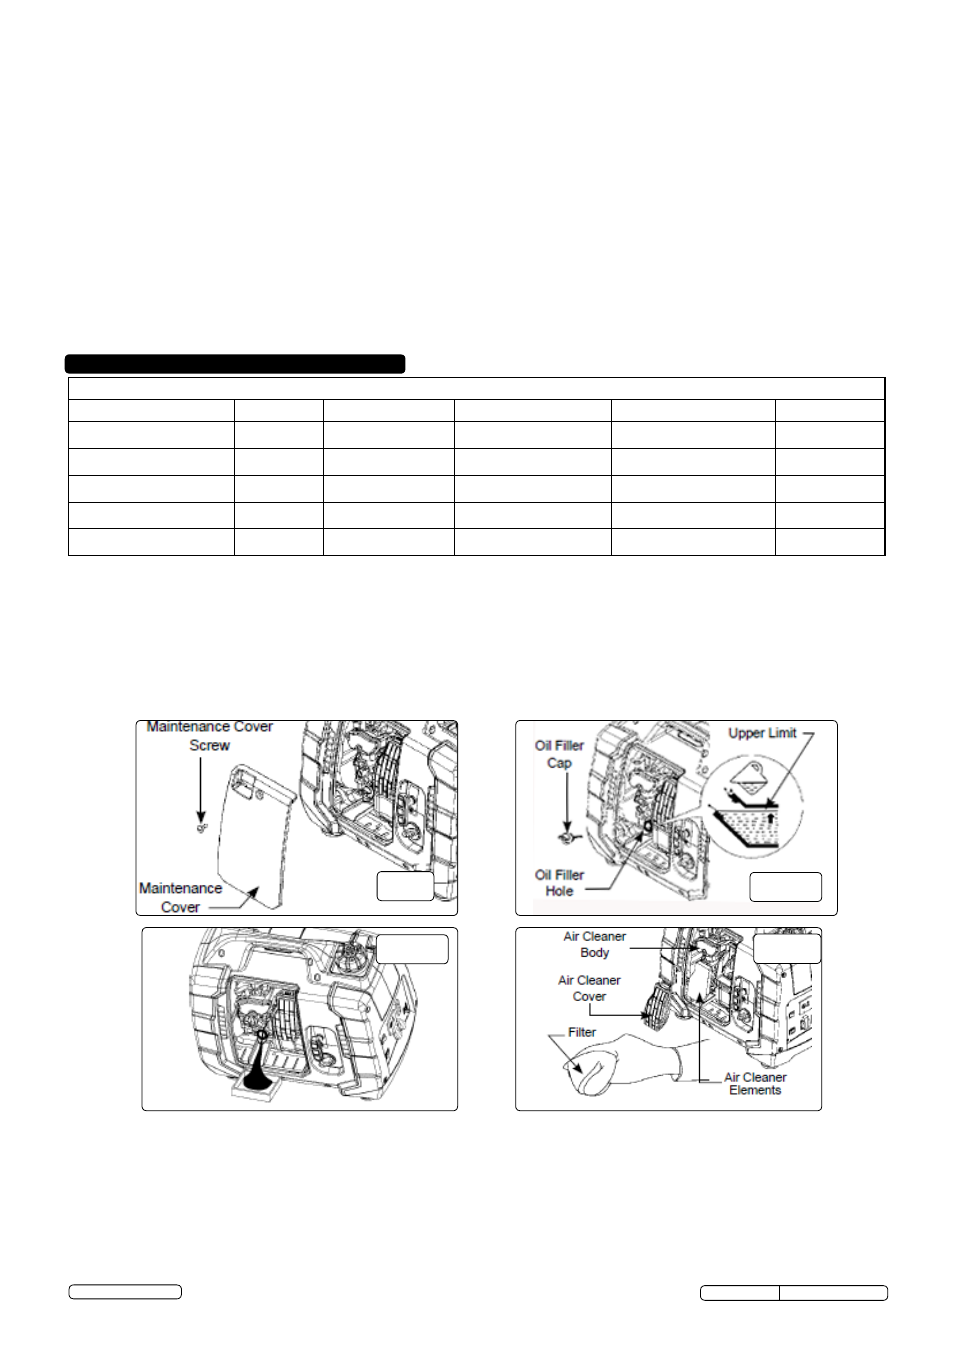
Maintenance Schedule
Item
Daily Check
20hrs or first month
50hrs or every 3 months
100hrs or every 6 months
200hrs or yearly
Check Engine Oil
Check
Replace Engine Oil
Replace
Replace
Check Air Filter
Check
Clean Air Filter
Clean
Spark Plug
Clean
Replace
WARNING! DO NOT attempt to start an automobile engine with the generator still connected to the battery. The generator may be
damaged.
NOTE:
The DC receptacle can be used while the AC output is in use. If you use both at the same time, be sure not to exceed the
total power for AC and DC.
6.5.
USB SOCKET
6.5.1.
The output from the USB socket is 5V in an unloaded state. Only use the USB socket to charge a mobile phone.
6.5.2.
To avoid damage to mobile phone battery, connect the charging lead to the generator first, then to the phone.
6.5.3.
Disconnect the phone first, then unplug the charging lead from the generator.
WARNING! DO NOT start the generator whilst connected to a mobile phone; there is the risk of damage to the phone battery.
6.6.
OUTPUT AND OVERLOAD INDICATORS
(fig.2
or
3)
6.6.1.
The output indicate LED (green) will flash during normal operating conditions.
6.6.2.
If the generator is overloaded, or if there is a short in the connected appliance, the output indicate LED (green) will go out, the
overload indicator LED (red) will light and current to the connected appliance will be shut off.
6.6.3.
Stop the engine if the overload indicator LED (red) comes on and investigate the overload source.
6.7.
STOPPING THE ENGINE
6.7.1.
In an emergency: Turn the fuel switch and ignition switch to the 'OFF' position.
6.7.2..
In normal use: unplug appliances from the generator, turn the fuel switch and ignition switch to the 'OFF' position, turn the fuel cap
breather to the 'OFF' position after the machine has cooled down.
7. maINTENaNcE
7.1.
cHaNGING THE ENGINE OIL
7.1.1.
Drain the oil while the engine is still warm to assure rapid and complete draining.
7.1.2.
Loosen the cover screw and remove the maintenance cover (fig.9).
7.1.3.
Remove the oil filler cap (fig.10).
7.1.4.
Drain dirty oil into a container (fig.11).
7.1.5.
Refill with the recommended oil, and check the oil level.
7.1.6.
Reinstall the maintenance cover and tighten the cover screw securely.
7.1.7.
Engine oil capacity: G1050I: Approx ∙18ltr, G2000I: Approx ∙35ltr. For normal temperatures, a 10W-30 oil is recommended.
7.1.8.
Dispose of used oil responsibly, complying with local environmental regulations.
fig.9
fig.10
fig.11
7.2.
aIR FILTER cLEaNING
A dirty air cleaner will restrict air flow to the carburettor. To prevent carburettor malfunction, service the air cleaner regularly. Service
more frequently when operating the generator in extremely dirty areas.
Never run the generator without the air filter, otherwise rapid engine wear may result.
7.2.1.
Loosen the cover screw and remove the maintenance cover. (fig.9)
7.2.2.
Remove the air cleaner cover. (fig.12)
7.2.3.
Wash the filter in a non-flammable or high flash point solvent and dry it thoroughly.
7.2.4.
Soak the filter in clean engine oil and squeeze out the excess oil.
7.2.5.
Reinstall the air filter and the air cleaner cover.
7.2.6.
Reinstall the maintenance cover and tighten the cover screw securely.
fig.12
Original Language Version
© Jack Sealey Limited
G1050I, G2000I Issue: 1 - 06/06/14