Fig.4 fig.5 fig.6, Fig.7, Operation – Sealey SAC12000 User Manual
Page 3
5.1.
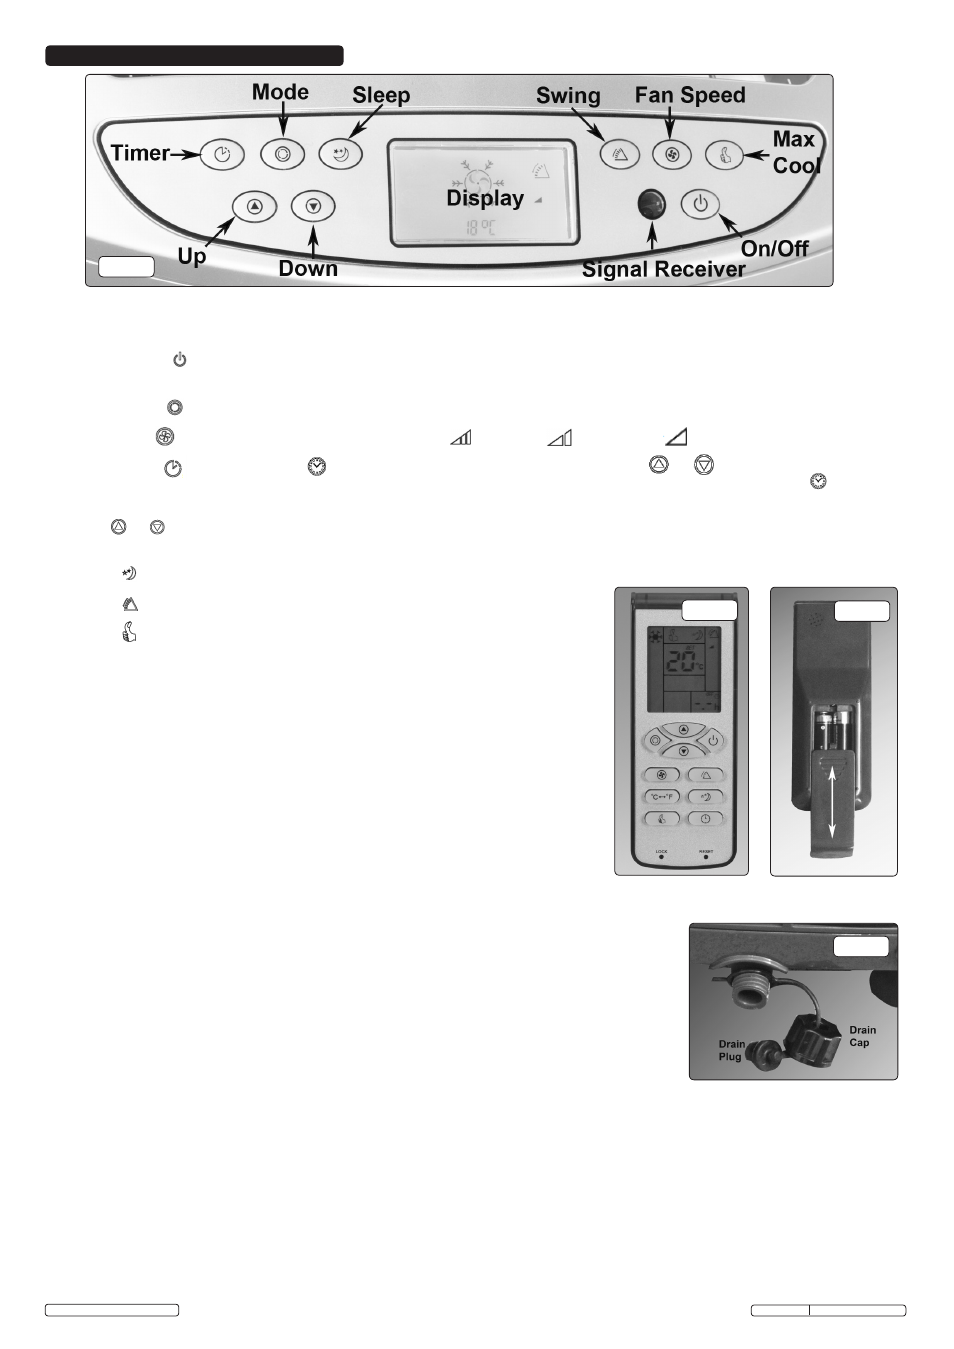
Control Functions
5.1.1
. When connected to mains power, the unit enters standby status. The display shows the ambient temperature if between 5-35°C/41-95°
If below this range, the display will show 'L'; if above it will show 'H'.
5.1.2. On/Off Button : When this button is pressed, the unit will enter cooling mode (the default temerature setting is 24°C/75°F). A further press of
the button and the machine will revert to standby status.
5.1.3. Mode Button : Scroll through by repeatedly pressing this button for: Cooling, Fan, Heating or Dehumidifier mode.
5.1.4. Fan Button : Scroll through by repeatedly pressing to obtain: High Speed, Medium Speed, Low Speed.
5.1.5. Timer Button :On the first press the icon will show in the display, along with '24.00'. Using the and buttons adjust the hour either up
or down, the minute setting will flash after a short pause and can be adjusted up or down until the required time is reached. The icon will show
until the machine switches on after the set period. When the unit is running, setting the timer will switch it off after the required period
5.1.6. The and buttons can be used to set either time or temperature.
If pressed simultaneously, the temperature display can changed from °C to °F.
5.1.7. Press button to select sleep mode when the machine is in cooling or heating mode.
5.1.8. Press button to start the outlet louvres oscillating; a second press will stop them.
5.1.9. Press button for maximum cooling. This will achieve cool air more quickly when
in the cooling mode.
5.2.
Remote Control
5.2.1. The remote control requires 2 x AAA 1.5V batteries which are fitted and removed by sliding
the battery compartment cover open and inserting the batteries in the compartment.
Ensure that the correct polarity of the batteries.
5.2.2. The icons on the remote control are identical to those on the control panel as
described in section
5.1. above, and fulfil the same functions. The only difference is the
Temperature °C↔°F button which allows the temperature scale to be altered.
5.2.3. The key pad can be locked by pressing a sharp object into the 'Lock' aperture.
This will prevent tampering. To release: similarly press into the 'Reset' aperture.
© Jack Sealey Limited
5. OPERATION
fig.4
fig.5
fig.6
5.3
Self Protection Features
5.3.1. Freezing Protection.
During low ambient temperature conditions the unit will stop working when in the cooling mode.
The display will show 'E4'. When the temperature rises
, the previous setting is resumed.
5.3.2.
Full Water Tank.
If the water tank becomes full, P2 will flash on the display. See section 5.4 for remedy.
5.3.3. Compressor Delay.
Except when starting up for the first time, there is a 3 minute delay before the
compressor starts running.
5.3.4. Low Refrigerant.
When the unit senses a low refrigerant condition (by comparing inlet and output temperatures)
it will shut the compressor and water pump down and the fan speed will drop to minimum setting.
The display will show 'E3'.
5.4.
Water Drainage.
Under normal circumstances, the unit will evaporate the condensate produced and discharge it along with the exhaust air.
5.4.1. If the machine shuts down because of excess water in the drain tank (as in 5.3.2.), disconnect from mains power. Move the machine slowly to
avoid spilling condensate. Drain the tank (fig.7) by unscrewing the drain cap, removing the drain plug and draining the collected water into a
suitable container or drain.
5.4.2. Refit the drain plug and drain cap; reconnect to the mains power and continue using
fig.7
SAC120000 Issue: 1- 16/01/15
Original Language Version