Fig.5 fig.4, Operation, Maintenance – Sealey EH30001 User Manual
Page 3
NOTE: It is our policy to continually improve products and as such we reserve the right to alter data, specifications and component parts without prior notice.
IMPORTANT: No liability is accepted for incorrect use of this product.
WARRANTY: Guarantee is 12 months from purchase date, proof of which will be required for any claim.
01284 757500
01284 703534
Sole UK Distributor, Sealey Group,
Kempson Way, Suffolk Business Park
,
Bury St. Edmunds, Suffolk,
IP32 7AR
www.sealey.co.uk
Original Language Version
© Jack Sealey Limited
5. OPERATION
5.1. Position the heater in an upright position on a firm surface and
at a safe distance from any obstructions, flammable substances
etc. Keep to a minimum of 0.5mtr clearance at the rear and
sides, and 2mtr clearance at the front.
5.2. Connect the heater to a suitable mains supply (see section 4.4).
5.3. Referring to fig.5, set the thermostat dial to the maximum
setting (fully clockwise).
5.4. The heater will switch on when the power setting selector is set
to one of the power settings.
NOTE:
It will take up to three minutes for the heater to reach
optimum temperature.
5.5. Once the room reaches the required temperature, turn the
thermostat dial slowly counter-clockwise until the thermostat
clicks, leave the dial in this position and the room temperature
will be maintained at this setting. The heater will continue to
operate until the power switch is turned to the OFF position.
5.6. For fan only operation, turn the power/fan selector to the fan
only setting and set the thermostat to its minimum setting.
5.7. When not in use, disconnect the heater from the mains supply.
Store it in a safe, dry, childproof location.
6. MAINTENANCE
WARNING! Before attempting any maintenance, ensure that the unit
is unplugged from the mains power supply and that it has cooled down.
6.1. Clean the heater with a soft dry cloth only. DO NOT use
abrasives or solvents.
6.2. Periodically check the heater grille to ensure that it is not
blocked. No other maintenance is necessary. If a problem with
the heater is experienced, contact your local authorised service
agent for repair. If the power lead or plug is damaged, contact
a
qualified electrician.
DO NOT dismantle or tamper with the
heater, as this may be dangerous and will invalidate the
warranty.
NOTE: It may take up to three minutes for the heater
elements to reach optimum temperature. This is normal
and not a fault.
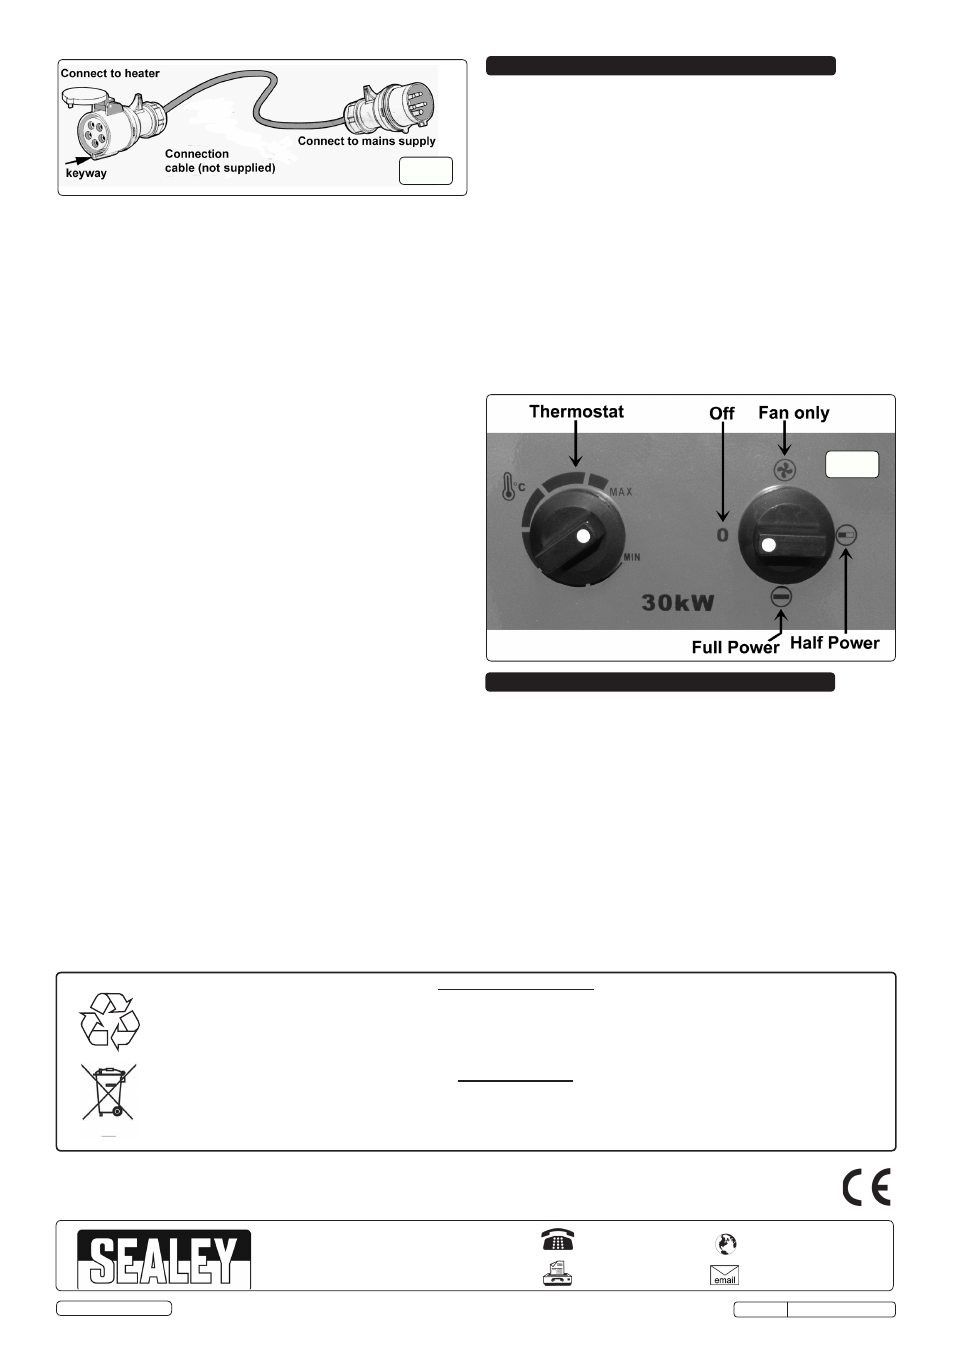
4.4. CONNECTING TO MAINS SUPPLY
4.4.1. The EH30001 heater is supplied with a protected 5 pin
connector mounted on the side of the control housing. In order
to connect to the mains it will be necessary to have the
extension cable shown in fig.4 made up by a qualified
electrician (this cable is not supplied).
The cable should be no shorter than 1.8mtr and no longer than
3.0mtr. The minimum size of cable to be used is 6mm².
4.4.2. Before connecting to the mains supply ensure that the
selector switch is set to OFF and the thermostat is set at
minimum.
4.4.3. Hold open the protective cover on the socket connector on the
extension lead as shown in fig.4 and present it to the heater
connector in the correct orientation so that the spigot on the
heater connector passes into the keyway on the socket
connector. Push the socket connector fully home.
4.4.4. Connect the other end of the extension cable to the mains
supply.
4.5. THERMOSTATIC PROTECTION
4.5.1. The EH30001 has a thermal cut out to prevent the unit
from overheating for any reason, especially if the air input is
restricted. If the temperature of the front grille reaches 45ºC a
a thermal cutout will operate, turning off the heating elements.
When the fan has cooled the unit to 40ºC, normal thermostatic
operation will resume.
4.5.2.
AUTO COOLING. It is recommended that the thermostat should
be set to the minimum to cool the unit prior to switching off. If
the unit is switched off when operating at full temperature, and
the front grille has reached 45ºC, the time delay thermostat will
keep the fan running to cool down the unit. When the front grille
has cooled to 40ºC the fan will stop running.
4.5.3.
NOTE: Auto cooling will only function if the unit is plugged
into the mains and the mains is switched ON.
fig.5
fig.4
EH30001 Issue: 4(L) - 05/05/15
Environmental Protection
Recycle unwanted materials instead of disposing of them as waste. All tools, accessories and packaging should be
sorted, taken to a recycling centre and disposed of in a manner which is compatible with the environment.
When the product becomes completely unserviceable and requires disposal, drain off any fluids (if applicable)
into approved containers and dispose of the product and the fluids according to local regulations.
WEEE Regulations
Dispose of this product at the end of its working life in compliance with the EU Directive on
Waste Electrical and Electronic Equipment (WEEE). When the product is no longer required, it must be disposed
of in an environmentally protective way. Contact your local solid waste authority for recycling information.