Fig.1, Fig.2, Specifications 6. care 2. introduction – Sealey HVF20PO User Manual
Page 2: Operation 4. assembly
3. SPECIFICATIONS
6. CARE
2. INTRODUCTION
IMPORTANT: Ensure that all safety instructions from section 1 have been read and understood
before using the fan.
5.1.
Set the fan on a level, dry surface.
5.2
Plug the power cord into the mains supply.
5.3.
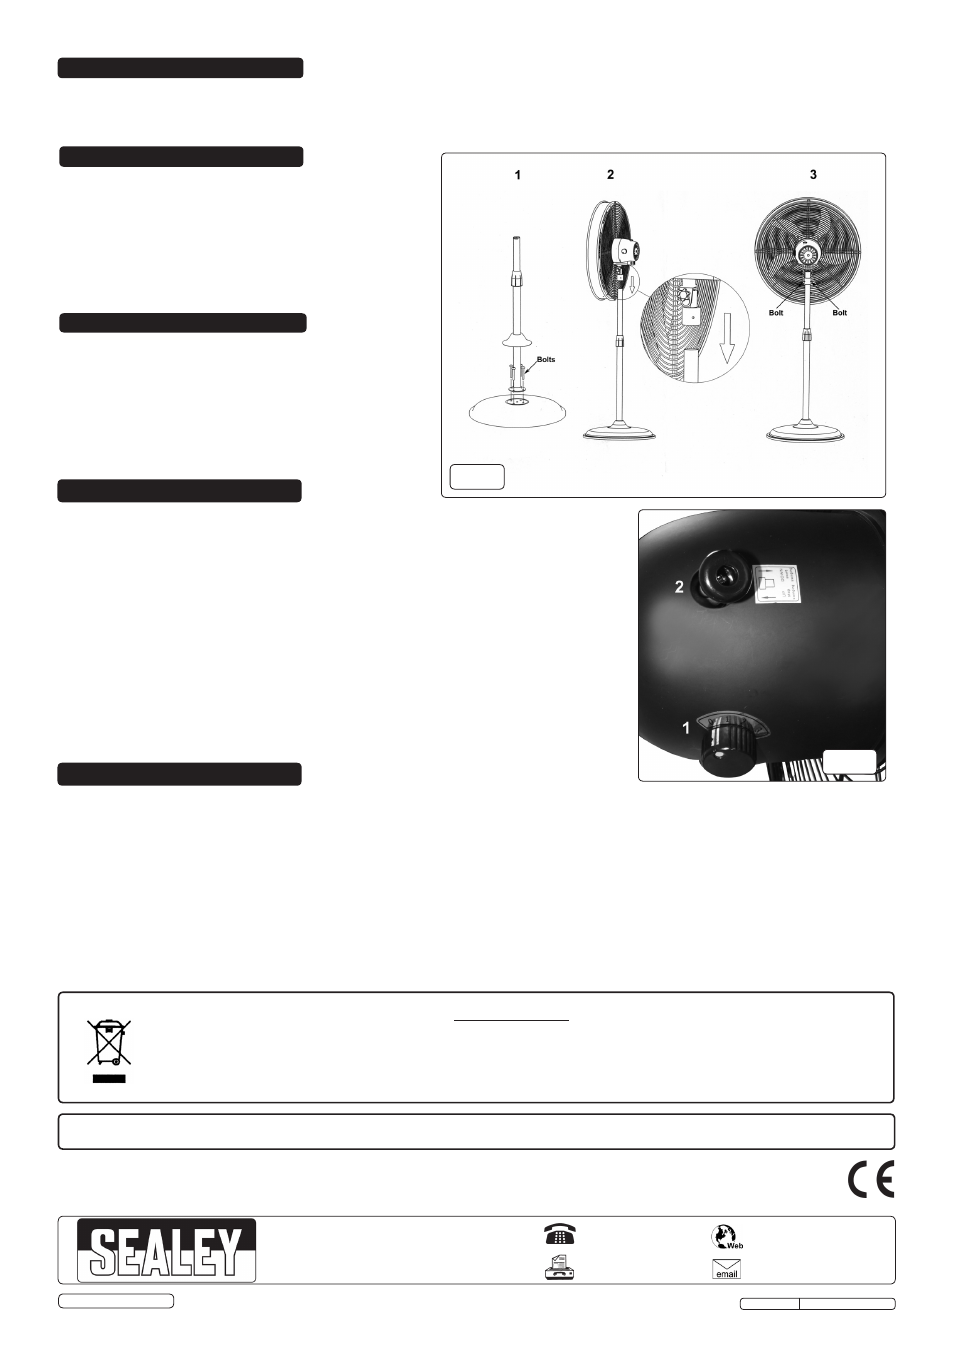
The fan features 3 speeds - selectable using the switch located at the back of the fan
(fig.2.1.) The fan speed increases as the switch is turned in a clockwise direction.
5.4.
To start the fan oscillating, press the control button (fig.2.2.) down, and lift to stop the
oscillation.
5.5
When not in use, disconnect from power supply and store in a safe, dry, childproof
location.
IMPORTANT: Turn the control switch to OFF and disconnect the fan from the power supply before cleaning.
6.1.
Use only a soft, damp cloth to clean the fan.
6.2.
DO NOT submerse the fan in water and NEVER allow water to drip into the motor housing.
6.3.
DO NOT use solvents or other chemicals to clean the fan.
6.4.
To clean the fan blades, loosen the 7 clips around the guards and then lift off the front guard from the top hook.
6.5.
Wipe the blades and guards.
6.6.
Reassemble by hooking the front guard into place at the top of the rear guard and then push the 7 clips back into place so that they
engage both the front and rear guards.
Model No: . . . . . . . . . . . . . . . . . . . . . . . . . . . . . . . . . . HVF20PO
Fan Diameter:. . . . . . . . . . . . . . . . . . . . . . . . . . . . . . .550mm(20")
Speeds: . . . . . . . . . . . . . . . . . . . . . . . . . . . . . . . . . . . . . . . . . . . 3
Speed Range: . . . . . . . . . . . . . . . . . . . . . . . .1050/1150/1350rpm
Maximum Airflow: . . . . . . . . . . . . . . . . . . . . 110m³/min(3900CFM)
Height: . . . . . . . . . . . . . . . . . . . . . . . . . . . . . . . . . . 1080-1410mm
Power: . . . . . . . . . . . . . . . . . . . . . . . . . . . . . . . . . . . . . . . . . 115W
Supply: . . . . . . . . . . . . . . . . . . . . . . . . . . . . . . . . . . . . . . . . . 230V
Current:. . . . . . . . . . . . . . . . . . . . . . . . . . . . . . . . . . . . . . . . . . 0.5A
WEEE Regulations
Dispose of this product at the end of its working life in compliance with the EU Directive on
Waste Electrical and Electronic Equipment (WEEE). When the product is no longer required, it must be disposed
of in an environmentally protective way. Contact your local solid waste authority for recycling information.
Parts support is available for this product. To obtain a parts listing and/or diagram, please log on to www.sealey.co.uk,
email [email protected] or telephone 01284 757500.
HVF20PO Issue: 1 - 11/12/14
NOTE: It is our policy to improve products continually and as such we reserve the right to alter data, specifications and component parts without prior
notice.
IMPORTANT: No liability is accepted for incorrect use of this product.
WARRANTY: Guarantee is 12 months from purchase date, proof of which will be required for any claim.
01284 757500
01284 703534
Sole UK Distributor, Sealey Group,
Kempson Way, Suffolk Business Park
,
Bury St. Edmunds, Suffolk,
IP32 7AR
www.sealey.co.uk
Original Language Version
© Jack Sealey Limited
5. OPERATION
4. ASSEMBLY
High velocity fan suitable for movement of huge volumes of air. Features three-speed settings for choice of airflow, height adjustable stand, tilting
blade cradle and oscillation. Fully guarded blades with large diameter base for safety and added stability. Suitable for industrial, commercial,
agricultural, workshop and showroom applications.
fig.1
4.1.
Bolt the bottom tube to the base as in fig.1.1.
4.2.
Place the fan head assembly on the upper tube (fig.1.2)
4.3.
Secure the fan head assembly by means of the two bolts
as shown in fig.1.3.
4.4.
The height is adjustable by loosening the collar on the
tube, sliding to the required height and retightening.
4.5.
The angle of the head is adjusted by loosening the head
clamp and moving the head and retightening the clamp.
fig.2