Fig.1, Fig.2, Introduction & specification – Sealey SA1565 User Manual
Page 2: Preparation, Operation
2. INTRODUCTION & SPECIFICATION
Static compressor with Honda GX200 6.5hp power unit coupled to
heavy-duty, two stage twin piston, cast iron pump. Pump has heavy-
duty full cast cylinders capped by alloy heads for improved heat
dissipation and long life. Heavy-duty drive guard protects belt and
flywheel that is designed to force air over the pump to aid cooling.
Features single gauge and air outlet. Runs on unleaded fuel.
3. PREPARATION
3.1.
Remove compressor from packaging and inspect for any
missing or damaged parts. If anything is found to be missing
or damaged contact your supplier.
3.2.
Save the packing material for future transportation of the
compressor. It is recommended to store the packing in a safe
location, at least for the period of the guarantee. Then, if
necessary, it will be easier to send the compressor to the
service centre.
3.3.
Take care to transport the compressor correctly, do not
overturn it or lift it with hooks or ropes.
3.4.
Position the compressor on a flat surface or with a maximum
permissible inclination of 10°. Site in a well ventilated area.
If the surface is inclined and smooth, check if the compressor
moves whilst in operation.
If the surface is in a raised position, make sure the
compressor cannot fall, securing it in a suitable way.
3.5.
To ensure good ventilation and efficient cooling, the
compressor’s belt guard must be at least 100cm from any
wall.
3.6.
Before using the compressor, check the oil level by looking
at the dipstick as shown in fig.5c. If the oil is not between the
min and max. mark, it should be topped up with synthetic oil
(see section 5.4. for recommended oils). We do not
recommend using mineral oil in these compressors. do not
overfill.
3.7.
The compressor should be located in a position that allows
good air circulation around the unit and where there is good
ventilation.
Remember that the compressor's engine
produces harmful exhaust fumes.
2.1.
SPECIFICATION
4. OPERATION
WARNING! Ensure that you read, understand and apply
Section 1 Safety Instructions.
4.1.
STARTING
IMPORTANT! Always check and, if necessary, top-up the
engine oil and the pump oil before starting. Severe engine
and/or pump damage may otherwise result.
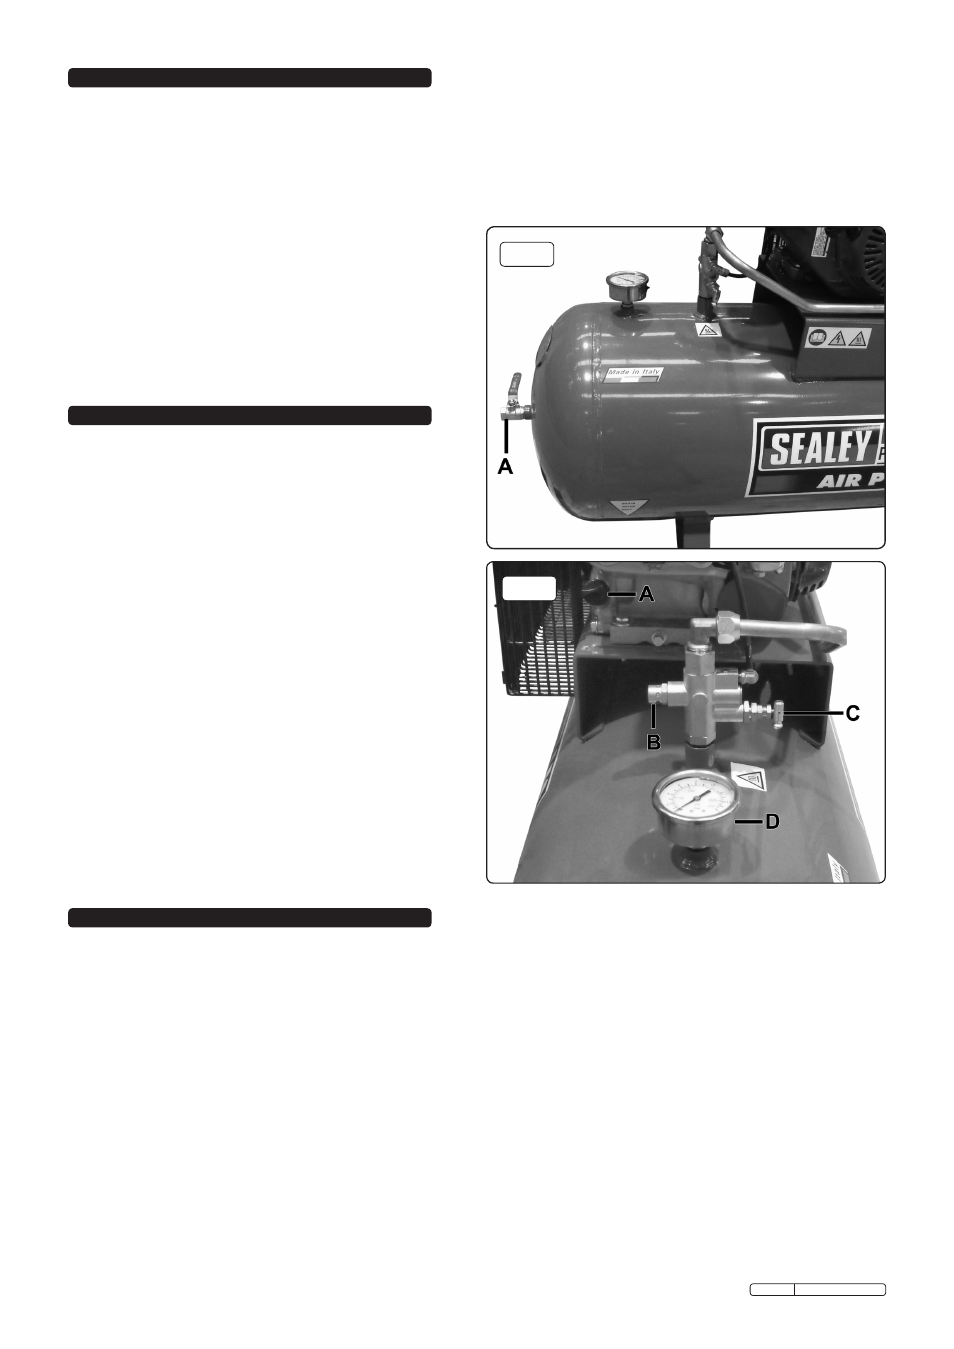
4.1.1. check that the air outlet valve on the tank end-plate
(fig.1.A)
is closed.
4.1.2. Start the compressor engine, following the procedure
detailed in the manufacturer’s handbook supplied.
Ensure the oil is topped up. Oil filler/dipstick - fig.2A.
4.1.3. When the engine is running smoothly, the compressor will
operate automatically, building up the pressure in the tank,
which is shown on the pressure gauge (fig.2d), to the
maximum setting (factory set). W
hen the maximum tank
pressure is reached, the relief valve (fig.2B)
will
automatically vent the pump output. When the tank
pressure falls below the minimum threshold
(approx.2bar/29psi less than the maximum pressure), the
relief valve will automatically close, and the tank pressure will
increase back to it's maximum.
fig.1
Model No: . . . . . . . . . . . . . . . . . . . . . . . . . .SA1565
Engine Output: . . . . . . . . . . . . . . . . . . . . . . . .6.5hp
Speed. . . . . . . . . . . . . . . . . . . . . . . . . . . . 1500RPM
Noise Level: . . . . . . . . . . . . . . . . . . . . . . . . 97dB.A
Noise LwA Level: . . . . . . . . . . . . . . . . . . . . .
99lwA
Air Displacement:. . . . . . . . . . . . . . . . . . . .20.9cfm
Maximum Free Air Delivery: . . . . . . . . . . .15.2cfm
Width x Depth x Height:. . . 1360 x 540 x 1110mm
Tank Capacity: . . . . . . . . . . . . . . . . . . . . . . . .150ltr
Maximum Pressure: . . . . . . . . . . . . . .145psi/10bar
Weight: . . . . . . . . . . . . . . . . . . . . . . . . . . . . . 103kg
4.2.
STOPPING.
4.2.1. To stop the compressor turn the engine ignition switch (fig.3)
to Off (O). See the engine manufacturer’s handbook for the
complete engine shutdown procedure.
4.3.
CONNECTING AIR POWERED EQUIPMENT.
4.3.1. After fitting the desired coupling to the outlet valve (fig.1)
connect an air hose and hook up to air system. An outlet
regulator is necessary to use air equipment direct from the
compressor.
Note: To determine the correct working pressure and air flow
requirements for any piece of equipment check the
corresponding manual. Be aware that the air flow figure
stated on tools and accessories refers to ‘Free Air delivery’
and not the piston displacement of the compressor. When
adjusting the regulator, always adjust
up to the required
pressure.
4.4.
WHEN WORK IS COMPLETE.
At the end of each working day, drain any moisture from the
main tank. Place a container under the drain plug and then
carefully unscrew it (fig.4).
DO NOT allow moisture to
accumulate in the tank as this will corrode the inside of the
tank and affect the pressure rating of the tank.
WARNING! Wear safety goggles and gloves when performing
this task.
fig.2
Note: a) If the relief valve does not cut in and out, but is
continuously closed whilst using an air appliance, the
capacity of the compressor may be too small for the
equipment or tool.
b) The gauge (fig.2d) indicates the pressure inside the tank,
nOT the pressure supplied to the air equipment. If the
pressure in the tank exceeds the relief valve maximum, a
safety valve (fig.5E) will open.
WARNING! For this reason
DO NOT tamper with, or adjust, the relief valve or the
safety valve.
Original Language Version
SA1565 Issue: 2 - 20/02/12