Fig.4, Fig.4.1, Fig.5 – Sealey DH02 User Manual
Page 2: Locate chain in fastening lever, Chain pulled tight and secured by ratchet pawl, Maintenance, Operation
5. maintenanCe
5.1
regularly check the drum handler chassis and wheels for
rigidity. Ensure that the rear castor is firmly secured to the
chassis.
5.2
regularly check the pawl and ratchet for wear. replace when
necessary.
5.3
regularly check the drum handlers connecting components
such as retaining pins, nuts and washers for lubrication and/
or wear.
5.4
Keep handle free from grease and oil to prevent accidents.
4.1 Clamping drum.
4.1.1 the opening section of the hoop (fig.3.15) is sprung loaded to
remain open when not clamped to a drum.
4.1.2 Position the Drum Handler so that the supporting hoop
(fig.3.3) encompasses the drum to be lifted.
4.1.3 Pull the location levers (fig.3.10) to release the handle (fig.3.4)
and position the supporting hoop in the middle of the drum.
4.1.4 release the location levers to lock the handle in this position.
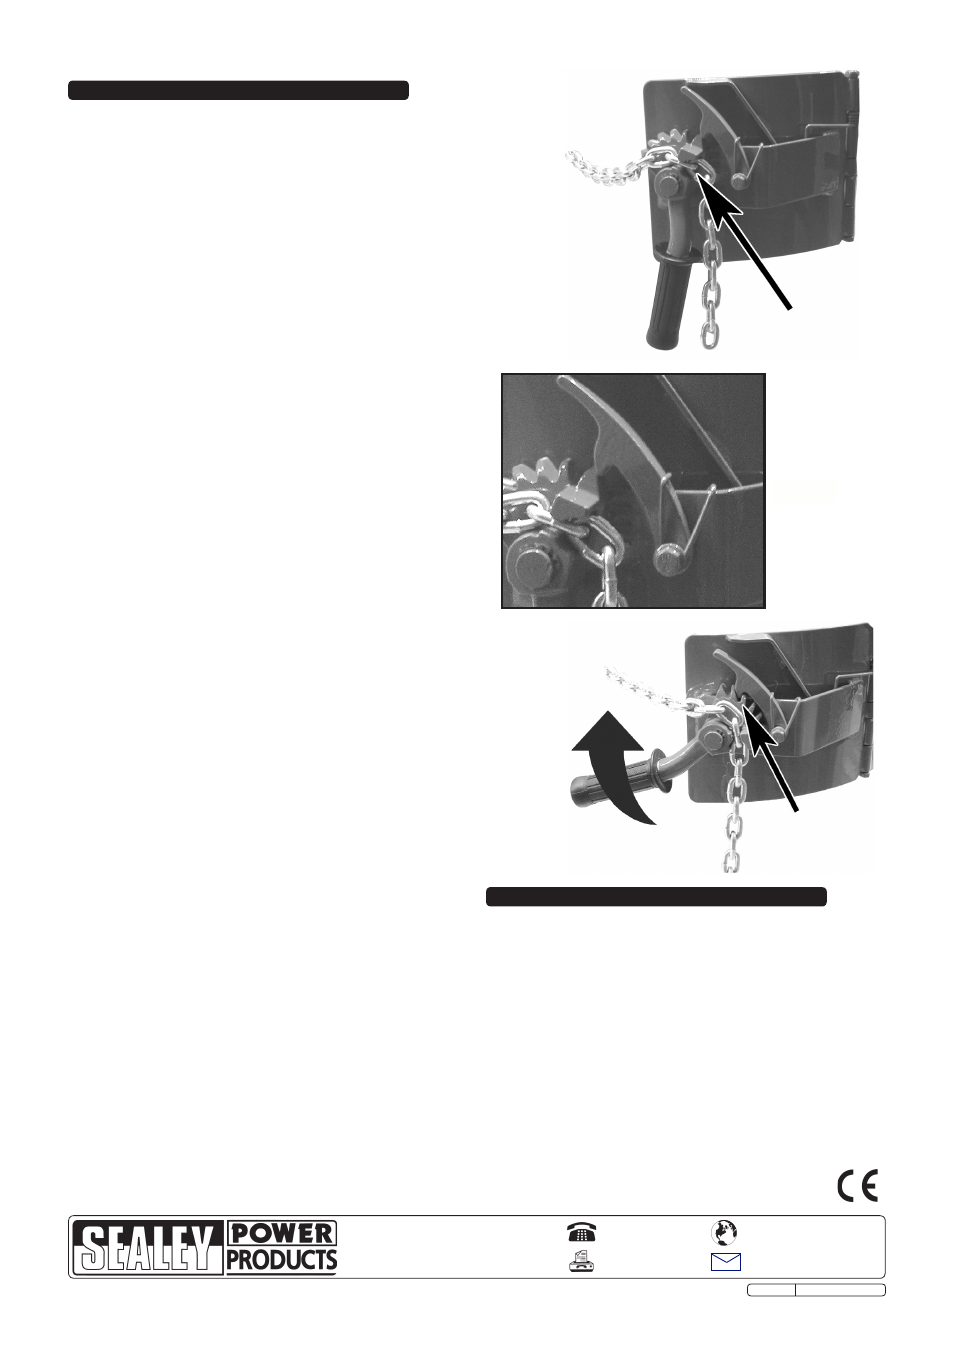
4.1.5 turn the fastening lever (fig.3.6) so the teeth are pointing
upwards, take the slack up on the chain and place it in the
groove (fig.4) on the fastening lever ensuring that it is fully
located as in fig.4.1.
4.1.6 Pull the fastening lever sharply clockwise until the chain is tight
and the ratchet pawl has locked the ratchet as in fig.5.
4.1.7 check that the drum is now securely held in place. If the chain
is not tight repeat procedure 4.1.5 to 4.1.6 but take more slack
out of the chain. the drum is now ready to be lifted.
4.2 lifting drum.
4.2.1 Pull the handle (fig.3.4) downwards, this will lift the drum.
4.2.2 When the drum is at the required height, slowly release the
handle and the location levers will automatically lock the
handle in place.
4.3 transportation.
4.3.1 Push or pull the drum handler using the handle to the required
destination. Apply pressure left or right to steer the handler.
CAUTION! Ensure that there are no obstructions in your path,
make sure the floor surface is suitable to take the weight of the
fully laden drum handler.
4.4 lower & release drum.
4.4.1 to lower the drum, apply downward pressure to the handle (fig.3.4).
4.4.2 Pull the two location levers (fig.3.10) at the same time.
4.4.3 this will release the handle and drum which may now be
lowered to the ground, when the drum reaches a firm surface,
release the location levers.
4.4.4 turn the fastening lever clockwise slightly to disengage the
ratchet pawl.
4.4.5 release the fastening lever and remove the chain and hang it
on the hook (fig.3.17).
4.4.6 Pull the drum handler away from the drum.
4.5 rotate the drum.
4.5.1 the drum handler can rotate the drum from vertical to
horizontal position.
4.5.2 to turn the drum from vertical to horizontal disengage pins
(fig.2) and turn through 90° to lock them in the disengaged
position and then turn the drum through 90° to the horizontal
position.
4.5.3 rotate the pins again until they engage with the supporting
hoop to secure the drum in the horizontal position. note!
Before rotating drum make sure drum has been lifted
sufficiently high enough allowing it to turn without interference
from the ground.
4.6 adjustment.
4.6.1 If the supporting hoop is too high to hold the middle of the
drum while the handle is at its highest point or the drum cannot
be lifted to the required height when the handle has reached
its lowest point it will be necessary to adjust the height of the
supporting hoop.
4.6.2 choose another hole (fig.3.13&16) on the lifting arm (fig.3.11)
and or the hanger plates (fig.3.12) remove the hanger plate
bolts from the original position an relocate them in the new
position ensuring that the same hole is chosen for each side.
4. oPeration
Fig.4
Locate chain
in fastening lever.
Fig.4.1
chain pulled tight
and secured by
ratchet pawl
Fig.5
NOTE: It is our policy to continually improve products and as such we reserve the right to alter data, specifications and component parts without prior notice.
imPortant: no liability is accepted for incorrect use of this product.
WarrantY: Guarantee is 12 months from purchase date, proof of which will be required for any claim.
inFormation: for a copy of our latest catalogue and promotions call us on 01284 757525 and leave your full name and address, including postcode.
01284 757500
01284 703534
Sole uK distributor, Sealey Group,
Kempson Way, suffolk Business Park
,
Bury st. Edmunds, suffolk,
IP32 7Ar
www.sealey.co.uk
Web
Original Language Version
DH02.V2 Issue: 2 - 15/03/10