Fig.1 fig.2, Assembly 5. parts, All models – Sealey AP1010 User Manual
Page 2
4.
ASSEMBLY
5.
PARTS
WARNING: The workbenches are heavy. One person should not attempt to move the unassembled bench in the box, on their own.
Ensure that there is adequate manpower or lifting equipment to place the box in the area in which it is intended to carry out the assembly.
Ensure that the box is the right way up by referring to the symbols printed on the side of the box. Remove all parts and fixings from the box.
Ensure that you have adequate help to remove the bench top from the box as it is too heavy for one person to lift safely.
Unpack workbench and check to make sure that it has not been damaged during transit and check the contents against the contents list.
Should there be any damaged or missing parts contact your supplier immediately.
ASSEMBLY
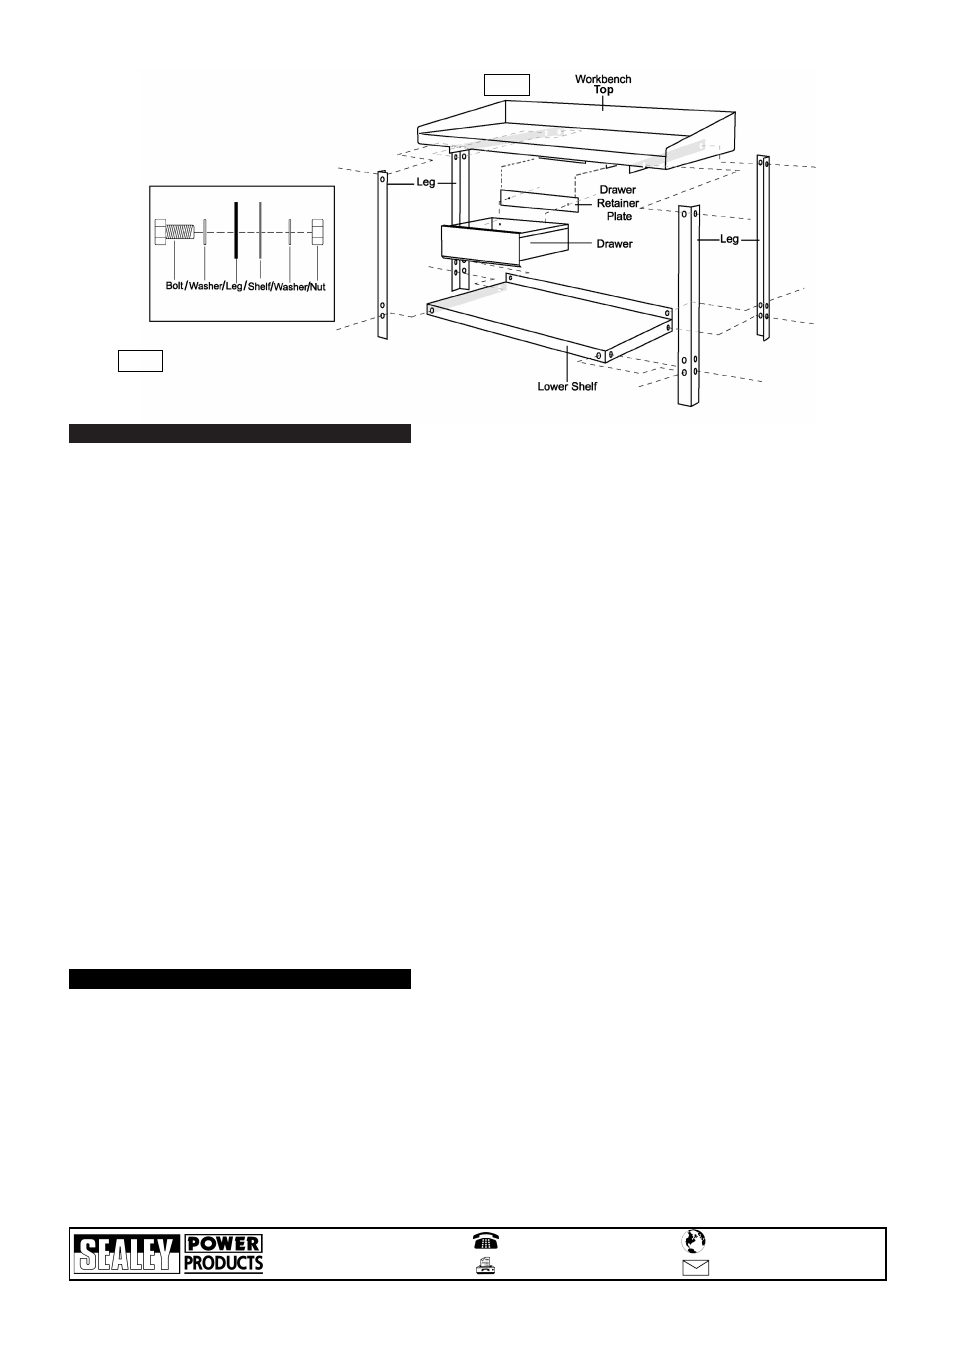
Note: All four legs of the workbench are identical.
Rear Legs
4.1. Rest the workbench top on its rear edge.
4.2. Align the two holes at the top of one of the legs with the two holes located at the rear of the mounting bracket.
4.3. Insert a bolt with a washer through each of the holes of the leg and then through the mounting bracket holes.
4.4. Place a washer and nut onto each of the bolts and hand tighten (fig.2).
4.5. Repeat steps 4.2. to 4.4. for the other rear leg.
Note: Do not fully tighten the nuts at this time.
Front Legs
4.6. Align the two holes at the top of one of the legs with the two holes located at the front of the mounting bracket.
4.7. Insert a bolt with a washer through each of the holes of the leg and then through the mounting bracket holes.
4.8. Place a washer and nut onto each of the bolts and hand tighten (fig.2).
4.9. Repeat steps 4.6. to 4.8. for the other remaining front leg.
Note: Do not fully tighten the nuts at this time.
Lower Shelf
4.10. Align the holes in the lower shelf with the holes in the legs.
4.11. Insert a bolt with a washer through each of the holes in the legs and through the corresponding holes in the lower shelf.
4.12. Place a washer and nut onto each of the bolts and hand tighten (fig.2).
Note: Do not fully tighten the nuts at this time.
4.13. Set the workbench upright onto its feet. Make sure it is completely stable and resting on all four legs on level ground, then fully tighten all nuts and
bolts.
WARNING: Do not place any weight on the workbench until all the nuts and bolts have been fully tightened.
Drawer
4.14. Install the drawer by sliding it into place on the drawer runners (AP1015 and AP1020 have 2 choices of position).
4.15. Once drawer is in place on the drawer runners, align the holes of the retaining plate with the holes on the rear wall of the drawer.
4.16. Using the two self tapping screws, fasten the drawer retaining plate to the rear of the drawer.
01284 757500
01284 703534
Sole UK Distributor
Sealey Group,
Bury St. Edmunds, Suffolk.
www.sealey.co.uk
Web
AP1010.V3, AP1015.V3, AP1020.V3 - 1 - 280906
fig.1
fig.2
ALL MODELS
ITEM
PART NO.
DESCRIPTION
1
AP1010.V3-01
LOCK AND KEY ASSEMBLY
2
AP1010.V3-02
BOLT, NUT AND WASHER
3
AP1010.V3-03
SELF TAPPING SCREW
4
AP1010.V3-04
LEG
5
AP1010.V3-05
DRAWER WITH RAILS, HANDLE AND RETAINING PLATE
6
AP1010.V3-06
FIXING KIT, COMPLETE (ALL NUTS, BOLTS, WASHERS AND SCREWS)
NOTE:
It is our policy to continually improve products and as such we reserve the right to alter data, specifications and component parts without prior notice.
IMPORTANT: No liability is accepted for incorrect use of this product.
WARRANTY: Guarantee is 12 months from purchase date, proof of which will be required for any claim.
INFORMATION: For a copy of our catalogue and latest promotions call us on 01284 757525 and leave your full name, address and postcode.