Fig.1 fig.2, Fig.3 fig.4, Operating instructions – Sealey PP35PLUS User Manual
Page 4
4.3.
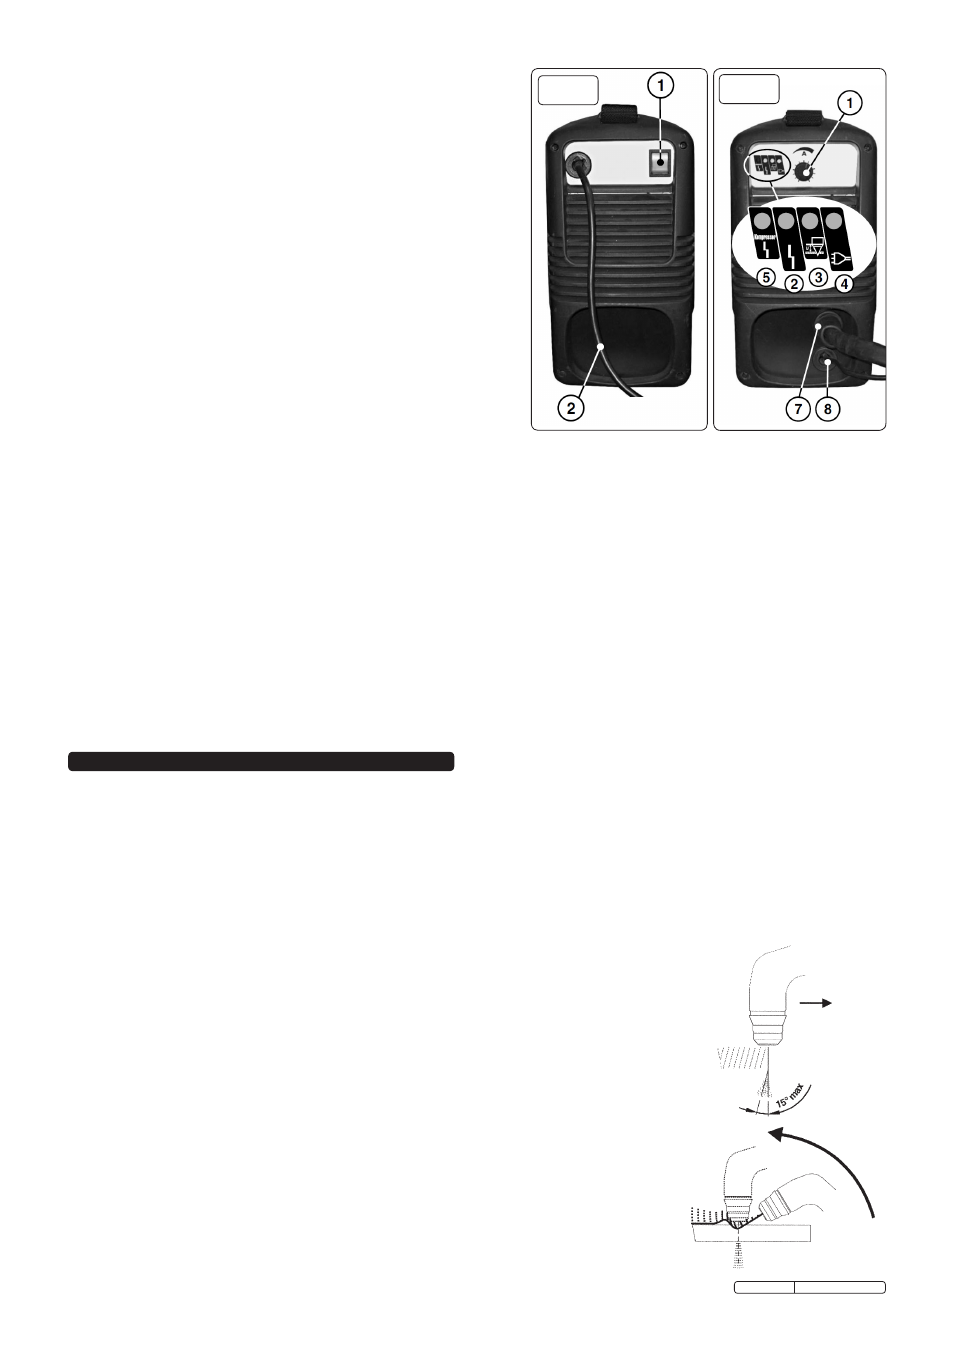
ON/OFF switch
The on/off switch is located at the rear of the machine (fig.1.1).
When the switch is in the “O” position the machine is turned off.
When switched to the “I” position the machine is turned on and the
switch will illuminate.
A green LED will also show on the front panel (fig.2.4) indicating
that mains power is present and the machine is in the ‘ready’
condition. The control and duty circuits are now live but the torch
will remain in ‘stand-by’ mode until the torch button is pressed.
4.4.
Cutting regulator
The cutting current is regulated by the knob/potentiometer on the
front panel (fig.2.1).
4.5.
Torch control
When the machine is turned on, the green indicator light (fig.2.4) will
show that the torch is in “Stand-By” mode.
4.5.1.
When the torch button is pressed the machine is activated and a
yellow LED will illuminate (fig.2.3) indicating the presence of the
pilot arc. As a safety feature, should the following situations arise
the torch will automatically de-activate:
a) During Post-Air (>30sec) phase.
b) If the pilot arc is not moved to the workpiece within 2 seconds.
c) If the cutting arc is interrupted because the torch is held too far
from the workpiece, or if the electrode is worn out, or if the torch
has been forced away from the workpiece.
d) If the warning LED illuminates indicating either mains voltage
fluctuation or overheating.
4.6.
Thermal switch and mains voltage fault
If the yellow LED (fig.2.2) on the front panel illuminates this indicates a mains voltage or thermal problem and the machine will be
automatically shut down as a result of one of the following:
a) The power transformer has overheated.
b) There has been a decrease or increase in the mains voltage supplied to the machine.
When the safety switch is activated in this way the problem is normally self-rectifying, and within a few seconds the switch will
re-set and the LED will go out. The machine is then ready for use again.
4.7.
Compressor thermal fault
When the red LED (fig.2.5) on the front panel illuminates it indicates that the compressor drive motor has overheated. Reset is
automatic after the motor has cooled.
4.8.
Torch
Although the machine and torch may be fully powered, the torch button is the only way to activate the cutting process.
4.8.1.
To turn the cutting process on, the torch button must be fully depressed.
4.8.2.
Release the button and the cutting cycle will stop immediately. The cooling air (post-air) will continue to flow for a further 30 seconds.
Note:
To minimise the possibility of accidental starting, the button must be pressed for at least 2/10ths of a second before the cutting
operation will start.
fig.1
fig.2
WARNING! Before operating the machine ensure that you read, understand and apply Section 2 safety instructions and that you
have familiarised yourself with the controls. Ensure that the machine is disconnected from the power supply before moving or
changing accessories.
5.1.
Set-up
5.1.1.
Check that the earth cable is correctly clamped to the workpiece or work bench (see 5.2).
5.1.2.
Switch on the mains power supply. Switch on the machine by operating the switch on the rear panel (fig.1.1).
5.1.3.
Set the current regulation control (fig.2.1) to the required value.
5.1.4.
Press the torch button and release to commence the flow of cooling air (post-air).
5.1.5.
Allow the air flow to continue to remove any condensation from the torch. The air flow will automatically stop after approx. 30secs.
NOTE: Longer than standard nozzles and electrodes are available (see section 1.2 'Specifications') to improve accessibility in awkward
cutting positions.
5.2.
Cutting from the edge
The torch provided with this unit should make contact with the material to be cut (touch-cut).
5.2.1.
Bring the torch nozzle toward the edge of the workpiece and hold it at 3mm above the cutting line.
5.2.2.
Press and hold down the torch button. After about 0.2secs of pre-air, the pilot arc will be generated.
If the distance between the torch nozzle and the workpiece is correct, the arc will immediately
jump to the workpiece and the cutting process will begin.
5.2.3.
Move the torch slowly and smoothly forward, on the surface of the workpiece, along the cutting line.
5.2.4.
Adjust the cutting speed according to the thickness of the material and the selected current.
5.2.5.
Check the underside of the cut. The arc should make a 5 - 10° angle with the vertical in the opposite
direction to the cutting direction (fig.3).
5.3.
Cutting from the centre
5.3.1.
Place torch nozzle at an angle to the surface at the start-of-cut position (fig.4).
5.3.2.
Initiate the pilot arc, then slowly and smoothly bring the torch head to the upright position.
The arc will pierce the workpiece and cutting can start.
5.4.
Arc off
5.4.1.
Release the torch button to switch off the arc. The post-air will continue to flow, cooling the nozzle.
5.4.2.
Other reasons for the arc ceasing are:
a) The distance between the torch nozzle and workpiece is too great.
b) You have completed a cut and have continued beyond the edge of a workpiece.
c) The waste falls away from the workpiece thus increasing the gap.
5. OPERATING INSTRUCTIONS
fig.3
fig.4
Original Language Version
PP35PLUS Issue: 2 - 15/05/12