Medal Sports WM.com1442124 User Manual
Page 7
3
X 2
X 12
X 4
A4
X 24
5
X 12
A3
X 4
A2
X 2
13
A9
www.themdsports.com
1442124
6
(Continúe en la siguiente página.)
(Continued on the next page.)
Español
English
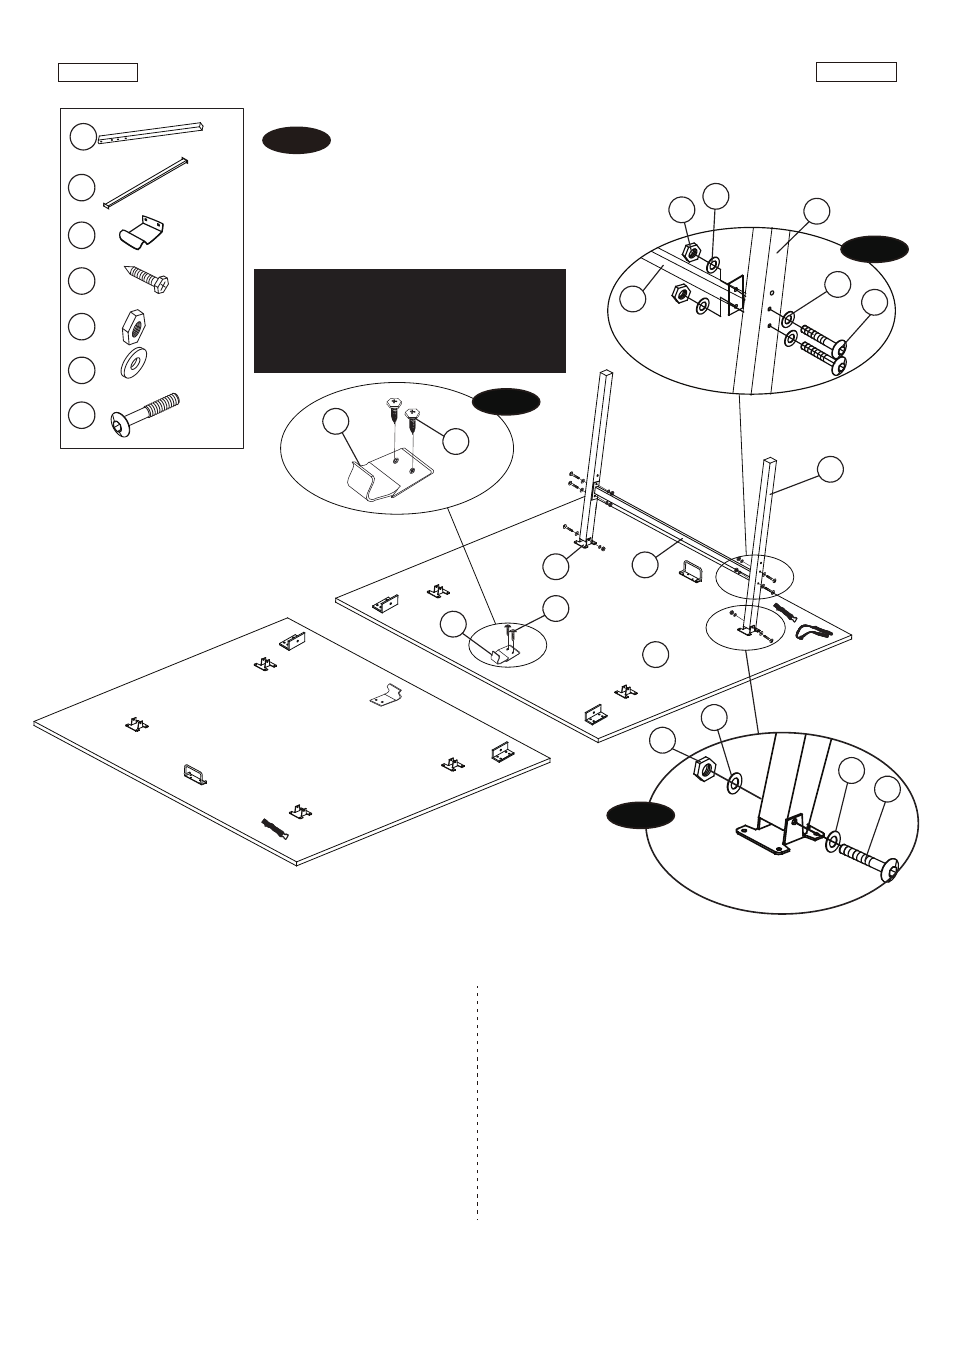
FIG.2
8. Attach Legs - A (#3) to Table Surface (#1 and #2) using
one Bolt (#A9), two Washers (#A4) and one
Nut (#A3) per Leg
. See FIG. 2A.
9. Attach a Linkage Tube - A (#5) to the legs - 3 (#3) using
four Bolts (#A9), eight Washers (#A4) and four Nuts
(#A3) per Linkage Tube - A.
See FIG. 2B.
10. Attach one Safety Clip (#13) to the Table Surface using
two Screws (#A2) per Safety Clip.
See FIG. 2C.
Player
/ Jugador
Player
/ Jugador
Center
/ Centro
3
1
5
20
A4
A4
A3
A9
A9
A3
A4
A4
5
3
FIG.2
8. Adjunte la Pierna Curvada - A (#3) a la Superficie de
Mesa (#1 y #2) usando 1 Cerrojo (#A9), 2 Arandelas
(#A4) y 1 Tuerca (#A3) por Pierna.
Vea la FIG. 2A.
9. Adjunte el Tubo de Conexión - A (#5) a la Pierna
Curvada - 3 (#3) usando 4 Cerrojos (#A9), 8 Arandelas
(#A4) y 4 Tuercas (#A3) por Tubo de Conexión - A.
Vea la FIG. 2B.
10.
Adjunte el
Clip de Seguridad (#13)
a la
Superficie de
Mesa
usando 2 Tornillos (A2) por Clip de Seguridad.
Vea la FIG. 2C.
FIG. 2
FIG. 2A
FIG. 2B
13
A2
13
A2
FIG. 2C
IMPORTANT:
Make sure all Safety Clips
must be installed correctly.
/ IMPORTANTE:
Haga seguro que todos los
Clips de Seguridad está instalados
correctamente.