MEDC FB4 User Manual
Page 3
ensuring the o-ring remains correctly seated in its groove during re-assembly. Fully tighten the 3 off M8
cover screws (6.0mm A/F hexagon key). Ensure the required gap (0.15mm max.) is maintained between
the cover and enclosure
3.0 OPERATION
The operating voltage of the unit is stated on the unit label.
The Beacon can be powered directly only
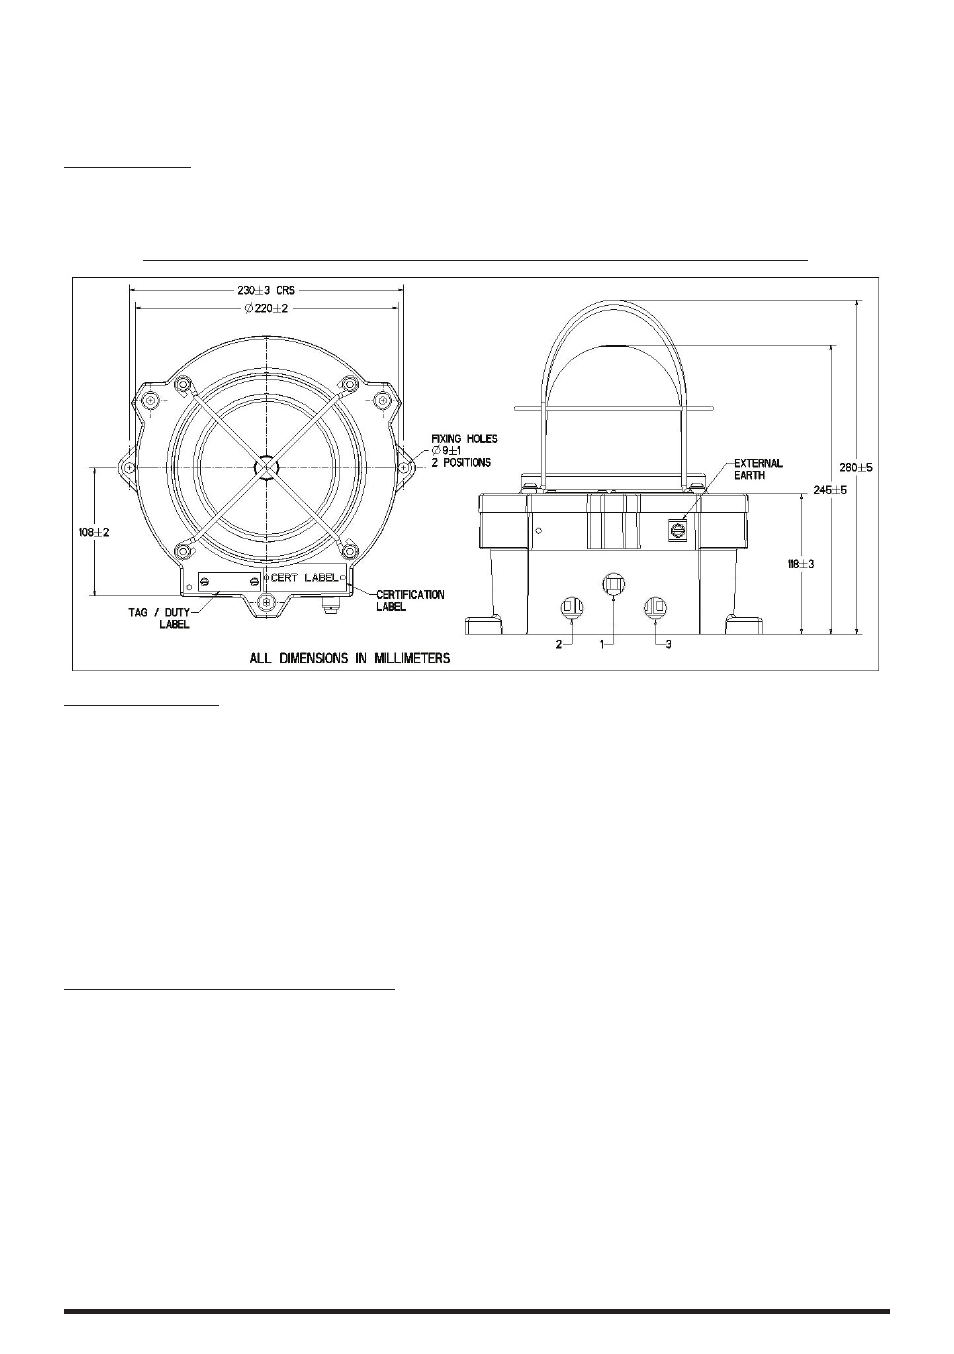
GENERAL ARRANGEMENT/SCHÉMA GENERAL/AUFBAU /GENERALIDADES
E-Mail: [email protected]
Title:
PROCEDURE/
Fax: +44 (0)1773 580282
DOCUMENT NO.
Tel: +44 (0)1773 812249
FL4 TECHNICAL MANUAL
DD036-0
3
-03
Colliery Road
,
Pinxton, Notts., NG16 6JF U.K.
REV`D
H:\D&D2\F
ishwickP\P
ROJECTS\I
ECEx\XB4\
FL4
combined
manual Exd
only.doc
MED
3.0 OPERATION
The operating voltage of the unit is stated on the unit label.
The Beacon can be powered directly only
GENERAL ARRANGEMENT
4.0 MAINTENANCE
During the working life of the unit, it should require little or no maintenance.
However, if abnormal or unusual environmental conditions occur due to plant damage or accident etc., then
visual inspection is recommended.
If the unit requires cleaning, then only clean exterior with a damp cloth to avoid electro-static charge build up.
Replacement of the filament bulb (FB4) or fluorescent tubes (FL4) can be carried out by competent site
personnel (see below). Other repairs should be undertaken by returning the unit to MEDC or by an authorised
repairer of Ex equipment.
If a unit fault should occur, then the unit can be repaired by MEDC. All parts of the unit are replaceable.
If you acquired a significant quantity of units, then it is recommended that spares are also made available.
Please discuss your requirements with the Technical Sales Engineers at MEDC.
4.0 MAINTENANCE
During the working life of the unit, it should require little or no maintenance.
However, if abnormal or unusual environmental conditions occur due to plant damage or accident etc., then
visual inspection is recommended.
If the unit requires cleaning, then only clean exterior with a damp cloth to avoid electro-static charge build
up.
Replacement of the filament bulb (FB4) or fluorescent tubes (FL4) can be carried out by competent site per-
sonnel (see below). Other repairs should be undertaken by returning the unit to MEDC or by an authorised
repairer of Ex equipment.
If a unit fault should occur, then the unit can be repaired by MEDC. All parts of the unit are replaceable.
If you acquired a significant quantity of units, then it is recommended that spares are also made available.
Please discuss your requirements with the Technical Sales Engineers at MEDC.
FB4 - Removing / Replacing Filament Bulb
CAUTION: Before removing the cover assembly, ensure that the power to the unit is isolated.
WARNING: The replacement filament bulb must be the same wattage and voltage as the original and
must match the ratings stated on the certification label in order to maintain the marked T-ratings.
Unscrew the 3 off M8 screws (6.0mm A/F hexagon key) holding the cover assembly to the base. The cover
screws are captive and will be retained in the cover assembly.
Twist the cover assembly gently clockwise and anti-clockwise, whilst pulling it away from the base.
Remove to gain access to the interior. The cover will remain attached to the base by means of a retention
chain. Carefully unscrew the filament bulb anti-clockwise until it is free to be removed from the holder.
© Cooper MEDC 2010
12/10