Multi-Contact MA270 User Manual
Page 4
Advanced Contact Technology
4 / 4
www.multi-contact.com
5
6
7
8
9
7
MC4
MC4-EVO 2
(ill. 5)
Desbloqueo de la hembra
Solmac
Inserte los conectores de desblo-
queo del
PV-MS-PLS/2 en los
orificios previstos para ello del
macho
MC4-EVO 3 en las orejas de
encastre de la hembra, extraiga la
herramienta después del desbloqueo
y luego separe la unión enchufable.
Desbloqueo del macho Solmac
Inserte los conectores de desblo-
queo de
PV-MS-PLS/1 en los orifi-
cios previstos para ello del macho
Solmac en las orejas de encastre de
la hembra
MC4-EVO 3 y extraiga la
hembra de la carcasa del conector
Solmac.
(ill. 5)
Unlocking the Solmac socket
Insert the unlocking pins of
PV-MS-PLS/2 into the openings provi-
ded in the
MC4-EVO 3 plug and onto
the latch clips of the socket, remove the
tool after unlocking and then disconnect
the plug connector.
Unlocking the Solmac plug
Push the unlocking pins of
PV-MS-PLS/1 into the openings of the
Solmac plug and onto the latch clips
of the
MC4-EVO 3 socket and pull the
socket out of the Solmac plug housing.
(ill. 6)
Desbloqueo del macho TwinBox
Inserte los conectores de desblo-
queo del
PV-MS-PLS/1 en las orejas
de encastre de la hembra y extraiga
la hembra
MC4 y luego extraiga
esta de la carcasa del conector del
TwinBox.
Nota:
Para desbloqueos no mostrados en
las ilustraciones de otras combinacio-
nes de productos, véase la matriz de
aplicaciones.
(ill. 6)
Unlocking the Twin Box plug
Push the unlocking pins of
PV-MS-PLS/1 onto the latch clips of
the
MC4 socket and pull the socket out
of the plug housing of the TwinBox.
Note:
For unlocking operations on other
product combinations not shown in
the illustrations, please see the utilisa-
tion matrix.
Atornillado de uniones
enchufables
Screw assembly of plug connec-
tions
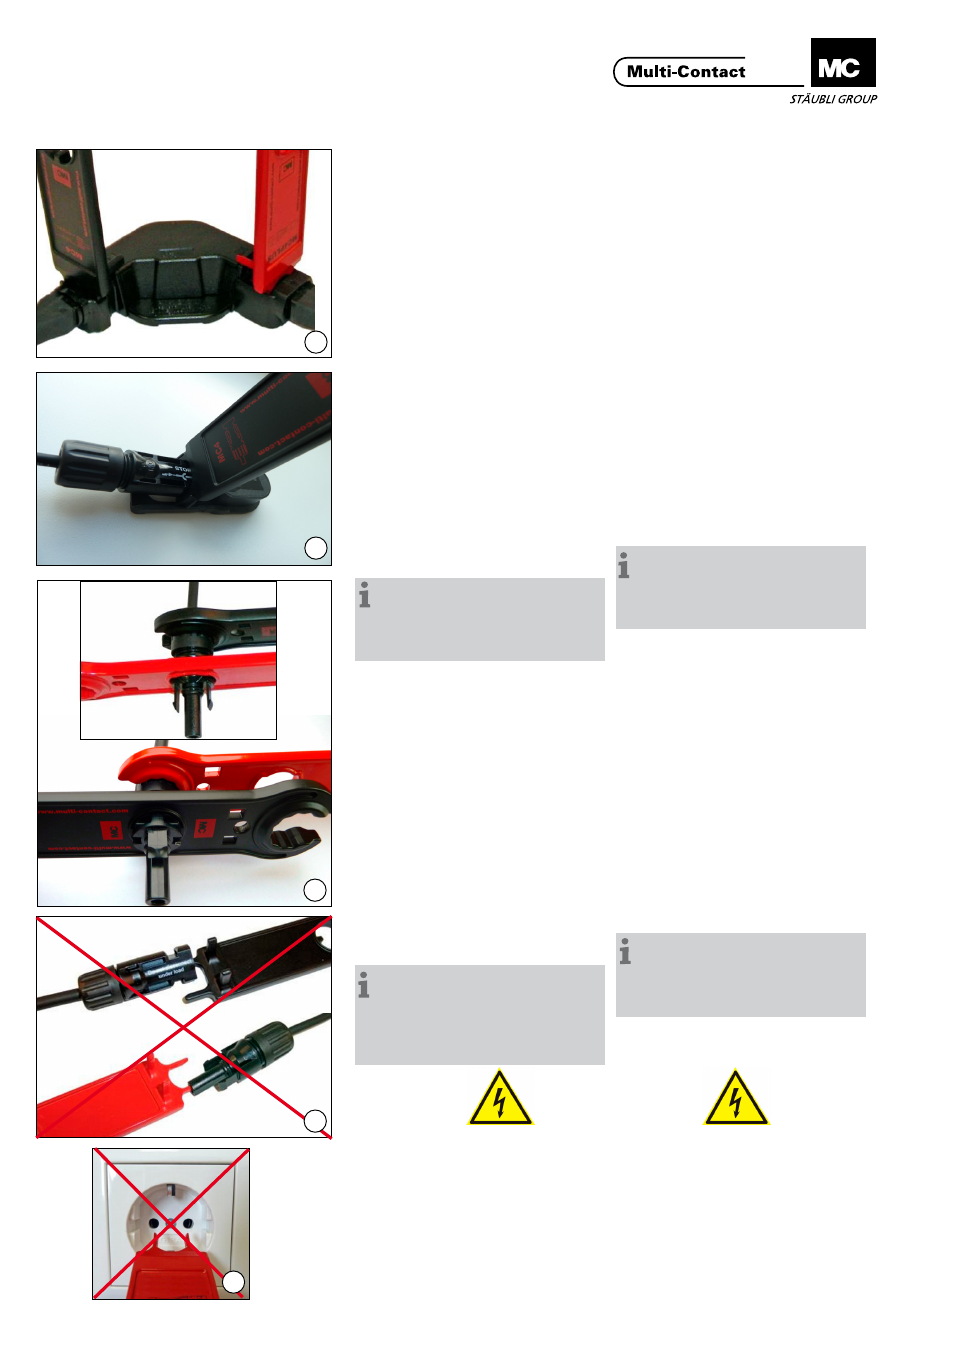
(ill. 7)
Atornillado de MC4
Inserte la carcasa de la hembra
MC4 o bien del macho en el orificio
de montaje previsto para ello (dispo-
sitivo de fijación) del
PV-MS-PLS/2
y apriete la tuerca de caperuza con
la llave poligonal del
PV-MS-PLS/1.
Atornillado del MC4-EVO 2
Inserte la carcasa hembra o macho
del MC4-EVO 2 en el orificio de
montaje (abertura de fijación) de la
herramienta PC-MS-PLS/1 y atornille
la tuerca-tapa con la llave tipo estrel-
la de la herramienta PV-MS-PLS/2.
Nota:
Encontrará más detalles sobre ator-
nillado de la tuerca con caperuza con
el conector en las instrucciones de
uso MA231 (MC4) y MA273 (MC4-
EVO 2).
(ill. 7)
Screw fixing of MC4
Insert the housing of the
MC4 socket or
plug in the assembly opening (holder)
of the
PV-MS-PLS/2 and screw on the
cap nut with the ring spanner of the
PV-MS-PLS/1.
Screw fixing of MC4-EVO 2
Insert the housing of the MC4-EVO 2
socket or plug in the assembly opening
(holder) of the PC-MS-PLS/1 and screw
on the cap nut with the ring spanner of
the PV-MS-PLS/2.
Note:
Further details on screwing the cap
nut onto the plug connector are given
in the assembly instructions MA231
(MC4) and MA273 (MC4-EVO 2).
Mal uso
Misuse
(ill. 8)
No inserte los conectores de desblo-
queo del
PV-MS-PLS/1 y PV-MS-
PLS/2 en machos o hembras de los
conectores MC.
(ill. 8)
Do not Insert the unlocking pins of
PV-MS-PLS/1 and PV-MS-PLS/2 in
sockets or plugs of the MC plug con-
nectors.
(ill. 9)
No inserte los conectores de desblo-
queo del
PV-MS-PLS/1 y PV-MS-
PLS/2 en un enchufe hembra.
(ill. 9)
Do not insert the unlocking pins of the
PV-MS-PLS/2 and PV-MS-PLS/2 into
the openings of a mains power outlet.
© b
y Multi-Contact A
G, Switz
erland – MA270 – 10.2014, Inde
x e
, Global Communications – Se reserva el derecho de efectuar modificaciones / Subject to alterations