Primare SP33 av preamp User Manual
Page 11
s P 3 3 u s e r g u i d e
1 1
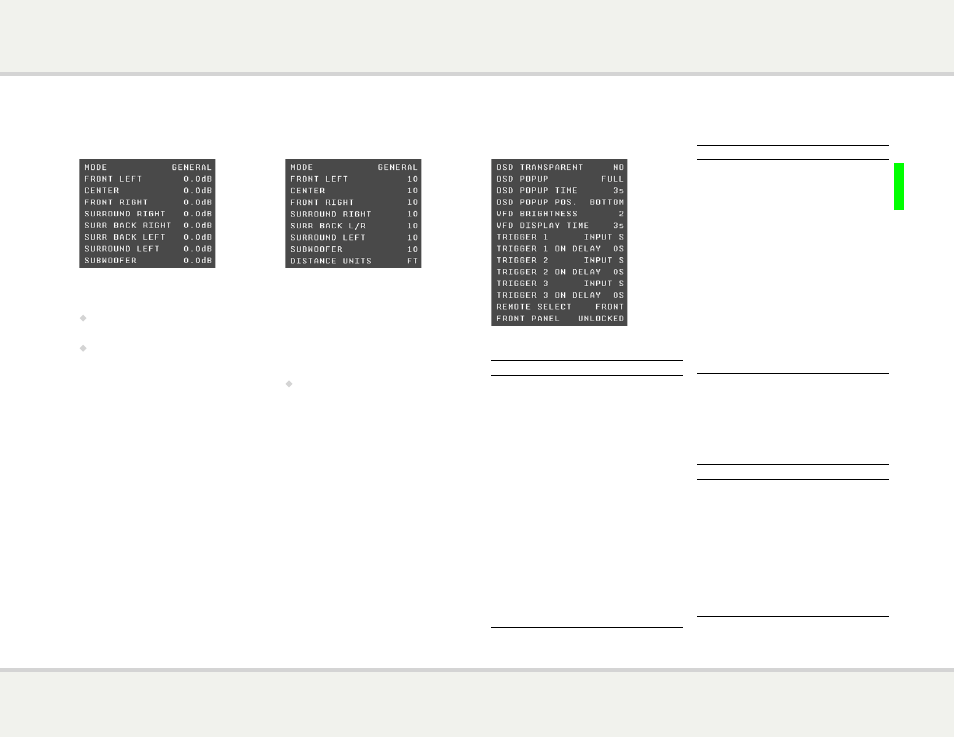
l e V e l a d J u s t
The LEVEL ADJUST menu allows you to adjust
the levels so that the sound from each speaker is
equally loud at the listening position.
•
Highlight each of the speakers in turn; a white
noise signal will be played through the speaker.
•
Use the < and > buttons on the remote
control to adjust the level.
For best results measure the level at the listening
position using a Sound Pressure Level meter.
s P e a k e r d i s t
The SPEAKER DIST menu allows you to
specify the distance of each speaker from the
listening position, in feet or metres. The SP33 will
then add delays to each channel to ensure that
the sound from each speaker reaches the listener
at the same time.
You can also add an extra delay to the surround
speakers to make the sound more spacious.
•
Use the < and > buttons on the remote
control to adjust the distance or delay.
In GENERAL mode you can adjust the
distance between 0 and 20 feet (0 and 6m).
Setting DISTANCE UNITS to MS shows the
calculated delays and allows you to adjust them
directly.
c o n t r o l s e t t i n g s
Allows you to configure hardware settings of the
SP33.
Option
Description
OSD
TRANSPARENT
Set to YES to allow the video
image to show through the
background of the on-screen
display, or NO to blank the
video image when the on-screen
display is displayed.
OSD POPUP
Determines what information is
shown on the on-screen display
when changing source. FULL
shows the same information as
the front panel display, SIMPLE
shows just the source name, and
OFF turns it off.
OSD POPUP
TIME
Set to 1-10 sec to determine
how long the on-screen display
stays on the screen.
OSD POPUP
POS.
Position of on-screen display.
VFD
BRIGHTNESS
1-3 to specify the front panel
display brightness.
Option
Description
VFD DISPLAY
TIME
If the front-panel display is
blanked, sets the delay (1-10
sec) before the display is blanked
after operating any control.
TRIGGER 1 to
TRIGGER 3
See
Trigger settings below.
REMOTE
SELECT *
Select FRONT to use an infra-
red remote control pointer at
the front panel, or BACK to
control the SP33 using the IR
input on the back panel.
FRONT PANEL Select LOCKED to lock the
front panel; you will then only
be able to operate the SP33 via
the remote control. Reset to
UNLOCKED when you turn
off the SP33 at the back panel.
* Note: After changing this option you will not
be able to use the remote control to control the
SP33. To reset this option operate the menus from
the front panel.
Trigger settings
For each trigger you can set the following:
Option
Description
TRIGGER 1-3
Specifies when the current
trigger is active: OFF,
STANDBY to enable it when
the SP33 is in standby, INPUT
S to take the setting from the
INPUT SETTING menu, or
ZONE 2 to take the setting
from the ZONE 2 menu.
TRIGGER 1-3
ON DELAY
Allows you to specify a delay
of 0, 1, 2, or 5 secs before the
trigger is activated.