Rugged Cams Fusion DVR User Manual
Page 2
Quick Reference Steps for the FuZion DVR
General Information to Guide you through the DVR.
• To power unit, supply voltage using the supplied power cord. To shut the system down hit Power button on the remote control
and input password. To turn off the power to the monitor only press the Monitor Power button on the front right of the monitor
face.
• Enter/Select on this DVR is the middle button of the circle of buttons on the front panel and the remote control.
• Some menu functions require password input. When asked select user name, input password and press Enter/Select to continue.
Input the password on the front of the DVR for the 4 and 9 channel DVRs, and from the remote control for the 16 channel version.
• Whenever you make changes in the menu save settings when prompted. Some alteration of menu items requires the system to
reboot. This will happen automatically if necessary.
• All screen options for live display are found in the Menu under Live.
• If you make a mistake in any menu press Esc to exit out and start again.
• Extra copies of manuals, remote software, etc can be found at
http://www.rugged-cctv.com/downloads.shtml
Recording Methods – Press Menu / Record (make sure and save all settings before exiting out)
Continuous Recording
• Under Recording for each camera you need to set it to Continuous.
• Adjust Resolution, Quality and Rate under the same Record Menu.
Motion Based Recording
• Under Recording for each camera you need to set it to Motion.
• For the motion detection to look at the entire screen, make sure the Motion Zone is set to Full
• For the motion detection to look at a certain portion of the screen, in the Record Menu, set Motion Zone to partial zone and
press Enter. You will be given a masking screen for that particular camera. All squares are set to detect as default, so when you
select each square it turns it off, and motion will not be detected in that area. Press Enter to select a screen, or turn it off. It will
be red.
• To adjust the sensitivity for the motion detection go under the Record category where it says Motion Sensitivity and press Enter.
It will give you the sensitivity that can be adjusted up or down.
Viewing Screens – change the monitor viewing screens
• One camera Full Screen – press the number of the camera you want to see on the front of the DVR or on the remote control.
• 4, 9 and 16 camera screens all at once – press the multi button to the left of the POWER LED.
• Sequencing - to sequence one camera full screen for all cameras that are enabled, or 4, or 9 start on the monitor split you
desire and then press the Enter button (to turn it off press the Enter button again).
Search – You can Search on a Timeline, by Event, or Direct. Days you have archives to search through will be in red. Press
Search and select Timeline, Event or Direct by using your right and left arrow keys.
• Timeline
o Select the Day, then the hour, then minute and press Enter. Use your Play buttons to traverse playback.
• Event (A – All, M – Motion, S – Schedule, R – Pre-Recording, C – Continuous)
o Select the Day, then the Channel, then the type of event.
o Once you select the type of event use your right and left arrow keys to change the list, and the up and down arrow
keys to go to a particular event and then press Enter.
• Direct
o Go to First time – first saved footage recorded on the hard drive (s).
o Go to Last time – last minute of recorded footage.
o Go to Specific Time – change date and/or time and press Enter.
Back Up – to make a back up copy of video or still image onto a USB 2.0 memory stick or USB 2.0 CD drive. (not included)
• You will now need to access playback and figure out exactly what dates and times need to be copied. At this point you need
to have your stick in the DVR. Once you have found where you want to start press Pause and then press Freeze/Capture on the
remote control. It will ask you what kind of archive you would like to make. Still or Video. (see page 43 in the manual)
o Still – is just saving a still image of exactly what is showing on the screen. In live mode or in playback. When you
press Enter on Still it will tell you when the image is saved, and then it will ask you if you want to make a back up. Select USB
or CD drive and yes or no and press Enter. The system will tell you it is saving and when it is complete. If your USB stick isn’t
compatible with the system the Back up will fail. You will then need to try a different stick. See page 16 in the manual for a full
list of compatible USB media.
o Video – This will be saved as an AVI file. After pressing Enter on Video it will ask you the duration of the video.
Select how many minutes you would like to make a copy of, and press Enter. When the video is saved it will ask you if you want
to make a back up. Select USB or CD drive and yes or no and press Enter. The system will tell you it is saving and when it is
complete. If your USB stick isn’t compatible with the system the Back up will fail. You will then need to try a different stick. See
page 16 in the manual for a full list of compatible USB media.
o Back Up Later - You can also tell the system no when it asks you if you want to make a back up right then. The
data will be saved in the DVR, and at a different time you can come back to the DVR and hit archive. You will be able to search
through the archives you have made and select one at a time to back up. This is a great feature if you don’t have a stick with
you at the time, and need to make sure the data you need is not overwritten.
Network Connection
– you must install the remote client software onto each PC you want to access the DVR from.
• Connect the DVR into your router with a standard Ethernet cable (cannot use cross over cable or go direct to a PC).
• How to Find Correct Network Information to put in the DVR from your router (the info in the DVR is from the test Network at Rugged
CCTV)
o On a regular PC connected into the same router as the DVR go to Start / Run / type in cmd and press Enter / type in
ipconfig and press Enter / then write down the IP, Subnet Mask and Gateway from your computer (you will enter the exact Subnet Mask
and Gateway into the DVR, the IP will be different)
o Example of info from your PC
• IP – 192.168.1.100, Subnet Mask – 255.255.255.0, Gateway – 192.168.1.1
o Example of info you would input into the DVR
• IP – 192.168.1.200, Subnet Mask – 255.255.255.0, Gateway – 192.168.1.1
• Type of network connection needs to remain LAN.
• All DNS numbers need to be left as 0’s.
o How to find your static IP coming into your router at the DVR
• On a regular PC plugged into the same router as the DVR open up a regular web browser screen, erase
everything in the address line and type in
www.whatismyip.com
and it will give you back the IP address you
will use for the off site connection
• Dynamic addresses do not work well with the FuZion DVR.
•
DVR Network setup
– Menu / Network
o Go to whichever number you need to alter and press Enter. Input the correct information and then press exit. Repeat
this step for all numbers you need to change. Save all settings once you are prompted to do so.
• Ports to open to the IP address in the DVR
o 5445-5447
o All in the TCP direction.
o For help with Port forwarding go to
http://www.portforward.com/English/routers/port_forwarding/routerindex.htm
• Remote Access through a PC
o Remote software – install software, and double left click on it to launch the program. You will then need to click on the
connect button and input the appropriate connect information.
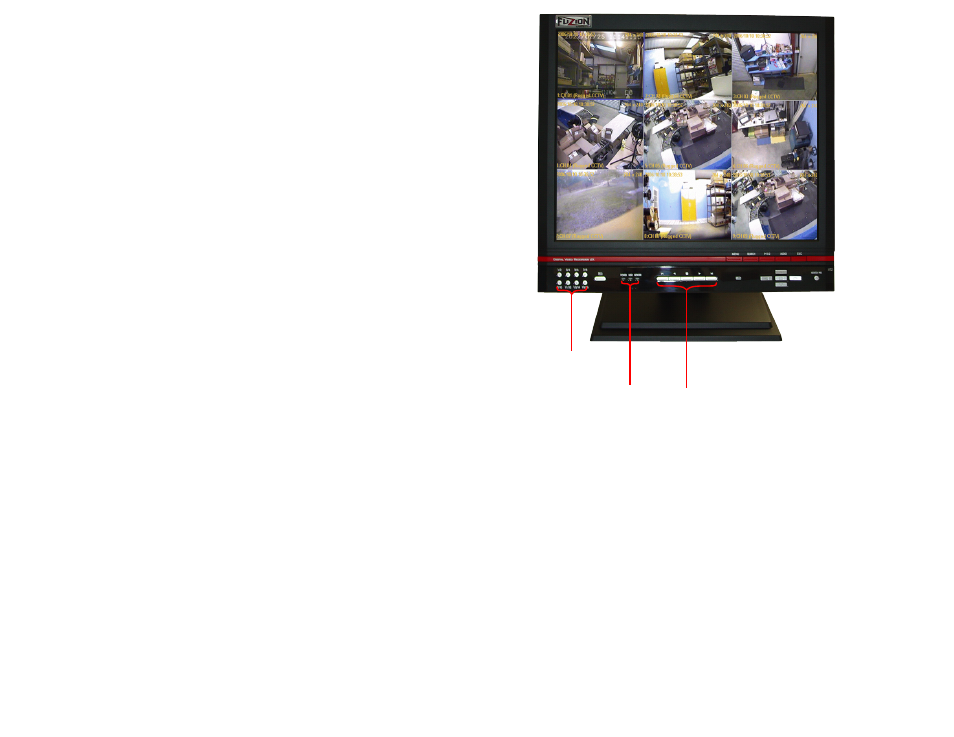
Camera Channels &
Channel Division
System
LEDs
Playback
Buttons
Infrared
Receiver
Direction
& Selection
Buttons
Monitor
Power
Menu
Search
PTZ
Audio
ESC
USB Port