Instructions for the installer, Installation – DE DIETRICH DTG1195X User Manual
Page 18
6
INSTALLATION
Installing the top
The appliance is designed to be embedded into
heat-resistant pieces of furniture.
The walls of the pieces of furniture must resist a
temperature of 75°C besides the room one.
The gas hobs are equipped with type X degree
protection against overheating. Therefore,
the appliance can be installed next to cabinets,
provided the height of the cabinet doses not
exceed that of the hob.
The equipment must not be installed near
inflammable materials, such as curtains, cloths,
etc.
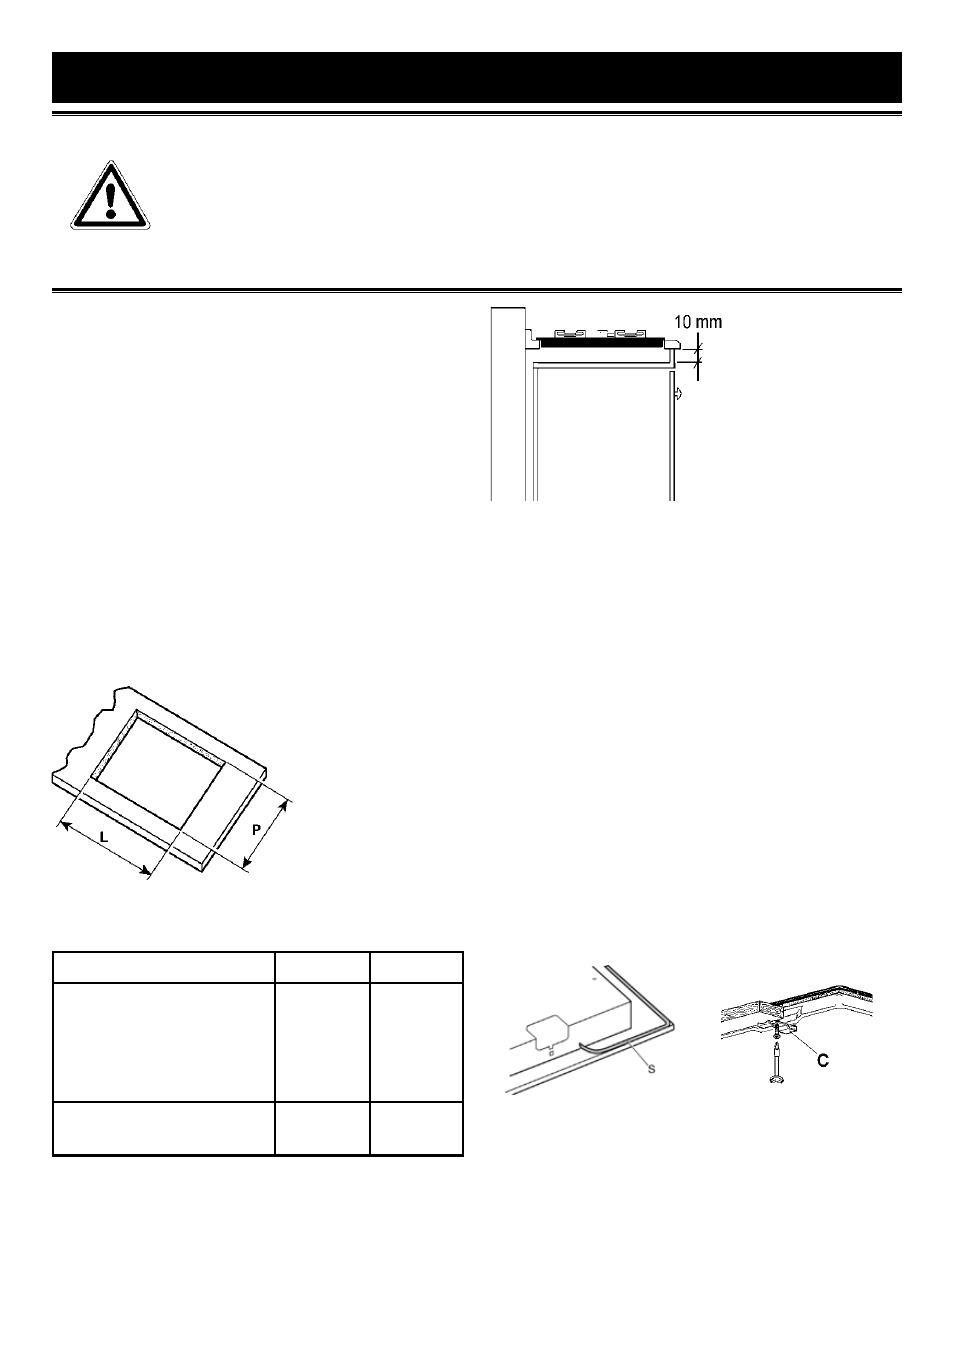
Make a hole in the top of the piece of furniture, with
the dimensions indicated in fig. 3, at a distance of
at least 50 mm from
the appliance border
to the adjacent
walls.
MODEL
L (mm)
P (mm)
DTE1114X / W / B
DTE1115X / W / B
DTE1172X / W
DTG1164X
DTG1175X / W
560
480
DTE1192X
DTG1195X
860
480
Any possible wall unit over the cook-top must be
placed at a distance of at least 760 mm from the
top.
It is advisable to isolate the appliance from the
piece of furniture below with a separator, leaving a
depression space of at least 10 mm (fig. 4).
If the hob is going
to be installed on
the top of an oven,
precautions must be
taken to guarantee
an installation in
accordance with
current accident
p r e v e n t i o n
s t a n d a r d s . P a y
particular attention to the position of the electric
cable and gas pipe: they must not touch any hot
parts of the oven.
Moreover, if the hob is going to be installed on
the top of a built in oven without forced cooling
ventilation, proper air vents must be installed to
guarantee an adequate ventilation, with the lower
air entering with a cross section of at least 200cm
2
,
and the higher air exiting with a cross section of at
least 60 cm
2
.
Fastening the top
Every cook-top is equipped with a special washer.
A set of hooks is also supplied for mounting the
cook-top.
For the installation proceed as follows:
-Remove the racks and burners from the top.
-Turn the appliance upside down and lay the
washer S along the external border (fig. 5).
Fig.5
Fig.6
-Introduce and place the cook-top in the hole made
in the piece of furniture, then block it with the V
screws of the fastening hooks G (fig.6.
Installation room
This appliance is not provided with a device for
exhausting the products of combustion. Regarding
INSTRUCTIONS FOR THE INSTALLER
IMPORTANT NOTICE:
THE OPERATIONS INDICATED BELOW MUST BE FOLLOWED BY QUALIFIED
PERSONNEL EXCLUSIVELY, IN CONFORMITY WITH THE REGULATIONS IN FORCE.
THE MANUFACTURING FIRM REFUSES ALL RESPONSIBILITY FOR DAMAGES TO
PEOPLE, ANIMALS OR THINGS, RESULTING FROM THE FAILURE TO COMPLY WITH
SUCH PROVISIONS.
Fig.3
Fig.4