Roland SE-02 Boutique Designer Series Analog Synthesizer User Manual
Roland Synthesizers
English
Owner’s Manual
Copyright © 2017 ROLAND CORPORATION
Before using this unit, carefully read “USING THE UNIT SAFELY” and “IMPORTANT NOTES” (the leaflet “USING THE UNIT SAFELY” and the Owner’s Manual). After reading, keep the document(s) where it will be available for
immediate reference.
Introduction
The SE-02 is a fully-analog three-VCO synthesizer module.
In spite of its compact body, it’s a full-fledged analog synthesizer that lets you experience the enjoyment of
designing your own sounds.
Using the SE-02 in conjunction with the DK-01 Boutique Dock (sold separately)
For installation/removal/angle adjustment, refer to the DK-01’s Owner’s Manual.
Using the SE-02 in conjunction with the K-25m Keyboard Unit (sold separately)
For installation/removal/angle adjustment, refer to the K-25m’s Owner’s Manual.
* When turning the unit over, be careful so as to protect the buttons and knobs from damage. Also, handle the
unit carefully; do not drop it.
Playing the SE-02 via MIDI or USB
You can also play the SE-02 via MIDI or USB. For details, refer to “Connecting Your Equipment.”
Connecting Your Equipment
* To prevent malfunction and equipment failure, always turn down the volume, and turn off all the units before
making any connections.
A
B
C
D
E
F
G H I J
A
DC IN jack
Connect the included AC adaptor here.
* Place the AC adaptor so the side with the indicator (see illustration)
faces upwards and the side with textual information faces downwards.
The indicator will light when you plug the AC adaptor into an AC
outlet.
B
[POWER] switch
This turns the power on/off.
C
Micro USB (
O
) port
Use a commercially available USB 2.0 cable (A-microB) to connect
this port to your computer.
You must install the USB driver when connecting the SE-02 to your computer. Download the USB driver from
the Roland website. For details, refer to Readme.htm which is included in the download.
&
https://www.roland.com/support/
* Do not use a micro USB cable that is designed only for charging a device. Charge-only cables cannot transmit
data.
D
MIDI connectors
OUT
Outputs note messages and control changes.
IN
You can play the SE-02 by connecting a MIDI device via a
commercially available MIDI cable.
E
TRIGGER jacks *1
OUT
Outputs a trigger signal at the playback timing of each step of the step sequencer.
IN
If this is connected to a rhythm machine etc. that’s equipped with a trigger out jack, and the Sync
setting (setup parameter) of the step sequencer/song mode is set to “
trg
,” trigger signals from
the external device will advance the steps of the SE-02’s step sequencer.
&
Refer to “Setup parameter settings (SETUP).”
F
INPUT jacks *1
CV
Inputs a pitch from an external device. This jack supports OCT/V (Hz/V is not supported).
GATE
Inputs note-on/off from an external device.
VCF CV
Controls the filter cutoff frequency from an external device.
*1
Use a mini-plug (mono) cable to make these connections. The connections won’t work correctly if a
stereo mini-plug cable is used.
G
EXT INPUT jack
This is an audio input jack. You can use this to apply filter or delay to the audio from a connected device.
H
OUTPUT jack
Connect this jack to your amp or monitor speakers.
I
PHONES jack
Connect headphones here.
J
[VOLUME] knob
Adjusts the volume.
Turning On/Off the Power
* Before turning the unit on/off, always be sure to turn the volume down. Even with the volume turned down,
you might hear some sound when switching the unit on/off. However, this is normal and does not indicate a
malfunction.
When powering up
Turn on the power in the order of the SE-02 first, and then the connected equipment.
When powering down
Turn off the connected equipment first, and then the SE-02.
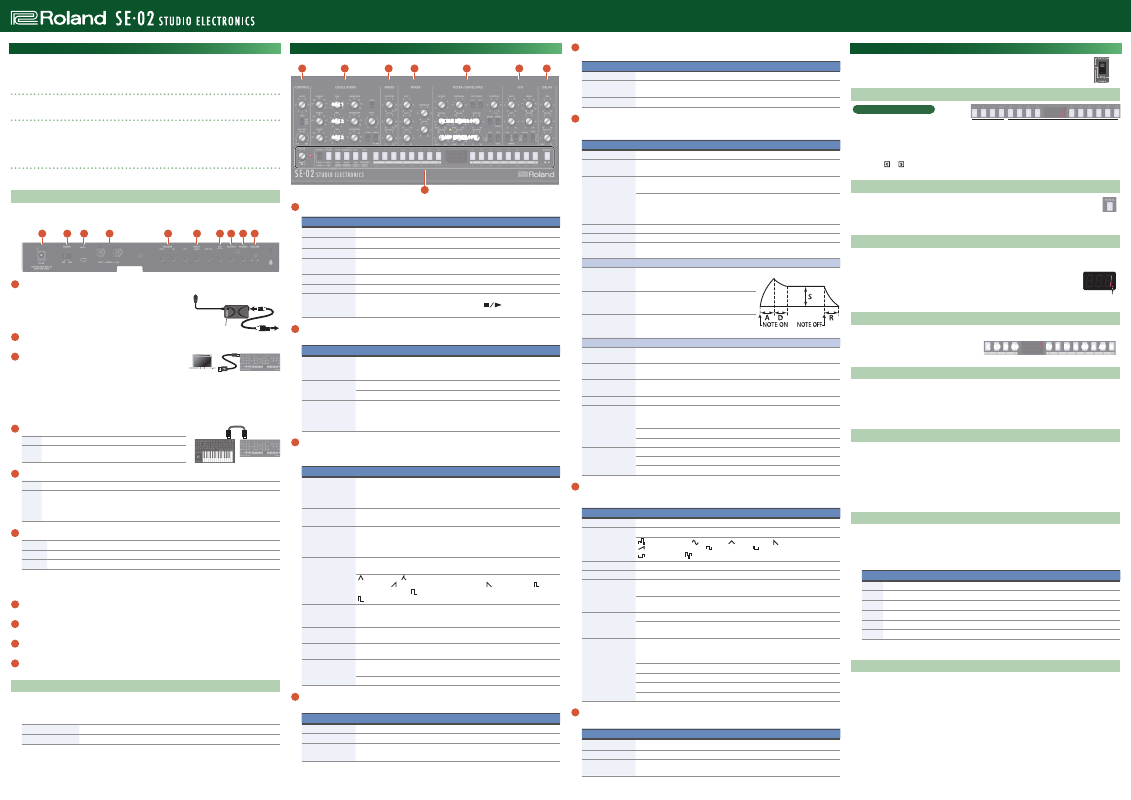
Panel Descriptions
2
3
4
5
6
7
8
1
OSC 1
OSC 2
OSC 3
FILTER ENVELOPE
AMP ENVELOPE
1
Common section
Controller
Explanation
[VALUE] knob
Edits a value. Press this knob to access the Write operation.
Tempo LED
Blinks in synchronization with the sequencer’s tempo.
Mode select switch
Switches between patch mode, step sequencer mode, and song mode.
Function select
buttons
Select or specify functions. The available functions differ depending on the mode.
[1]–[16] buttons
Use these buttons to recall patches, patterns, or songs, or to edit settings.
Display
Shows the value of a setting.
[MANUAL] button
Makes the sound reflect the current settings of the knobs and switches. In step
sequencer mode or song mode, this operates as the [
] button to start/stop
the pattern or song.
2
CONTROL section
Here you can adjust performance effects.
Controller
Explanation
[GLIDE] knob
Adjusts the time of the glide effect (which creates a smooth transition between two
pitches. As you turn the knob toward the right, the transition to the next note takes
a longer time.
[TYPE] switch
Selects the curve of the glide effect.
LIN
: Linear change,
EXP
: Exponential (natural) change,
OFF
: Glide effect is off
[WHL MIX] knob
When using XM (cross modulation) or the LFO to apply modulation, this adjusts the
mix ratio between XM and LFO.
If you connect a MIDI keyboard to the SE-02 and operate the modulation wheel,
modulation is applied according to the setting of the [WHL MIX] knob.
3
OSCILLATORS section
Here you can select the waveform that determines the character of the sound, and specify its pitch. The SE-02
has three oscillators (OSC 1–3).
Controller
Explanation
[RANGE] knob
Switches the pitch of each oscillator (OSC 1–3) in octave units. Choose from five
octaves in the range 2’–32’.
If this is set to “LO,” the oscillator generates an ultra-low pitch. You can use this to
apply modulation or for some other purpose.
[TUNE] knob
This is the master tune setting that is common to OSC 1–3.
* The master tune setting is not stored in patches.
[FINE] knob
This knob is provided for OSC 2 and 3. It adjusts the tuning of those oscillators as a
difference relative to OSC 1.
You can make the sound richer by slightly detuning the pitch of oscillators, or you
can create a chord by detuning oscillators to a specific musical interval.
[WAVEFORM] knob
Selects the waveform of each oscillator. The selected waveform determines the tonal
character of each oscillator.
: triangle wave, : a waveform that combines triangle and sawtooth waves (OSC
1 and 2 only), : reverse sawtooth wave (OSC 3 only), : sawtooth wave, : pulse
wave 1 (square wave), : pulse wave 2 (square wave with wider pulse width),
: pulse wave 3 (square wave with narrower pulse width)
[SYNC] switch
Turns oscillator sync on/off.
If oscillator sync is on, OSC 2 is forcibly returned to the beginning of its cycle in
synchronization with the cycle of OSC 1, generating a complex waveform.
[ENV1] knob
Uses the filter envelope to apply modulation to OSC 2. Turning the knob in the
negative direction inverts the polarity of the envelope.
[KYBD] switch
Specifies whether OSC 3 is controlled by the keyboard. If this is off, control from the
keyboard is disconnected, and OSC 3 operates as an independent oscillator.
[XMOD TO MW]
switch
Selects the modulator that is assigned to the [WHL MIX] knob’s XM (cross modula-
tion).
A
: [O2-FILTER] knob,
B
: [O3-O2] knob,
C
: [O3-PW1,2] knob
4
XMOD section
Here you can specify how cross modulation (frequency modulation) is applied.
Controller
Explanation
[O2-FILTER] knob
Lets OSC 2 modulate the filter cutoff frequency.
[O3-O2] knob
Lets OSC 3 modulate the OSC 2 waveform.
[O3-PW1,2] knob
Lets OSC 3 modulate the pulse width of OSC 1 and 2.
* If a waveform other than pulse wave is selected, modulation is not applied.
5
MIXER section
Here you can adjust the volume of OSC 1–3 and noise.
Controller
Explanation
[OSC 1]–[OSC 3] knob
Adjust the output level of each oscillator.
[FEEDBACK] knob
Adjusts the amount of the SE-02’s output (except for DELAY) that is returned to the
input of the FILTER.
[NOISE] knob
Adjusts the volume of noise (white noise).
6
FILTER/ENVELOPES section
These settings determine the brightness and thickness of the sound. Here you can also specify the time-
varying change (filter envelope) for the filter and the time-varying change (amp envelope) for the volume.
Controller
Explanation
[CUTOFF] knob
Adjusts the filter cutoff frequency.
[EMPHASIS] knob
Boosts the region near the filter cutoff frequency. Higher values produce greater
boost, creating a distinctively “synthesizer-like” character.
KEY TRACK [1/3],
[2/3] switches
Specify how the filter cutoff frequency changes in response to the pitch that is
played on the keyboard.
[1/3]
: The filter cutoff frequency changes by 1/3 of the pitch change.
[2/3]
: The filter cutoff frequency changes by 2/3 of the pitch change.
If both switches are on, the filter cutoff frequency changes by the same amount as
the change in keyboard pitch.
[CONTOUR] knob
Adjusts the depth of change produced by the specified envelope settings.
[MTRIG] switch
If this is on, the filter envelope restarts each time you press a key.
[NORM/INVERT]
switch
Specifies the polarity of the envelope that is controlled by the [CONTOUR] knob. If
this is set to “INVERT,” the polarity is inverted.
FILTER ENVELOPE
[ATTACK] knob
Specifies the time (attack time) from when the
key is pressed until the cutoff frequency reaches
the maximum level.
[DECAY] knob
Specifies the time (decay time) from when the
cutoff frequency reaches the maximum level
until it decreases to the sustain level.
[SUSTAIN] knob
Specifies the level (sustain level) that is held
after the attack time and decay time have
elapsed until the key is released.
AMP ENVELOPE
[ATTACK] knob
Specifies the time (attack time) from when the key is pressed until the volume
reaches the maximum level.
[DECAY] knob
Specifies the time (decay time) from when the volume reaches the maximum level
until it decreases to the sustain level.
[SUSTAIN] knob
Specifies the volume (sustain level) that is held after the attack time and decay time
have elapsed until the key is released.
Gate LED
Lit while a note is sounding.
[REL] switch
Specifies whether the setting of the amp envelope [DECAY] knob is applied to the
release time (the time from when the key is released until the volume decays to
zero).
1, 2:
Applied to both the filter and amp envelope.
2:
Applied only to the amp envelope.
[LFO/GATE] switch
Specifies the signal that controls the amp envelope.
LFO:
The LFO controls the amp envelope.
GATE:
The Note or Gate controls the amp envelope.
7
LFO section
Here you can create cyclic change (modulation) in the sound by applying vibrato (pitch modulation) or
tremolo (volume modulation).
Controller
Explanation
[RATE] knob
Adjusts the LFO frequency.
[WAVE] knob
Selects the LFO waveforms.
: Sample and Hold, : Sine wave, : Triangle wave, : Sawtooth wave,
: Reverse sawtooth wave, : Square wave 1, : Square wave 2,
: Square wave 3, : Random wave
[OSC] knob
Adjusts the depth to which the LFO affects the oscillator.
[FILTER] knob
Adjusts the depth to which the LFO affects the filter.
[MWHL] switch
Selects the modulator that is assigned to the LFO of the [WHL MIX] knob, and
specifies the depth of the effect.
F
: The effect is applied strongly.
H
: The effect is applied weakly.
OFF
: No effect is
applied.
[MODE] switch
Specifies the LFO’s operating mode.
1X
: The LFO applies only once.
KEY
: The LFO starts at note-on.
FREE
: The LFO applies
always.
[SYNC] switch
Selects whether LFO and DELAY are synchronized with MIDI clock.
* If you want to synchronize via MIDI clock, set the SEQ SETUP parameter “Sync”
to MIDI IN (
Nid
) or USB MIDI (
USb
).
Ø
:
Not synchronized.
L
:
Only the LFO is synchronized to MIDI clock.
D
:
Only the DELAY is synchronized to MIDI clock.
LD
:
Both LFO and DELAY are synchronized to MIDI clock.
8
DELAY section
Adjusts the depth of delay.
Controller
Explanation
[TIME] knob
Adjusts the delay time.
[REGEN] knob
Specifies the number of times that the delay is repeated.
[AMOUNT] knob
Adjusts the volume of the delay sound. With the “DRY” setting, only the undelayed
sound is output from OUTPUT.
Using Patch Mode
1.
Set the mode select switch to “PATCH.”
* To save the edited settings, perform the Patch Write operation.
Selecting a Patch
What are patches and banks?
You can recall 384 preset patches (128
patches x banks A–C) and 128 user patches
(128 patches x the USER bank).
1.
Make the [COMP] button and [PLAY] button go dark.
2.
Press one of the [A]–[C] or [USER] buttons to select a bank.
3.
Use the [ ]–[ ] buttons to enter a number (1–128), or use the [VALUE] knob to select a number.
The display shows the patch number.
Playing the Sound of the Current Knob/Switch Settings (MANUAL)
1.
Press the [MANUAL] button.
The SE-02 is in manual mode; the sound reflects the current settings of the knobs and switches.
The display indicates “
---
.”
2.
To return to patch selection, press one of the [A]–[C] or [USER] buttons.
Comparing Patches (COMP)
Here’s how to compare the currently-edited patch with a saved patch.
* This function can not be used in manual mode.
1.
Press the [COMP] button.
Each time you press the button, you switch between the saved patch (button lit) and the
currently-edited patch (button unlit).
If there are any differences between the currently-edited patch and the saved patch, a dot
appears in the display, and the entire content shown in the display blinks.
Using the Buttons As a Keyboard (PLAY)
You can use the [5]–[16] buttons as a one-octave keyboard to play the sound.
1.
Press the [PLAY] button.
The [5]–[16] buttons are lit.
2.
Press the [5]–[16] buttons to play.
Shifting the Pitch Range in One-Octave Units (OCT+, OCT–)
You can shift the pitch in one-octave units in a range of ±3 octaves.
1.
Press the [OCT+] button or [OCT–] button.
At one octave, the button is lit; at two octaves, the button blinks slowly; at three octaves, the button blinks
rapidly.
• Simultaneously pressing the [OCT+] button and [OCT-] button resets the value to 0.
Transposing the Pitch (TRANSPOSE)
You can transpose the pitch in semitone units in a range of ±1 octaves.
1.
Hold down the [TRANSPOSE] button and press the [OCT+] button or [OCT–] button.
The display indicates the transpose value.
• You can also change this value by holding down the [TRANSPOSE] button and turning the [VALUE] knob.
• Holding down the [TRANSPOSE] button and simultaneously pressing the [OCT+] button and [OCT-] button
resets the value to 0.
2.
Press the [TRANSPOSE] button to turn transpose on/off.
Setup Parameter Settings (PATCH SETUP)
1.
Press the [COMP] button and [PLAY] button to make them light.
* If you decide to cancel, press the [COMP] button and [PLAY] button once again to make them go dark.
2.
Use the [1]–[6] buttons to select a parameter, and use the [VALUE] knob to edit the parameter’s value.
The display indicates the value.
Button Parameter
Value
[1]
Pitch bend range (semitone units)
0–24
[2]
Depth by which modulation wheel controls CC
0–127
[3]
Depth by which aftertouch controls the LFO that affects the oscillators
0–127
[4]
Depth by which aftertouch controls the cutoff frequency
0–127
[5]
Depth of the [CONTOUR] knob’s effect
0–127
[6]
Patch volume
0–127
3.
To save the edited settings, perform the Patch Write operation.
Saving a Patch (Patch Write)
If you’ve edited the settings, your edits are lost when you turn off the power or select another patch. If you
want to keep the changes that you made, use the Write operation to write them to a user patch.
1.
Press the [VALUE] knob to access Write mode.
The current patch number blinks.
2.
Select the writing-destination user patch.
The display indicates the selected patch number.
3.
Press the [VALUE] knob.
A confirmation message appears in the display.
* If you decide to cancel, press the [EXIT] button.
4.
To save the settings, press the [VALUE] knob.
When the settings are saved, the writing-destination patch is selected.
Power cord
Indicator
SE-02
MIDI keyboard
MIDI IN
MIDI OUT
Bank
Enter a number (numeric keys)
Dot
C C# D D#
E# F F# G G# A A# B