Sony VPL-GTZ380 10,000-Lumen 4K DCI-P3 Laser SXRD Projector (No Lens) User Manual
Sony Projectors
a
b
0.50
X
(1:2.0)
0.33
X
(1:3.0)
0.19
X
(1:5.3)
0.06
X
(1:16.8)
0
0.26
WIDE
0.33
0.49
1.3
0.42
TELE
0.61
1.1
3.3
m
c
+
2
3
+
1
3
+1
–1
(1)
(2)
–2
–3
(1)
(3)
(1)
(4)
(2)
(2)
(1)
(3)
(2)
1
2
3 4 5 6
7
8
8
9 10 11 12 1314
8
18
19
20
15 16 17
交換レンズ
Interchangeable Lens
可更换镜头
取扱説明書
Operating Instructions
使用说明书
FE 70-200mm
F4 Macro G OSS
Ⅱ
E-mount
SEL70200G2
©2023 Sony Corporation
Printed in China
5-042-455-
01
(1)
この取扱説明書には、事故を防ぐための重要な注意事項と製品
の取り扱いかたを示しています。この取扱説明書をよくお読みの
上、製品を安全にお使いください。お読みになったあとは、いつで
も見られる所に必ず保管してください。
この「取扱説明書」ではレンズの使いかたを説明し
ています。使用上のご注意など、レンズに共通した
ご注意や説明については別冊の「使用前のご注意」
でご覧頂けます。
必ずご使用の前に、本書と合わせてよくお読みのう
えでご使用ください。
本機はソニー製αカメラシステムEマウントカメラ専
用のレンズです。Aマウントカメラにはお使いになれま
せん。
35mm判相当の撮像素子範囲に対応しています。
35mm判相当の撮像素子搭載機種ではカメラ設定に
よってAPS-Cサイズでも撮影が可能です。
カメラの設定方法については、カメラの取扱説明書を
ご覧ください。
カメラ本体との互換情報については専用サポートサイ
トでご確認ください。
使用上のご注意
• レンズを絶対に太陽や強い光源に向けたままにしないで
ください。レンズの集光作用により、発煙や火災、ボディ・
レンズ内部の故障の原因になります。やむを得ず太陽光
下等におく場合は、前後レンズキャップを取り付けてく
ださい。逆光撮影時は、太陽を画角から充分にずらしてく
ださい。
• 本機は防じん、防滴性に配慮して設計されていますが、防
水性能は備えていません。雨中使用時などは、水滴がかか
らないようにしてください。
• レンズ単体の状態や、カメラ装着時に電源を切った状態
で本機を振ると、内部構造物が動き、音が発生することが
ありますが故障ではありません。
なお、本機を持ち運ぶ際などの振動で内部のレンズ群が
動いても、性能等に影響はありません。
• 繰り出されたレンズ部分でカメラを保持しないでくださ
い。
• レンズを取り付けてカメラを持ち運ぶときは、カメラと
レンズの両方をしっかり持ってください。
• 本機を他社製品と組み合わせて使用した際の性能や、そ
れによって生じた事故、故障につきましては保証いたし
かねますので、あらかじめご了承ください。
フラッシュ使用時のご注意
• レンズとフラッシュの組み合わせによっては、レンズが
フラッシュ光を妨げ、写真の下部に影ができることがあ
ります。その場合は、焦点距離または撮影距離を調整して
撮影してください。
周辺光量について
• レンズは原理的に画面周辺部の光量が中心部に比べ低下
します。周辺光量の低下が気になる場合は、開放絞りから
1 ~ 2段絞り込んでご使用ください。
各部のなまえ
1 レンズフード指標 2 フォーカスリング
3 ズームリング 4 ズームロックスイッチ
5 焦点距離指標(グレー) 6 三脚座指標(グレー)
7 レンズ信号接点* 8 フォーカスホールドボタン
9 焦点距離目盛 10 フォーカスモードスイッチ
11 フルタイムダイレクトマニュアルフォーカススイッチ
12 フォーカスレンジ切り替えスイッチ
13 三脚座指標(グレー) 14 マウント標点
15 手ブレ補正スイッチ 16 手ブレ補正モードスイッチ
17 三脚座 18 三脚座クランプノブ
19 レンズマウントゴムリング 20 レンズフード
* 直接手で触れないでください。
レンズの取り付けかた/取りはず
しかた
• レンズの取り付け/取りはずしは、レンズのマウント側
を持って行ってください。フォーカスリングなどの操作
部は持たないでください。
取り付けかた(イラスト
–
参照)
1
レンズリヤキャップとカメラのボディ
キャップをはずす。
2
レンズとカメラの白の点(マウント標点)を
合わせてはめ込み、レンズを軽くカメラに押
し当てながら、時計方向に「カチッ」とロック
がかかるまでゆっくり回す。
• レンズを取り付けるときは、カメラのレンズ取りは
ずしボタンを押さないでください。
• レンズを斜めに差し込まないでください。
3
レンズフロントキャップをはずす。
• レンズフロントキャップは図の(1)、
(2)の2通りの方
法で取り付け/取りはずしができます。
取りはずしかた
1
レンズフロントキャップを取り付ける。
2
カメラのレンズ取りはずしボタンを押した
まま、レンズを反時計方向に回してはずす。
(イラスト
–
参照)
三脚を使う
三脚をお使いの場合、カメラの三脚ネジ穴ではなく、レ
ンズの三脚座に取り付けます。
縦位置・横位置の変更
三脚座クランプノブをゆるめると(1)、カメラごと任意
に回転させることができます。三脚使用時に、安定感を
損なわずに縦位置/横位置の変更をすばやくできます。
• 三脚座には、90°ごとにグレーの指標(三脚座指標)があ
ります。レンズ側のグレーの指標(三脚座指標)と合わせ
ると、カメラの正確な位置決めができます(2)。
• 位置を決めた後は、三脚座クランプノブをしっかりと締
めてください。
• 三脚座を回転すると一部のカメラ本体、およびアクセサ
リーと干渉します。カメラ本体、およびアクセサリーとの
互換情報については専用サポートサイトでご確認くださ
い。
三脚座の取りはずしかた
三脚をお使いにならない場合、レンズから三脚座を取
りはずすことができます。
1
レンズをカメラから取りはずす。
• 詳しくは、
「
レンズの取り付けかた/取りはずし
かた」を参照してください。
2
三脚座クランプノブを反時計方向に回して
ゆるめる(3)。
3
三脚座クランプノブを引っ張りながら下げ
(4)、三脚座を開く。
• 三脚座を開くときはレンズと三脚座の両方をしっか
り持ってください。
• 三脚座のヒンジ部を持って操作すると、手を挟むお
それがあります。三脚座を操作するときはヒンジ部
以外を持ってください。
• レンズをカメラから取りはずさずに三脚座を開くと、
一部のカメラ本体およびアクセサリーと干渉します。
三脚座を取りはずす際は、レンズをカメラから取り
はずすことをおすすめします。
レンズフードを取り付ける
画角外にある光が描写に影響するのを防ぐために、レ
ンズフードの使用をおすすめします。
レンズフードの赤線をレンズの赤線(レンズ
フード指標)に合わせてはめ込み、レンズフード
の赤点とレンズの赤線が合って「カチッ」という
まで時計方向に回す。
• レンズフードを「カチッ」というまで回さないと、撮影画
像に影ができたり、フードが落下したりする恐れがあり
ます。
• フラッシュ光が遮られて、写真の下部に影ができること
があります。その場合はレンズフードをはずしてくださ
い。
• 撮影後レンズフードを収納するときは、逆向きにレンズ
に取り付けてください。
ズームする
ズームリングを回して、焦点距離目盛の範囲で
希望の焦点距離(ズームの位置)に合わせる。
ズームロックスイッチについて
携帯時など、レンズの自重による鏡筒の伸長を防ぎます。
レンズを広角端に戻してからスイッチを設定してくだ
さい。
スイッチを
マークの方向にスライドさせロックしま
す。解除するにはスイッチを元の位置に戻します。
ピントを合わせる
• 本製品のフォーカスモードスイッチは、一部のカメラ本
体においてお使いになれません。
カメラ本体との互換情報については専用サポートサイト
でご確認ください。
AF(オートフォーカス)/MF(マニュアル
フォーカス)の切り替え
AF(オートフォーカス:自動ピント合わせ)/MF(マ
ニュアルフォーカス:手動によるピント合わせ)の設定
を、レンズ側で切り替えることができます。
AFで撮影する場合は、カメラ側とレンズ側両方の設定
をAFにします。カメラ側あるいはレンズ側のいずれか
一方、または両方の設定がMFの場合、MFになります。
レンズ側の設定
フォーカスモードスイッチを、AFまたはMFのい
ずれか設定したいほうに合わせる(1)。
• カメラのフォーカスモードの設定方法については、カメ
ラの取扱説明書をご覧ください。
• MFではファインダー等を見ながらフォーカスリングを
回して、ピントを合わせます(2)。
• フルタイムダイレクトマニュアルフォーカススイッチを
ONに設定すると、AFのモード設定やピントの状態にか
かわらず、フォーカスリングを回すことで自動的にMFに
切り替わります(3)。
AF/MFボタンを装備したカメラをお使いの場合
• AF動作時にAF/MFボタンを押すと、一時的にMFへ切り
替えることができます。
• MF動作時にAF/MFボタンで一時的にAFへ切り替えがで
きるのは、レンズの設定がAF、カメラの設定がMFの場合
となります。
手ブレ補正を使用する
手ブレ補正スイッチ
• ON: 手ブレを補正します。
• OFF: 手ブレを補正しません。三脚をお使いになる場合
は、手ブレ補正をOFFにすることをおすすめします。
手ブレ補正モードスイッチ
手ブレ補正スイッチをONにし、手ブレ補正モードス
イッチを設定します。
• MODE1: 主に、通常の手ブレを補正します。
(ノーマル)
• MODE2:移動する被写体を流し撮りする場合、手ブレ
を補正します。
• MODE3:フレーミングを重視した手ブレ補正を行いま
す。スポーツなど不規則に素早く動く被写体
を追いかけやすくなります。
フォーカスホールドボタンを使用
する
• 本製品のフォーカスホールドボタンは、一部のカメラ本
体においてお使いになれません。
カメラ本体との互換情報については専用サポートサイト
でご確認ください。
AF中にフォーカスホールドボタンを押すと、AFの駆動
を止めることができます。ピントが固定され、そのまま
のピントでシャッターを切れます。シャッターボタン
を半押しした状態で、フォーカスホールドボタンを離
すと、AFが再開します。
フォーカスレンジ(AF駆動範囲)を
切り替える
AFの駆動範囲を切り替えて、ピント合わせの時間を短
縮できます。撮影距離が一定の範囲内に限られている
場合に便利です。
フォーカスレンジ切り替えスイッチで、撮影距
離範囲を選択する。
• FULL :
距離制限はありません。全域でピント合わせ
が可能です。
• -3m :
無限遠から3.0 mの範囲でピント合わせが可
能です。
• MACRO : 下記の範囲でピント合わせが可能です。*
1
0.8 mから最短撮影距離まで
1.1 mから最短撮影距離まで*
2
1.6 mから最短撮影距離まで*
3
*
1
一部のカメラ本体においてはFULLと同じ撮影距離範囲
となります。カメラ本体との互換情報については専用
サポートサイトでご確認ください。
*
2
テレコンバーターSEL14TC(別売)装着時
*
3
テレコンバーターSEL20TC(別売)装着時
マクロ撮影について
撮影倍率
撮影倍率が高くなるとカメラぶれが目立ちやすくなり
ますので、撮影時は三脚等でカメラをしっかり固定し
てください。
市販の露出計、マニュアルフラッシュ撮影の
ご注意
近距離撮影でレンズの明るさが暗くなります。
カメラのAUTOモードなどの自動露出撮影やメーター
ドマニュアル撮影の場合は露出が自動補正されますの
で、そのまま撮影できます。
市販の露出計を使用する場合や、一部のフラッシュに
搭載されているマニュアルフラッシュ撮影機能を使っ
て撮影する場合は、指示値に対して露出補正量表
を
参考に露出を増やしてください。
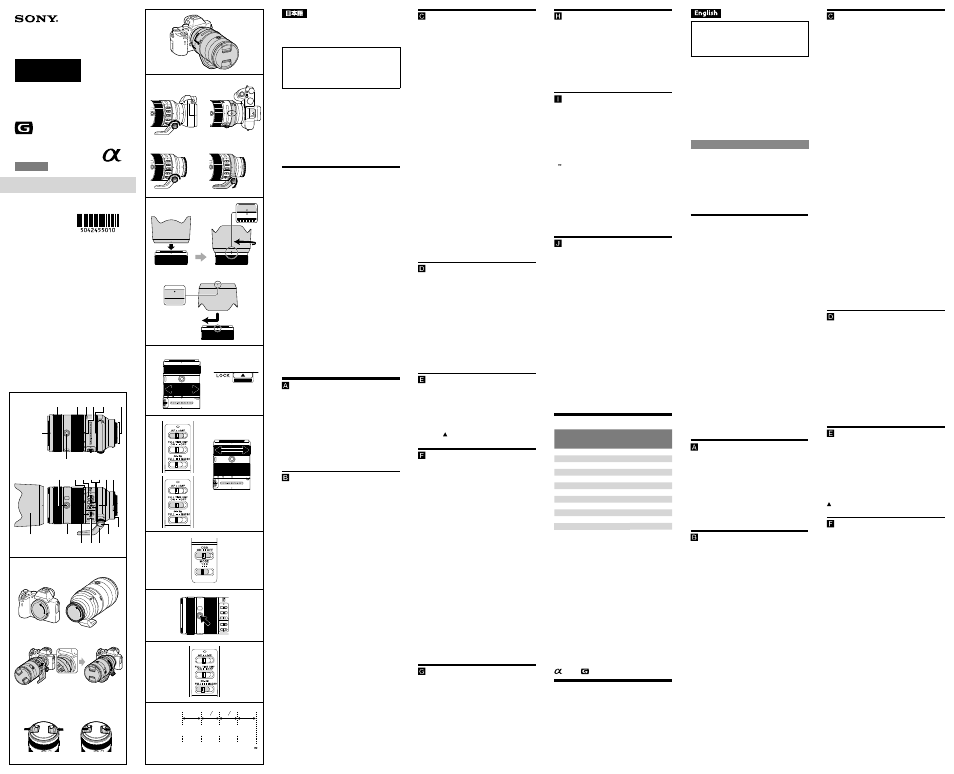
露出補正量表について(イラスト
参照)
a
露出補正段数
b
撮影倍率
c
撮影距離
• 撮影倍率と撮影距離の関係は目安です。
• フォーカスエリアの中に距離の異なるものが混ざってい
る場合、オートフォーカスでピントが合いにくいことが
あります。カメラの取扱説明書をご覧いただき、最適な
フォーカスモードを選んでください。
主な仕様
商品名
(型名)
FE 70-200mm
F4 Macro G OSS
Ⅱ
(SEL70200G2)
焦点距離(mm)
70-200
焦点距離イメージ*
1
(mm)
105-300
レンズ群一枚
13-19
画角1*
2
34°-12°30’
画角2*
2
23°-8°
最短撮影距離*
3
(m)
0.26-0.42
最大撮影倍率(倍)
0.5
最小絞り
F22
フィルター径(mm)
72
外形寸法(最大径×長さ)
(約:mm)
82.2 × 149.0
質量(約:g)
(三脚座別)
794
手ブレ補正機能
あり
テレコンバーター(別売)との互換情報、装着時の主な
仕様については専用サポートサイトでご確認ください。
*
1
撮像素子がAPS-Cサイズ相当のレンズ交換式デジタル
カメラ装着時の35mm判換算値を表します。
*
2
画角1は35mm判カメラ、画角2はAPS-Cサイズ相当の撮
像素子を搭載したレンズ交換式デジタルカメラでの値
を表します。
*
3
最短撮影距離とは、撮像素子面から被写体までの距離を
表します。
• レンズの機構によっては、撮影距離の変化に伴って焦点
距離が変化する場合があります。記載の焦点距離は撮影
距離が無限遠での定義です。
同梱物(()内の数字は個数)
レンズ(1)、レンズフロントキャップ(1)、
レンズリヤキャップ(1)、三脚座(1)、レンズフード(1)、
印刷物一式
仕様および外観は、改良のため予告なく変更すること
がありますが、ご了承ください。
および
はソニーグループ株式会社の商標です。
ライセンスに関するご注意
本製品には、弊社がその著作権者とのライセンス契約
に基づき使用しているソフトウェアが搭載されており
ます。当該ソフトウェアの著作権者様の要求に基づき、
弊社はこれらの内容をお客様に通知する義務がありま
す。本製品で使用しているソフトウェアについては、以
下のサイトをご覧ください。
This instruction manual explains how to use
lenses. Precautions common to all lenses such
as notes on use are found in the separate
“Precautions before using”. Be sure to read both
documents before using your lens.
This lens is designed for Sony α camera system
E-mount cameras. You cannot use it on A-mount
cameras.
The lens is compatible with the range of a 35mm
format image sensor.
A camera equipped with a 35mm format image
sensor can also be set to shoot at APS-C size.
For details on how to set your camera, refer to its
instruction manual.
For further information on compatibility, visit the
web site of Sony in your area, or consult your dealer
of Sony or local authorized service facility of Sony.
For Customers in the U.S.A.
For question regarding your product or for the Sony
Service Center nearest you,
call 1-800-222-SONY (7669).
Supplier’s Declaration of Conformity
Trade Name : SONY
Model : SEL70200G2
Responsible Party : Sony Electronics Inc.
Address : 16535 Via Esprillo, San Diego, CA 92127
U.S.A.
Telephone Number : 858-942-2230
Notes on Use
• Do not leave the lens exposed to the sun or a bright
light source. Internal malfunction of the camera
body and lens, smoke, or a fire may result due to the
effect of light focusing. If circumstances necessitate
leaving the lens in sunlight, be sure to attach the lens
caps. When shooting against the sun, keep the sun
completely out of the angle of view.
• This lens is not water-proof, although designed with
dust-proofness and splash-proofness in mind. If using
in the rain etc., keep water drops away from the lens.
• If the lens alone is shaken or if a camera with the lens
attached is shaken while the camera is turned off,
an internal component of the lens may rattle. This,
however, does not indicate a malfunction.
In addition, while you carry around the lens, your
movement may cause the internal lens groups to
shake. This, however, does not affect the performance
of the lens groups.
• Do not hold the lens by its extended part.
• When carrying a camera with the lens attached,
always firmly hold both the camera and the lens.
• Using this unit with products from other
manufacturers may affect its performance, leading to
accidents or malfunction.
Precautions on using a flash
• With certain combinations of lens and flash, the lens
may partially block the light of the flash, resulting in
a shadow at the bottom of the picture. In such a case,
adjust the focal length or the shooting distance before
shooting.
Vignetting
• When using the lens, the corners of the screen
become darker than the center. To reduce this
phenomena (called vignetting), close the aperture by
1 to 2 stops.
Identifying the Parts
1 Lens hood index 2 Focusing ring 3 Zooming ring
4 Zoom lock switch 5 Focal-length index (gray)
6 Collar index (gray) 7 Lens contacts*
8 Focus hold button 9 Focal-length scale
10 Focus mode switch
11 Full-time direct manual focus switch
12 Focus-range limiter 13 Collar index (gray)
14 Mounting index 15 SteadyShot switch
16 SteadyShot mode switch
17 Tripod-mounting collar 18 Collar-locking knob
19 Lens mount rubber ring 20 Lens hood
*
Do not touch the lens contacts.
Attaching and Detaching the
Lens
• Before attaching/detaching the lens, hold the lens
by its mounting body. Do not hold it by any of its
operation controls, such as the focusing ring.
To attach the lens
(See illustration
–
.)
1
Remove the rear lens cap and the camera
body cap.
2
Align the white index on the lens barrel
with the white index on the camera
(mounting index), then insert the lens
into the camera mount and rotate it
clockwise until it locks.
• Do not press the lens release button on the
camera when mounting the lens.
• Do not mount the lens at an angle.
3
Remove the front lens cap.
• You can attach/detach the front lens cap in two
ways, (1) and (2).
To remove the lens
1
Attach the front lens cap.
2
While holding down the lens release
button on the camera, rotate the lens
counterclockwise until it stops, then
detach the lens. (See illustration
–
.)
Using the Tripod
When using a tripod, attach it to the tripod-
mounting collar of the lens, not to the tripod
receptacle of the camera.
To change vertical/horizontal
position
Loosen the collar-locking knob on the tripod-
mounting collar (1) and rotate the camera either
direction. The camera can be quickly switched
between vertical and horizontal positions while
maintaining stability when using a tripod.
• Gray indexes (collar indexes) are located at 90°
intervals on the collar. Align a gray index on the
tripod-mounting collar with the gray index (collar
index) on the lens to adjust the camera position
precisely (2).
• Tighten the collar-locking knob firmly after the camera
position is set.
• The collar may hit the camera body or accessory when
rotated, depending on the camera or accessory model.
For more information on compatibility with cameras
and accessories, visit the web site of Sony in your
area, or consult your dealer of Sony or local authorized
service facility of Sony.
To detach the tripod-mounting collar
from the lens
The tripod-mounting collar can be detached from
the lens when not using a tripod.
1
Remove the lens from the camera.
• See “
Attaching and Detaching the Lens” for
details.
2
Rotate the collar-locking knob
counterclockwise to loosen it (3).
3
Pull the collar-locking knob down (4), and
open the collar.
• Hold the lens and the collar firmly when opening
the collar.
• Handling the collar while holding its hinge may
cause your hand to get caught by the hinge.
When you handle the collar, be sure to keep your
hand away from the hinge.
• If you open the collar without removing the lens
from the camera, the collar may hit the camera
body or accessory. We recommend you remove
the lens from the camera before detaching the
collar.
Attaching the Lens Hood
It is recommended that you use a lens hood to
reduce flare and ensure maximum image quality.
Align the red line on the lens hood with the
red line on the lens (lens hood index), then
insert the lens hood into the lens mount and
rotate it clockwise until it clicks into place
and the red dot on the lens hood is aligned
with the red line on the lens.
• If the lens hood is not rotated until it clicks into
place, there is a possibility that a shadow appears on
captured images or the lens hood falls off.
• If the flash light is partially blocked by the lens hood,
a shadow may appear at the bottom of captured
images. In such a case, remove the lens hood.
• When storing, fit the lens hood onto the lens
backwards.
Zooming
Rotate the zooming ring to extend the
lens to the desired focal length (zooming
position) within the focal-length scale range.
Zoom lock switch
This prevents the lens barrel from extending due to
the weight of the lens while it is being carried.
Before setting the zoom lock switch, return the lens
to the wide end position.
Slide the zoom lock switch in the direction of the
mark to lock the zoom. To unlock the zoom, slide
the zoom lock switch back.
Focusing
• The focus mode switch of this lens does not function
with some camera models.
For further information on compatibility, visit the web
site of Sony in your area, or consult your dealer of
Sony or local authorized service facility of Sony.
To switch AF (auto focus)/MF
(manual focus)
The focus mode can be switched between AF and
MF on the lens.
For AF photography, both the camera and lens
should be set to AF. For MF photography, either or
both the camera or lens should be set to MF.
To set the focus mode on the lens
Slide the focus mode switch to the
appropriate mode, AF or MF (1).
• Refer to the camera manuals to set the focus mode of
the camera.
• In MF, turn the focusing ring to adjust the focus (2)
while looking through the viewfinder, etc.
• With the full-time direct manual focus switch slid to
ON, the focus mode automatically switches to MF
when the focusing ring is rotated, regardless of the AF
mode setting and the focus adjustment (3).
To use a camera equipped with an AF/MF
button
• By pressing the AF/MF button during AF operation,
you can temporarily switch to MF.
• Pressing the AF/MF button during MF operation lets
you temporarily switch to AF if the lens is set to AF
and the camera to MF.
(Continued on the back side)