Sony VPL-GTZ380 10,000-Lumen 4K DCI-P3 Laser SXRD Projector (No Lens) User Manual
Page 2
a
b
0.50
X
(1:2.0)
0.33
X
(1:3.0)
0.19
X
(1:5.3)
0.06
X
(1:16.8)
0
0.26
WIDE
0.33
0.49
1.3
0.42
TELE
0.61
1.1
3.3
m
c
+
2
3
+
1
3
+1
–1
(1)
(2)
–2
–3
(1)
(3)
(1)
(4)
(2)
(2)
(1)
(3)
(2)
1
2
3 4 5 6
7
8
8
9 10 11 12 1314
8
18
19
20
15 16 17
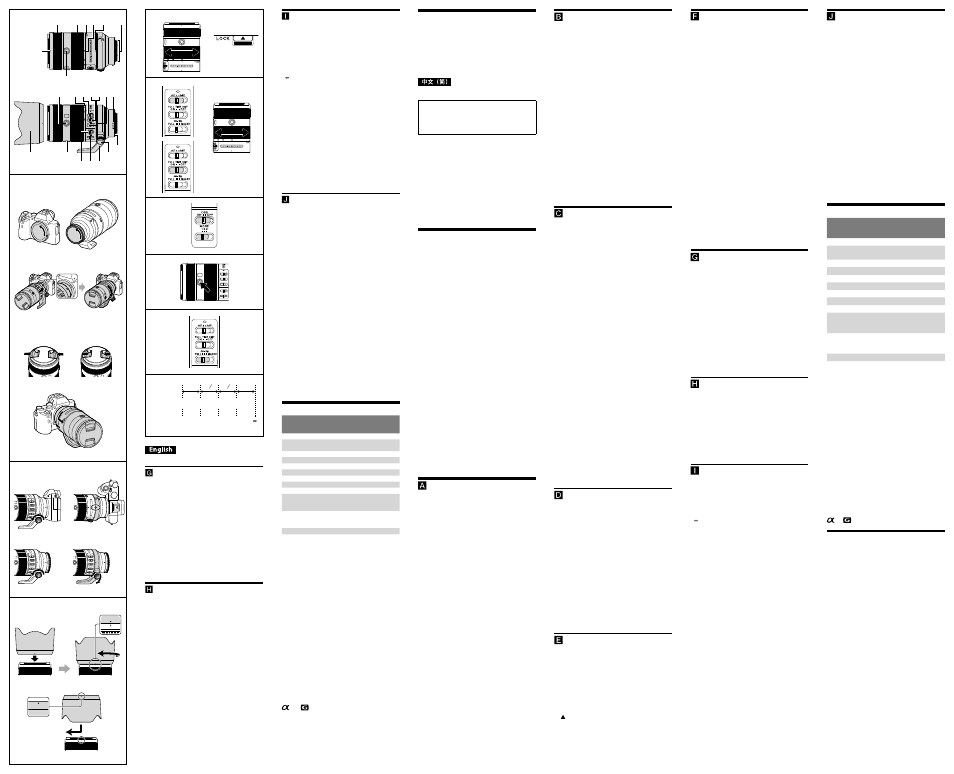
(Continued from the front side)
Using SteadyShot
SteadyShot switch
• ON: Compensate for camera shake.
• OFF: Does not compensate for camera shake. We
recommend setting the SteadyShot switch to
OFF when shooting with a tripod.
SteadyShot mode switch
Set the SteadyShot switch to ON, and set the
SteadyShot mode switch.
• MODE1: Compensate for normal camera shake.
• MODE2: Compensate for camera shake when panning
moving subjects.
• MODE3: Compensate for camera shake to minimize
framing disturbances. This helps you to keep
up with fast and irregularly moving subjects
for photography, for example, in sports
games.
Using the Focus Hold Button(s)
• The focus hold button of this lens does not function
with some camera models.
For further information on compatibility, visit the web
site of Sony in your area, or consult your dealer of
Sony or local authorized service facility of Sony.
Press the focus hold button in AF to cancel AF. The
focus is fixed and you can release the shutter on
the fixed focus. Release the focus hold button while
pressing the shutter button halfway to start AF
again.
Switching Focus Range
(AF range)
The focus-range limiter enables you to reduce the
AF time. This is useful when the subject distance is
definite.
Slide the focus-range limiter to select the
focus range.
• FULL:
You can adjust the focus from the minimum
focusing distance to infinity.
• - 3m: You can adjust the focus from 3.0 m
(9.85 feet) to infinity.
• MACRO: You can adjust the focus within the following
range.*
1
From 0.8 m (2.63 feet) to the minimum focus
length
From 1.1 m (3.61 feet) to the minimum focus
length*
2
From 1.6 m (5.25 feet) to the minimum focus
length*
3
*
1
Depending on the camera model, AF may be set to
the same focus range as when setting the focus-
range limiter to FULL. For further information on
compatibility, visit the web site of Sony in your area,
or consult your dealer of Sony or local authorized
service facility of Sony.
*
2
When the SEL14TC teleconverter (sold separately) is
attached
*
3
When the SEL20TC teleconverter (sold separately) is
attached
Macro Photography
Magnification ratios
As the magnification increases, the camera is more
vulnerable to shaking. Use a tripod to steady the
camera when shooting.
Precautions on using a commercially
available exposure meter or manual
flash shooting function
When shooting close to a subject, the brightness of
the lens is reduced.
When shooting in automatic exposure mode or
metered manual mode (for example, the camera’s
AUTO mode), the exposure is adjusted automatically.
When using a commercially available exposure
meter or shooting with the manual flash function
available on some external flash units, refer to the
exposure compensation table
and increase the
exposure with respect to the indicated value.
Exposure compensation table
(See illustration
.)
a
Exposure correction
b
Magnification ratios
c
Distance
• The relationship between magnification and distance
shown in the table is a rough guide.
• When two or more subjects at different distances
are overlapping in the AF area, it may be hard for the
camera to focus automatically. If this happens, refer to
the instruction manual of the camera and select the
proper focus mode.
Specifications
Product name (Model name)
FE 70-200mm
F4 Macro G OSS
Ⅱ
(SEL70200G2)
Focal length (mm)
70-200
35mm equivalent
focal length*
1
(mm)
105-300
Lens groups-elements
13-19
Angle of view 1*
2
34°-12°30’
Angle of view 2*
2
23°-8°
Minimum focus*
3
(m (feet))
0.26-0.42 (0.86-1.38)
Maximum magnification (X)
0.5
Minimum aperture
f/22
Filter diameter (mm)
72
Dimensions
(maximum diameter × height)
(approx., mm (in.))
82.2 Ч 149.0
(3 1/4 Ч 5 7/8)
Mass (approx., g (oz.))
(excluding tripod-mounting
collar)
794 (28.1)
SteadyShot
Yes
For further information on compatibility with the
teleconverter (sold separately) and specifications
used with the teleconverter, visit the web site of
Sony in your area, or consult your dealer of Sony or
local authorized service facility of Sony.
*
1
This is the equivalent focal length in 35mm format
when mounted on an Interchangeable Lens Digital
Camera equipped with an APS-C sized image sensor.
*
2
Angle of view 1 is the value for 35mm cameras, and
angle of view 2 is the value for Interchangeable Lens
Digital Cameras equipped with an APS-C sized image
sensor.
*
3
Minimum focus is the distance from the image
sensor to the subject.
• Depending on the lens mechanism, the focal length
may change with any change in shooting distance.
The focal lengths given above assume the lens is
focused at infinity.
Included items
(The number in parentheses indicates the number
of pieces.)
Lens (1), Front lens cap (1), Rear lens cap (1),
Tripod-mounting collar (1), Lens hood (1),
Set of printed documentation
Design and specifications are subject to change
without notice.
and
are trademarks of
Sony Group Corporation.
Notes on the License
This product comes with software that is used
based on licensing agreements with the owners
of that software. Based on requests by the owners
of copyright of these software applications, we
have an obligation to inform you of contents of the
agreement. For the software used on this product,
visit the website at:
保留备用
本说明书介绍镜头的用法。有关所有镜头
的一般注意事项(如使用须知)可以在另
外的“使用前注意事项”中找到。务必在使
用镜头前阅读以上两份文件。
本镜头是专为 Sony α 相机中的 E 卡口系统相
机而设计的。不能将其用于 A 卡口系统相机。
本镜头与 35mm 规格的图像传感器系列兼
容。
配备 35mm 规格图像传感器的相机可设定为
以 APS-C 尺寸进行拍摄。
有关如何设定相机的详情,请参阅相机的使用
说明书。
有关兼容性的详细信息,请访问所在地区的
Sony 网站,或者咨询您的 Sony 经销商或当地
的 Sony 授权服务机构。
使用须知
•
请勿将镜头置于阳光或强光下,由于光线
聚集的结果可能会导致相机机身和镜头的内
部故障,或引起冒烟或者火灾。如果在必须
将镜头置于阳光的情况下,请务必盖上镜头
盖。对着阳光方向拍摄时,不要让太阳进入
视角中。
•
尽管本镜头采用了防尘和防溅水设计,但不
具备防水性能。在雨中等环境下使用时,应
确保镜头远离水滴。
•
如果是镜头本身晃动,或者是装有镜头的相
机在关闭电源时发生晃动,镜头的内部组件
都可能会发出嘎嘎声。但是,这并不表示故
障。
此外,在携带镜头时,身体的移动可能会导
致内部镜头组晃动。但是,这不会影响到镜
头组的性能。
•
切勿抓握镜头的延伸部分。
•
当在装有镜头的情况下携带相机时,请务必
同时握紧相机和镜头。
•
将本机与其他制造商的产品一起使用可能会
影响其性能,并由此引发事故或故障。
闪光灯使用注意事项
•
使用镜头/闪光灯的某种组合时,镜头可能会
遮住闪光灯的部分亮光,从而造成图片的底
部出现阴影。在这种情况下,请在拍摄之前
调整焦距或拍摄距离。
晕影
•
使用镜头时,屏幕的角落要比其中心暗。为
避免这种现象(周边暗角),请将光圈缩小
1 ~ 2 级。
部件识别
1 镜头遮光罩标记 2 对焦环 3 可变焦距圈
4 变焦锁定开关 5 焦距标记(灰色)
6 套环标记(灰色) 7 镜头接点
*
8 对焦锁定按钮 9 焦距刻度
10 对焦模式开关 11 全时直接手动对焦开关
12 对焦范围限制器 13 套环标记(灰色)
14 安装标记 15 SteadyShot 开关
16 SteadyShot 模式开关 17 三脚架安装套环
18 套环锁定旋钮 19 镜头安装橡胶环
20 镜头遮光罩
*
请勿触摸镜头接点。
安装/拆下镜头
•
在安装/拆下镜头之前,请握住镜头的安装
主体部分。切勿抓握任何操作控制器,如对
焦环。
安装镜头(参见插图
–
。)
1
拆下镜头后盖和相机机身盖。
2
将镜筒上的白色标记与相机上的白
色标记(安装标记)对准,然后将
镜头插入相机安装部位并顺时针旋
转,直至镜头锁紧。
•
请勿在安装镜头时按相机上的镜头释放
按钮。
•
请勿倾斜安装镜头。
3
拆下镜头盖。
•
可以用 (1) 和 (2) 两种方式安装/拆下前镜
头盖。
拆下镜头
1
安装镜头盖。
2
按住相机上的镜头释放按钮,逆时
针转动镜头直至其停止,然后拆下
镜头。(参见插图
–
。)
使用三脚架
使用三脚架时,将其安装到镜头的三脚架安装
套环上,而非相机的三脚架插孔中。
改变垂直/水平位置
松开三脚架安装套环上的套环锁定旋钮 (1),
沿水平/垂直方向旋转相机。使用三脚架时,
相机可以在保证稳定性的同时快速在垂直和水
平位置切换。
•
灰色标记(套环标记)在套环上以 90°为间
隔。将三脚架安装套环上的灰色标记与镜头
上的灰色标记(套环标记)对准,以精确调
整相机位置 (2)。
•
在设定相机位置后,拧紧套环锁定旋钮。
•
取决于相机或配件的型号,套环在旋转时
可能会撞击相机机身或配件。有关与相机及
配件兼容性的详细信息,请访问所在地区的
Sony 网站,或者咨询您的 Sony 经销商或当
地的 Sony 授权服务机构。
从镜头上拆下三脚架安装套环
不使用三脚架时,可从镜头上拆下三脚架安
装套环。
1
从相机拆下镜头。
•
详见“
安装/拆下镜头”。
2
逆时针旋转套环锁定旋钮,将其松
开 (3)。
3
下拉套环锁定旋钮 (4),打开套环。
•
打开套环时,应牢牢握住镜头及套环。
•
在握住套环转轴部分的同时操作套环,
可能会导致手被转轴部分卡住。操作套
环时,务必让手远离转轴部分。
•
如果打开套环时未将镜头从相机上卸
下,套环可能会撞到相机机身或配件。
建议您在拆卸套环前先将镜头从相机上
卸下。
安装镜头遮光罩
建议使用镜头遮光罩以减少反光,从而确保最
佳画质。
将镜头遮光罩上的红线与镜头上的红线
(镜头遮光罩标记)对准,然后将镜头
遮光罩插入镜头安装部位并顺时针旋
转,直至其咔哒一声就位,且镜头遮光
罩上的红点与镜头上的红线(镜头遮光
罩标记)对准。
•
如果镜头遮光罩没有旋转到直至其咔哒一声
就位,则拍摄的影像上可能会出现阴影,或
者镜头遮光罩可能会脱落。
•
如果闪光灯的亮光被镜头遮光罩部分遮住,
则所拍摄影像的底部可能会出现阴影。在这
种情况下,请取下镜头遮光罩。
•
存放时,请将镜头遮光罩倒过来放在镜头
上。
变焦
旋转可变焦距圈,将镜头展开至焦距刻
度范围以内的目标焦距位置(变焦位
置)。
变焦锁定开关
携带镜头时,此开关可防止因镜头自重而导致
镜筒伸长。
在设定变焦锁定开关之前,请将镜头复位到广
角端位置。
沿
标记的方向滑动变焦锁定开关即可锁定
变焦。如需解锁变焦,请将变焦锁定开关向
回滑动。
对焦
•
对于某些型号的相机而言,本镜头的对焦模
式开关无效。
有关兼容性的详细信息,请访问所在地区的
Sony 网站,或者咨询您的 Sony 经销商或当
地的 Sony 授权服务机构。
切换 AF(自动对焦)/MF(手动对焦)
在镜头上,可以在 AF 和 MF 之间切换对焦模
式。
进行 AF 拍摄时,相机和镜头均应设定为 AF。
进行 MF 拍摄时,相机或镜头之一或者相机和
镜头两者应设定为 MF。
在镜头上设定对焦模式
将对焦模式开关滑到相应模式:AF 或
MF (1)。
•
有关相机的对焦模式设定,请参阅相机的说
明书。
•
在 MF 模式下,在通过取景器等观察的同
时,转动对焦环调整对焦 (2)。
•
在全时直接手动对焦开关滑到ON位置的情
况下,无论AF模式设置和对焦调整值如何,
当旋转对焦环时,对焦模式都会自动切换到
MF (3)。
使用具有 AF/MF 按钮的相机
•
在 AF 操作过程中按 AF/MF 按钮,可临时切
换为 MF。
•
如果镜头设定为 AF 而相机设定为 MF,则
在 MF 操作过程中按 AF/MF 按钮可临时切换
为 AF。
使用 SteadyShot
SteadyShot 开关
•
ON: 补偿相机震动。
•
OFF: 不补偿相机震动。使用三脚架拍摄时,
建议将 SteadyShot 开关设为 OFF。
SteadyShot 模式开关
将 SteadyShot 开关设为 ON,同时设置
SteadyShot 模式开关。
•
MODE1:补偿常规相机震动。
•
MODE2:补偿摇摄移动对象时的相机震动。
•
MODE3:对相机震动进行补偿,从而最大程
度减小画面扰动。这样可以帮助您
跟上体育运动中(举例而言)快
速、不规则移动的拍摄主体。
使用对焦锁定按钮
•
对于某些型号的相机而言,本镜头的对焦锁
定按钮无效。
有关兼容性的详细信息,请访问所在地区的
Sony 网站,或者咨询您的 Sony 经销商或当
地的 Sony 授权服务机构。
在 AF 模式下按对焦锁定按钮可取消 AF。 此时
将锁定对焦,而您可以在对焦锁定状态下释放
快门。 在半按快门按钮的同时释放对焦锁定
按钮将重新启动 AF。
切换对焦范围(AF 范围)
对焦范围限制器可以减少 AF 的时间。 适合拍
摄距离确定的主体。
滑动对焦范围限制器选择对焦范围。
•
FULL:
可在最短对焦距离到无限远之间调
整对焦。
•
- 3m: 可在 3.0 m 到无限远之间调整对焦。
•
MACRO: 可在下列范围内调整对焦。
*
1
0.8 m到最小对焦距离之间
1.1 m到最小对焦距离之间
*
2
1.6 m到最小对焦距离之间
*
3
*
1
取决于相机型号,AF 可能会被设定为与对
焦范围限制开关设为 FULL 时相同的对焦范
围。 有关兼容性的详细信息,请访问所在地
区的 Sony 网站,或者咨询您的 Sony 经销商
或当地的 Sony 授权服务机构。
*
2
安装 SEL14TC 增距镜(另售)的情况下
*
3
安装 SEL20TC 增距镜(另售)的情况下
微距拍摄
放大倍率
当放大倍率增大时,相机更容易受到震动的
影响。 拍摄时,请使用三脚架让相机保持稳
定。
市售曝光表或手动闪光拍摄功能的使
用注意事项
拍摄近景对象时,镜头的亮度会降低。
以自动曝光模式或手动计量模式(例如相机的
AUTO 模式)拍摄时,曝光会自动进行调整。
使用市售的曝光表或利用某些外部闪光灯部件
上的手动闪光功能进行拍摄时,请参阅曝光补
偿值表
并相对于指示值提高曝光值。
曝光补偿值表(参见插图
。)
a
曝光校正
b
放大倍率
c
距离
•
表中所示的放大倍率与距离之间的关系仅为
粗略指示。
•
当有两个或两个以上位于不同距离的拍摄对
象在 AF 区域重叠时,相机可能很难自动对
焦。在这种情况下,请参阅相机的使用说明
书并选择正确的对焦模式。
规格
产品名称
(型号名称)
FE 70-200mm
F4 Macro G OSS
Ⅱ
(SEL70200G2)
焦距 (mm)
70-200
相当于 35mm 规格
焦距
*
1
(mm)
105-300
镜头组-片
13-19
视角 1
*
2
34°-12°30’
视角 2
*
2
23°-8°
最小对焦
*
3
(m)
0.26-0.42
最大放大倍数 (倍)
0.5
最小光圈
F22
滤光镜直径 (mm)
72
尺寸
(最大直径×长)
(近似值 mm)
82.2 × 149.0
质量(近似值 g)
(不包括三脚架安
装套环)
794
SteadyShot
有
有关与增距镜(另售)的兼容性以及增距镜
规格的详细信息,请访问所在地区的 Sony 网
站,或者咨询您的 Sony 经销商或当地的 Sony
授权服务机构。
*
1
此为当镜头安装在配备 APS-C 尺寸图像传
感器的可更换镜头数码相机上时,相当于
35mm 规格的焦距。
*
2
视角 1 的值针对 35mm 相机,而视角 2 的值
针对配备 APS-C 尺寸图像传感器的可更换镜
头数码相机。
*
3
最小对焦是从图像传感器至物体的距离。
•
视镜头结构而异,焦距可能会随拍摄距离的
改变而变化。假设镜头对焦在无限远处。
所含物品
(括号中的数字代表件数。)
镜头 (1)、镜头盖 (1)、镜头后盖 (1)、
三脚架安装套环 (1)、镜头遮光罩 (1)、
成套印刷文件
设计或规格如有变动,恕不另行通知。
和
是 Sony Group Corporation 的商标。
有关许可的注意事项
本产品随附有根据与软件所有者签订的许可协
议而使用的软件。应这些软件应用程序版权所
有者的要求,我们有义务将协议内容告知您。
有关本产品上使用的软件,请访问以下网站: