Applications/joint maker, Setting the router bit depth of cut for box joints, Centering the router bit on your workpiece – INCRA Ultra Lite User Manual
Page 4
6
Joint making represents one of the most exciting applications for
your new Incra Jig Ultra Lite. Just by applying a little technique to
the accuracy of your Incra Jig, you’ll soon be able to add joinery for
box and drawer making to your list of shop skills. The two templates
included with the basic set will allow you to produce equally spaced
3
⁄
8
" box joints and equally spaced
1
⁄
2
" half blind dovetails.
There are three important operations that must take place each
time you use your Incra Jig for joint making at the router table:
1. Setting the router bit depth of cut
2. Centering the bit on your workpiece and installing
the template
3. Cutting the joint
We’ll begin with a look at the first two operations. These are
simple setup procedures with which you will want to become
familiar. They will be used every time you prepare to cut a joint at
your router table. Beginning on page 10, we will apply these two
setup operations in a step-by-step description for cutting box joints
and half blind dovetails.
Setting the Router Bit Depth of
Cut for Box Joints
After installing the appropriate diameter straight bit for the template
pattern you have selected, (a
3
⁄
8
" straight bit is required for the
Box1 template included with your Ultra Lite System) simply raise or
lower the bit in your router table to set the depth of cut at slightly
greater than the thickness of the stock you will be cutting. See
Fig. 12. Just remember, router bit manufacturers suggest that you
not cut any deeper than the diameter of the bit in any single pass.
APPLICATIONS/JOINT MAKER
FIG. 12
Depth of cut for box joints
For even more variety,
including through and
double dovetail
techniques, the optional
Incra Master Reference
Guide and Template
Library
contains a large
selection of new joinery
templates. For pricing
and ordering information,
see page 16.
FIG. 13
Set approximate depth of cut
Setting the Router Bit Depth of Cut
for Dovetail Joints
As with any half blind dovetail jig, the depth of cut of your
dovetail bit will determine how well the finished joint fits. Just a
little practice using the following steps will ensure that your
dovetail joints will always have a perfect fit.
Set the approximate depth of cut
Install the dovetail bit that corresponds to the template you
are using. (A
1
⁄
2
", 14° dovetail bit is required for the DOV1
template included with your Ultra Lite System.) Raise or lower
the bit to the approximate depth of cut listed under the diagram of
your template pattern. (
1
⁄
4
" for the DOV1 template, see diagram
on page 11.) Position your fence as shown in Fig. 13 so that
about half of the bit is inside the fence notch. Now slide the
1
⁄
32
"
scale on your Incra Jig to read 0" under the hairline cursor.
Make the test cuts
Clamp two pieces of square cut stock to your Right Angle
Fixture. You are now going to make two dovetail cuts on the
boards as shown in Fig. 14. The spacing between these two
cuts is listed under the diagram of your selected joint pattern.
For example; if you were setting the depth of cut for the DOV1
pattern included with the Ultra Lite System, the diagram shows:
Spacing to set depth of cut =
7
⁄
8
". Using the
1
⁄
32
" scale set in
Step 1, you would make a cut at the 0" setting, then move to
7
⁄
8
"
to make the second cut.
1
2
Raise or lower bit to
slightly greater than
the thickness of
your stock
Board to be joined
First: Set bit height
to recommended
approximate depth of cut
More Joinery Templates
FIG. 14
Make the test cuts
Second: Position the fence
so that about half of the bit
is inside the fence notch
Third: Slide the
1
/
32
" scale
to read 0" under the cursor
First: Clamp two
boards to Right Angle
Fixture
Second: Make
a cut at the 0"
setting
Third: Move fence
back to dimension listed
under diagram of your
joint pattern (
7
/
8
" for
DOV1 pattern) and
make second
cut
Centering the Router Bit on your
Workpiece
After setting your router bit depth of cut, you need to
position your Incra Jig and install the joinery template so
that all the cuts are made in the right places on your
wood. This is accomplished through a setup operation
called “centering”. Centering locates your Incra Jig so
that the router bit is aligned with the center of the stock
width you wish to use. Once you find the center, install
the selected template and you’ll be ready to cut a
perfect joint. The simple steps to follow should always
be used when setting up your Incra Jig for joint making.
Align board with bit
Begin by cutting a piece of
3
⁄
4
" thick stock to the
same width as the boards you wish to join later on. Mark
the center of this piece’s width on one end and place
the board face down on the router table with the center
of the board aligned with the approximate center of the
bit. See Fig. 17.
Set initial fence position
Unlock the carriage clamp and slide the fence up to
the edge of the board, then lock the carriage clamp
back in place. See Fig. 18. Make sure the center mark
on the board is still aligned with the approximate center
of the router bit.
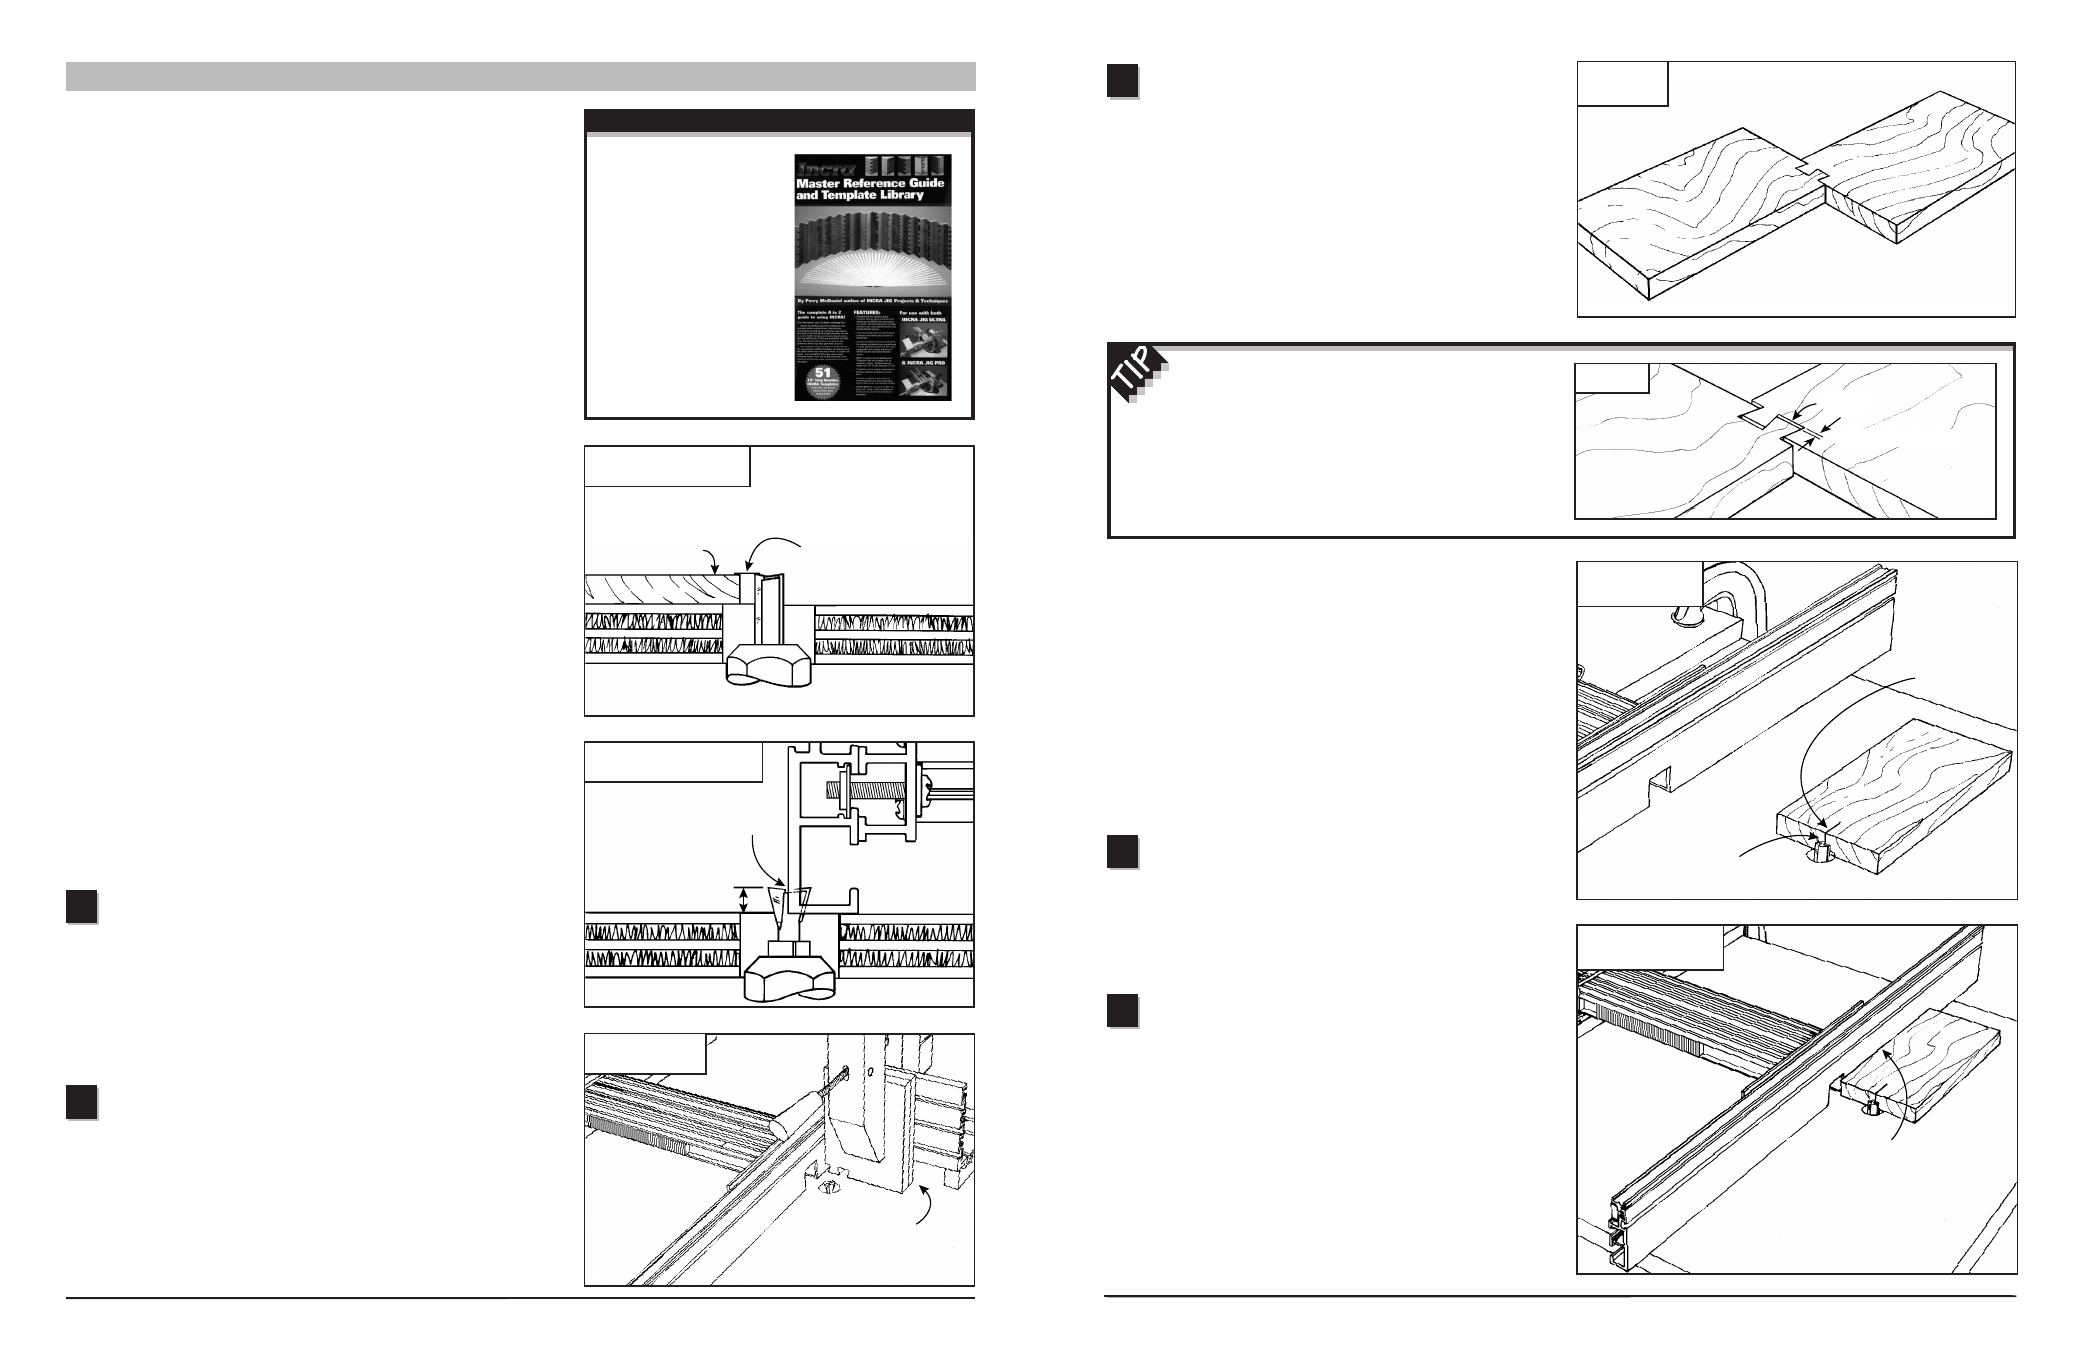
Test the fit and adjust as necessary
Unclamp the two boards and test the fit by joining
them as shown in Fig. 15. As with any half blind dovetail
jig, a little trial and error is needed to achieve a snug
fitting joint. To tighten the fit, raise the bit up slightly; to
loosen the fit, lower the bit slightly. Just remember this
phrase:
“Heighten to tighten, lower to loosen.” After
adjusting the bit height, make a new set of trial cuts on
the opposite end of the boards. After a few adjustments
and trial cuts, you’ll have a perfect fit. If you’ll mark the
properly fitting cuts on one edge of the boards, you can
save this piece to use as a depth gauge the next time
you set up this particular bit for joinery.
7
FIG. 15
Test the fit
When the fit is too loose, the trial cuts provide a
gauge to let you know how much to raise the bit. Just
join the trial pieces end to end and gently pull the boards
to wedge the dovetails together. The gap that appears is
equal to the distance you need to raise your dovetail bit to
achieve a tight fit. See Fig. 16.
FIG. 16
FIG. 17
Align board with bit
FIG. 18
Set initial fence position
2
1
3
Gap
Raise bit this much
Mark center
of board
Center of board
aligned with
approximate
center of bit
First: Unlock
carriage clamp
Second: Slide fence
up to edge of board
Third: Lock carriage
clamp back in place