45º fixed angle adapter installation instructions – TAMKO TAM-RAIL User Manual
Page 8
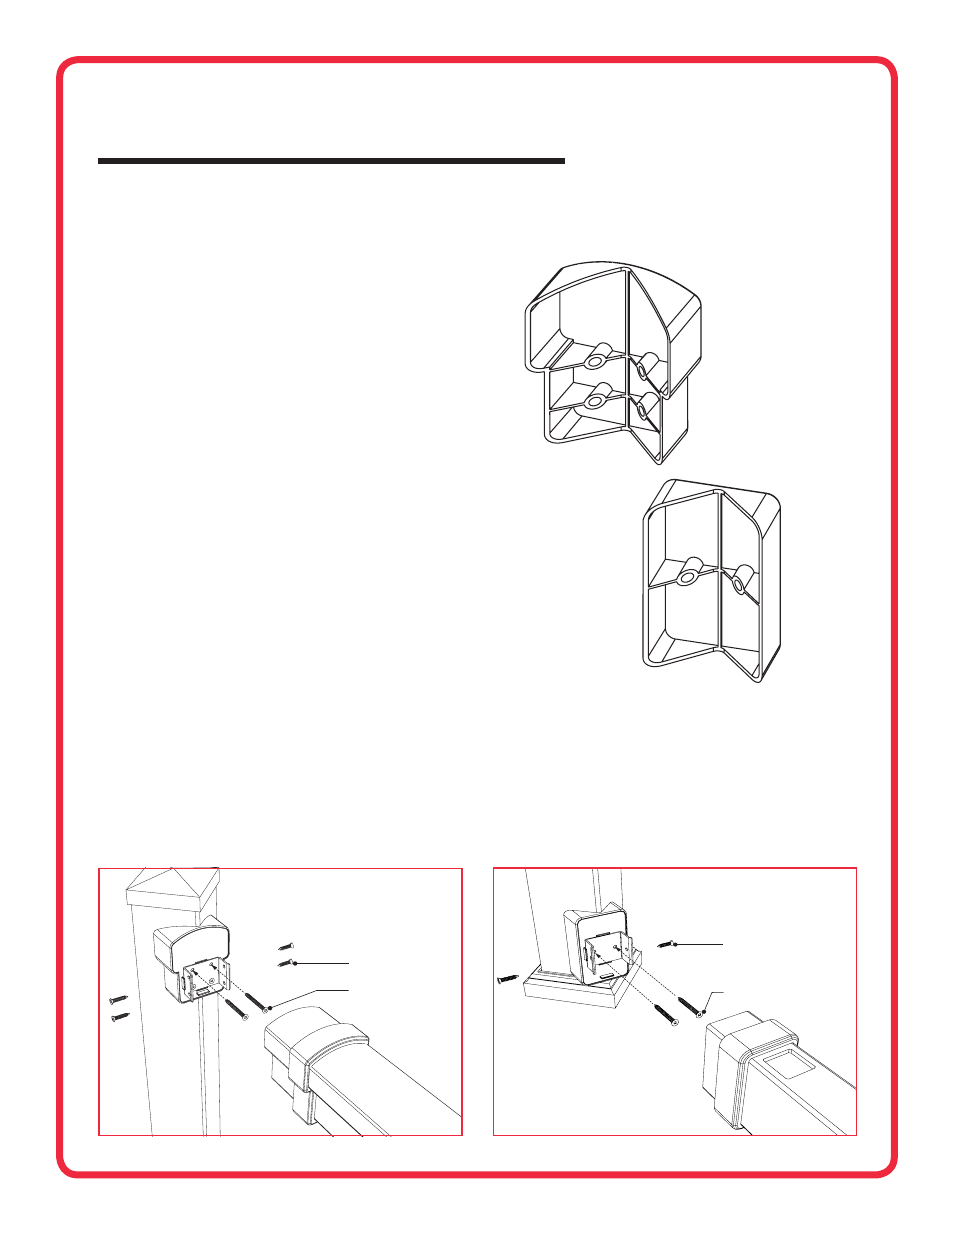
#10 X 2" SCREW
#10 X 1" SCREW
45º FIxED ANGLE ADAPTER
BOTTOM RAIL METAL BRACKET & ANGLE ADAPTER
STRAIGHT
TOP RAIL ADAPTER
STRAIGHT
BOTTOM RAIL ADAPTER
45º FIxED anglE aDaPtEr
InstallatIon InstrUCtIons
CONTINUED
ImPortant ProDUCt saFEtY anD
PrE-InstallatIon InFormatIon
The following installation instructions are provided to guide you
through the installation process of the TAM‑RAIL
®
45º Fixed Angle Adapter Kit.
TAMKO
®
Building Products, Inc. shall not be held liable for improper or unsafe
installations. Failure to follow these instructions may lead to an unsafe product
and will adversely effect coverage under the Limited Warranty.
TAMKO
recommends that all designs be reviewed by a licensed architect, engineer
or local building official before installation to ensure that they are safe and
in compliance with local building code requirements.
tools rEqUIrED For InstallatIon
Tape measure, pencil, drill, safety glasses, and hearing protection.
InstallatIon stEPs
1. Install and prepare all mounting surfaces and posts to which the TAM‑RAIL
Railing will be installed. Ensure the mounting surface is level and plumb.
TAMKO recommends using TAM‑RAIL post mount systems or wood posts
covered with our matching TAM‑RAIL post sleeve.
2. Measure and mark post 6" above the deck surface.
3. Position the bottom rail angle adapter on the post so that the top of the adapter
is 6" above the deck surface. Place the bottom rail metal bracket (marked “B”)
included in TAM‑RAIL railing kits onto the face of the bottom rail angle adapter.
Note: These installation instructions provide a 2" clearance between your
deck surface and bottom rail.
Be sure to check with your local building
code officials for any bottom rail clearance or rail height requirements.
Improper rail height and clearance could create a safety hazard.
4. Install the bottom rail metal bracket and angle adapter to the post using two of
the 2" screws provided in the TAM‑RAIL railing kits. Ensure angle adapters are
installed evenly and flush to post corners.
5. For 36" height rail systems, measure 36‑1/2" above the deck surface and mark
post. For 42" height rail systems, measure 42‑1/2" above the deck surface and
mark post.
6. Position the top rail adapter on the post so that the top of the adapter is aligned
with the mark. Place the top rail metal bracket (marked “T”) included in
TAM‑RAIL railing kits onto the face of the top rail angle adapter.
7. Install the top rail metal bracket and angle adapter to the post using
four 2" screws provided in the TAM‑RAIL railing kits.
45º FIxED anglE
aDaPtEr KIt ComPonEnts:
Top Rail Angle Adapter (1)
Bottom Rail Angle Adapter (1)
SUBSTITUTION FOR THESE
COMPONENTS IS NOT ALLOWED
AS SUBSTITUTING COMPONENTS
COULD CAUSE A SAFETY HAZARD.
accommodates 45º horizontal angle applications for attaching
tam-raIl
®
straight rail Kits to a tam-raIl Post mount system,
or wood post covered by a tam-raIl Post sleeve
#10 × 2" SCREW
#10 × 1" SCREW
45º FIxED ANGLE ADAPTER
TOP RAIL METAL BRACKET & ANGLE ADAPTER
8