Air connections (continued) – Nexen DFE-2500 964009 User Manual
Page 10
10
FORM NO. L-20021-E-0110
AIR CONNECTIONS (continued)
BRAKE
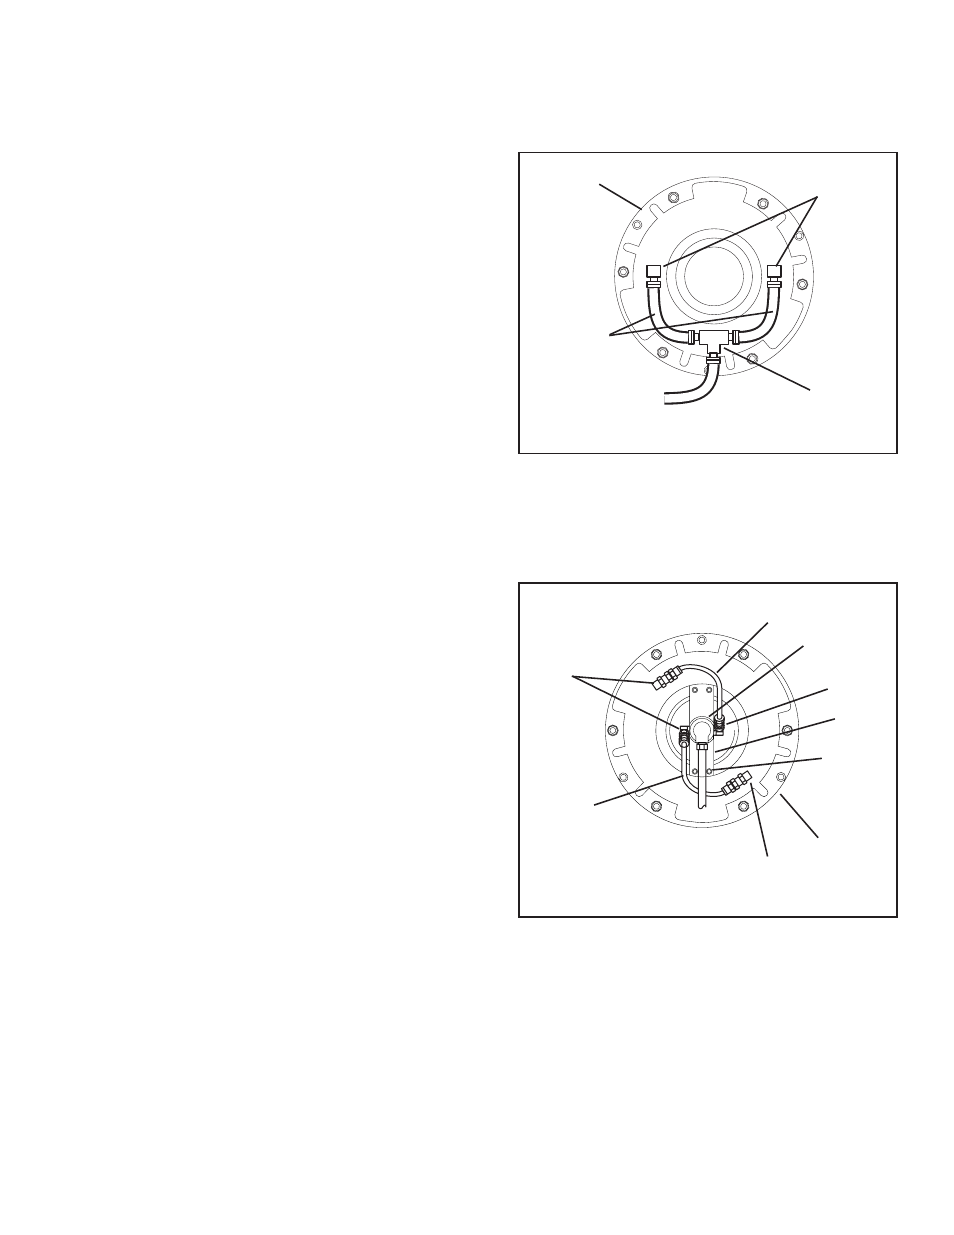
Refer to Figure 9.
1. Apply pipe sealant to the two Elbow Fittings (Item 26);
then, install two Elbow Fittings into the air inlet holes
located at 180
0
in the Cylinder (Item 5).
2. Install the two Hose Assemblies (Item 25) into a
customer supplied Tee Fitting.
3. Connect the two Hose Assemblies (Item 25) to the two
Elbow Fittings (Item 26) installed in the Cylinder (Item
5).
4. Connect an air line from the air supply directly to the
Tee Fitting.
NOTE: The Hose Assemblies must be routed as shown.
Do not use rigid pipe or tubing for air lines.
CLUTCH
Refer to Figure 10.
1. If the Rotary Air Union (Item 23) and Rotary Air Union
Bracket (Item 21) are not assembled, apply pipe sealant
to the threads of the Rotary Air Union and screw the
rotary Air Union into the Rotary air Union Bracket.
2. Apply a drop of Loctite
®
242 to the threads of the four
Socket Head Cap Screws (Item 22) provided with the
Rotary Air Union (Item 23) and the Rotary Air Union
Bracket (Item 21); then, secure the Rotary Air Union
Bracket to the Cylinder (Item 5).
3. Tighten the four Socket head Cap Screws (Item 22)
to 5.5 Ft. Lbs. [7.45 Nm] torque.
4. Apply pipe sealant to the threads of the Elbow Fittings
(Item 26); then, install the Elbow Fittings into the Rotary
Air Union (Item 23) and the Cylinder (Item 5).
5. Connect the two Hose Assemblies (Item 25) to the
four Elbow Fittings (Item 26).
6. Connect the Hose Assemblies (Item 25) to the Rotary
Air Union.
NOTE: The Hose Assemblies must be routed as
shown (See Figure 10). Do not use rigid pipe
or tubing for air lines.
FIGURE 10
26
25
23
26
21
22
5
26
25
FIGURE 9
Elbow
Fittings
(Item 26)
Tee
Fitting
Hose
Assembly
(Item 25)
Cylinder
(Item 5)
- QFE-1650 964064 QFE-1650 964046 DFE-1150 964000 DFE-1150 964178 DFE-1150 964043 DFE-1150 964255 DFE-1150 964179 QFE-2200 964066 DFE-2500 964010 DFE-2500 964049 DFE-1150 964001 DFE-1150 964002 DFE-1150 964005 QFE-2200 964067 QFE-2200 964058 QFE-2500 964069 QFE-1150 964060 QFE-1150 964093 QFE-2500 964070 QFE-2500 964047 QFE-1150 964061 QFE-1150 964041 QFE-1150 964062 DFE-1650 964003 DFE-1650 964050 DFE-1650 964203 DFE-1650 964057 DFE-1650 964042 DFE-1650 964048 DFE-1650 964304 DFE-1650 964004 DFE-1650 964024 DFE-1650 964056 DFE-1650 964044 DFE-1650 964027 DFE-2200 964006 QFE-1650 964063 DFE-2200 964007 DFE-1150 964016 DFE-1650 964019 DFE-2200 964022 DFE-2500 964025 QFE-1150 964088 QFE-1650 964091 QFE-2200 964094 QFE-2500 964097