CRU Forensic RTX User Manual
Page 2
WiebeTech
Forensic RTX411-QJ User Manual (A9-411-0001 REV 1.0)
- 2 -
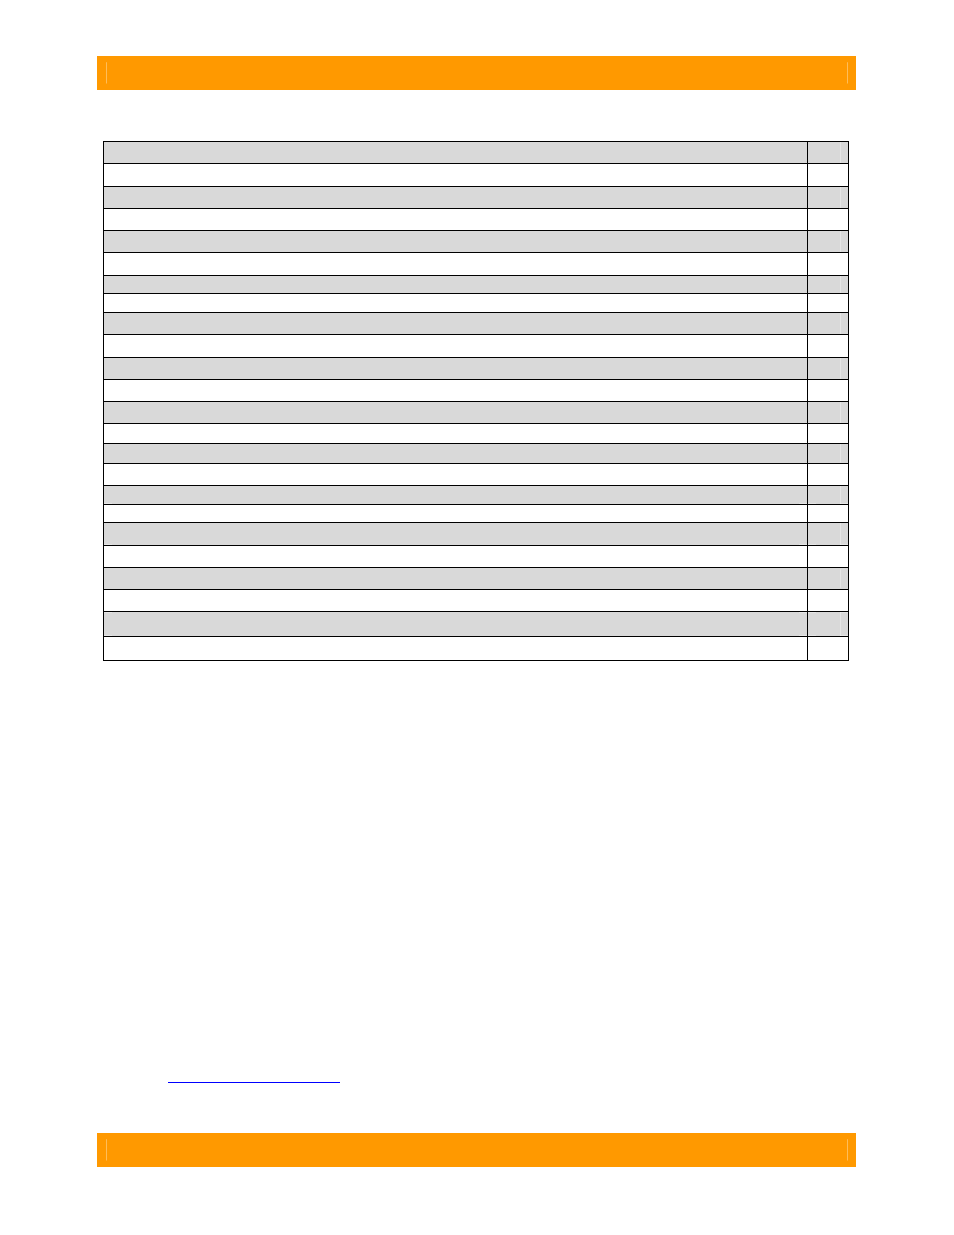
Table of Contents
1. Pre-Installation Steps
3
1.1 Forensic RTX411-QJ Accessories
3
1.2 Identifying Parts
3
2. Using Forensic RTX411-QJ
4
2.1 Installing a Host Bus Adapter (HBA)
4
2.2 Installing Hard Drives
4
2.2.1 SATA HDD: 3.5-inch
4
2.2.2 SATA HDD: 2.5-inch
4
2.3 Forensic RTX411-QJ Host Connections
5
2.4 Connecting Forensic RTX411-QJ to your Computer
6
2.5 Daisy Chaining
6
3. Usage with Mac and Windows Operating Systems
6
3.1 Usage with Macintosh Computers
6
3.1.1 Compatibility
6
3.1.2 Using Volumes
6
3.2 Usage with Windows Operating System
6
3.2.1 Compatibility
6
3.2.2 Using Volumes
6
4. HPA/DCO
7
4.1 HPA/DCO Indication
7
4.2 HPA/DCO Mode Setting
7
5. Firmware Updates
8
6. Frequently Asked Questions
8
7. Technical Specifications
9
Forensic Device User Advisory
We recommend that you perform a final check on this product.
Prior to first use, please verify that the write-blocking function of this product is working properly. This is
easily done: attach a known good formatted drive, and verify that the drive mounts properly on your
computer. Use a drive that has data on it that you are willing to overwrite. Transfer files to the drive. The
files will appear to transfer to the drive. Thereafter, unmount the drive and remount the drive. The files
that you wrote to the drive should not appear after the drive is remounted. If they do appear, there is a
problem with your forensic device, and you should contact our support department for further instructions.
CRU/WiebeTech support may be reached at:
(866) 744-8722 (toll free)
(316) 744-8722 (international)
(316) 744-1398 (fax)
(email)