Knox video sdi8x8 routing switcher – Knox Video SDI8x8 User Manual
Page 2
KNOX VIDEO
SDI8x8 Routing Switcher
KNOX VIDEO
SDI8x8 Routing Switcher
Page 3
Page 4
2.5 SETTING THE BAUD RATE
If the SDI8x8 is to be controlled through its RS232 port, it is important to set
the correct baud rate. One of four baud rates may be selected using positions 1 and
2 of the programming switch located on the rear panel of the SDI8x8. Set the
switches as follows:
Switches are ON when pushed up.
All baud rates are 8 bit, No Parity, One or Two stop bits.
The switches are read by the microprocessor only at power-up; for switch
configuration changes to take effect, cycle the power input to the SDI8x8.
2.6 ANSWERBACK MODES
The user may choose between two modes of answerback: verbose and non-
verbose. Select the mode using position 3 of the programming switch located on
the rear panel of the SDI8x8. Position 3 ON is verbose, while position 3 OFF is non-
verbose.
In the verbose mode, each time a routing command is sent, the entire current
routing map will be reported on the RS232 line.
In the non-verbose mode, only the word DONE will be reported.
In either mode, an incorrect or meaningless command will result in the word
ERROR being reported.
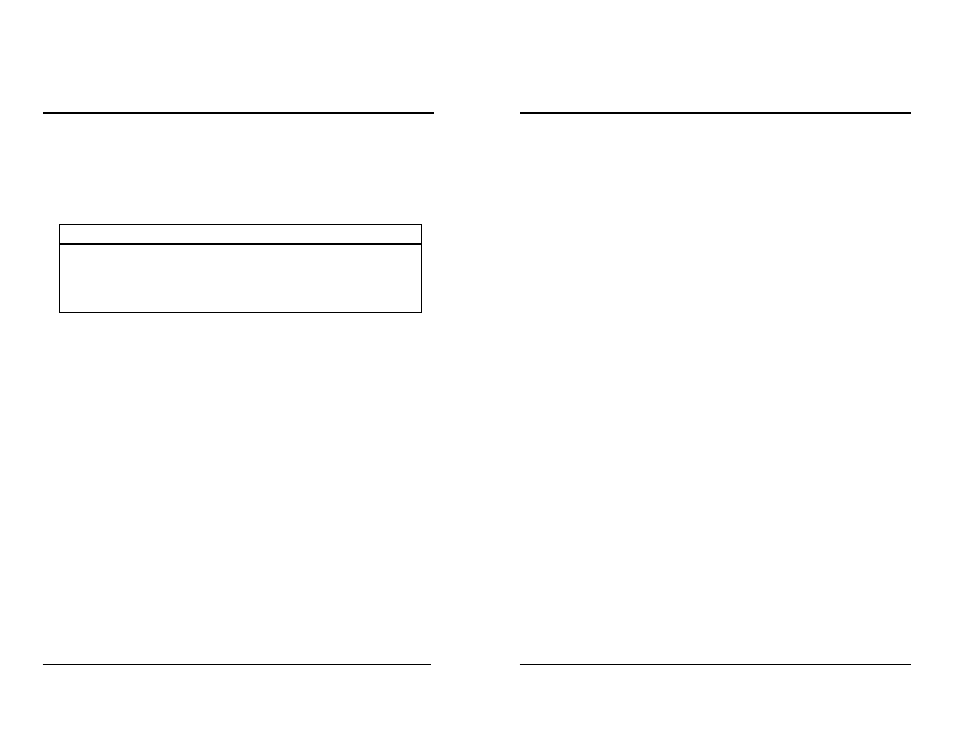
ALL OTHER SWITCH POSITIONS (5-8) SHOULD BE OFF.
BAUD RATE
19200
1200
2400
9600
SWITCH 1
ON
OFF
ON
OFF
SWITCH 2
ON
ON
OFF
OFF
SECTION 3. OPERATION
3.1 INTRODUCTION
This section explains in detail the operation of the SDI8x8 using either the front
panel pushbutton switches or the RS232 port.
3.2 CONNECTIONS
Connect video sources as described in sections 2.4 and 2.5. There is no
requirement that all inputs or outputs be used or terminated.
If outputs are left over they may be used like a distribution amplifier to buffer
and distribute an input signal. To use extra outputs in this way simply route the
input you wish to distribute to as many available outputs as desired.
Do not route an output back to the same input.
3.3 ROUTING VIA THE FRONT PANEL SWITCHES
3.3.1 HOW TO ROUTE SDI VIDEO
Select the output you wish to route a signal to and push (and release) the front
panel button with that number; the row of LEDs to the right of the button you
pushed will flash. Then select the input audio and video you wish to have routed
to that output and push the front panel button with that input number.
The row of LEDs will stop flashing and the lamp corresponding to that
crosspoint will then glow steadily.
If you do not push an input button within ten seconds, the LEDs will stop
flashing and the crosspoint will remain where it was.