Aervoe 32-Watt Portable Light System User Manual
Aervoe, Watt portable light system #8710
Aervoe
®
32-Watt Portable Light System #8710
Aervoe’s 32-Watt Portable Light System is a rechargeable, high-powered light suitable for industry,
construction, home repair, or anywhere additional light is needed. Recharge using 12V DC or 120V AC
electricity to power the white or red LEDs. Also includes two USB ports to charge handheld devices.
IMPORTANT SAFEGUARDS
•
Read all instructions before operating
•
Do not look directly at the light; may cause injury to your eyes
•
Do not use in flammable or explosive environments
•
Do not charge in wet environments
•
Do not operate at temperatures above 120°F or below 32°F
•
To reduce the risk of electric shock, do not submerge the unit or its accessories in any liquid. Unit is
water resistant but not waterproof.
•
Turn off all lights before charging
•
Do Not store when the battery is completely drained; could cause damage to the battery
•
Store in a clean dry place when not in use
•
Only use the charger included with this product
•
Administer close supervision when using around children
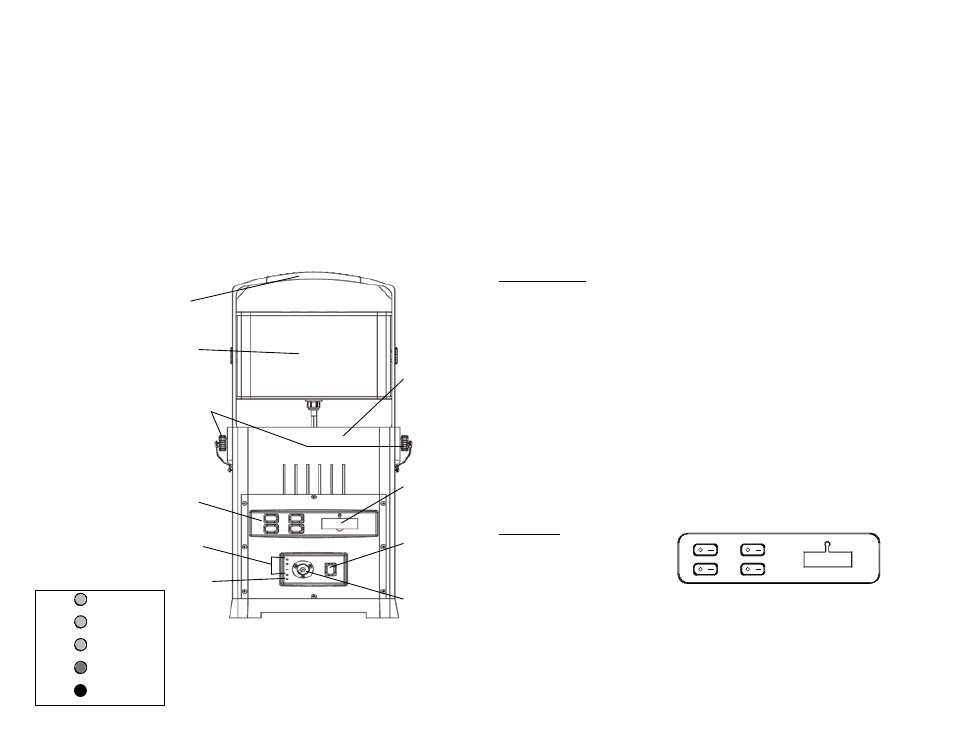
PARTS IDENTIFICATION
CHARGING THE RECHARGEABLE BATTERY
Before charging, turn off all lights.
Both chargers are stored in a compartment inside of the Battery Box. to access, remove the LeD Light
Box by unscrewing the two side screws and open the storage compartment.
1.
Turn the POWER SWiTCh on before charging. The POWER iNDiCATOR LED will illuminate
2.
Choose your desired charging option - 120V AC or 12V DC. Connect the XLR twist plug to the 3-PiN
ChARgiNg iNPUT and plug the other end into either an electrical wall socket or vehicle power outlet.
Other portable 12V battery storage units may also be used (see Sierra Wave product line for available
options).
3.
The LED light on either charger will change from Red to green when charging is complete.
4.
When charging from a vehicle, the engine must remain running to avoid draining the battery or
causing damage to the vehicle’s electrical system.
5.
When the 5 ChARgiNg iNDiCATOR LighTS are illuminated, charging is complete. Remove the
charger once fully charged (see fig. 1).
6.
To avoid overcharging, a protective circuit will automatically interrupt power to the battery if external
voltage is too high or the battery is fully charged.
Low Battery indication:
if battery level drops to 10% the power will shut off all functions except for the power indicator light.
Recharge as soon as possible and turn off the POWER SWiTCh to conserve energy.
•
Using Lights on 2 Sides: when battery power drops to less than 1 hour of use, a warning beep will
sound for 20 seconds every 15 minutes.
•
Using Lights on 1 Side: when battery power drops to less than 1½ hours, a warning beep will sound
for 20 seconds every 15 minutes.
•
Recharging will be needed. To avoid damage to the battery recharge a fully discharged battery within
24 hours and a stored battery every 3 months.
OPERATION
•
For convenience the light can be operated with the LED LighT BOX attached to the BATTERY BOX or
using the 16’ extension cord it can be placed on any stable surface away from the battery. it can also
be hung using the 2 holes in the handle. To remove it from the BATTERY BOX, remove the 2 side
SCREWS on the side and pull off.
•
Swivel the cross-bar 90º on the bottom of the LighT BOX to provide a stable base. Use a sandbag or
other heavy object to provide an anchor if it is being used in high wind.
•
Power off when not in use.
•
Use the included Rain/Snow cover to protect the battery and internal components when used
outdoors. Unzip and place over the battery box, wrapping around the extension cord.
Light Operation:
Switch #1: controls the red light in front
Switch #2: controls the white light in front
Switch #3: controls the red light in back
Switch #4: controls the white light in back
USB 1.5A PORTS
1.
Lift the rubber protective cover to expose the 2 USB ports. These are available to charge any device
with a USB power cord.
2.
Turn on the Power Switch before using the USB ports.
3.
Replace the cover when not in use to keep dust out.
USB Ports
Front Red
LED Switch
Front White
LED Switch
Back Red
LED Switch
Back White
LED Switch
LED
Light Box
Handle
Screws to
Remove Light
Light Option
Switches
USB Ports
(Under Dust Cover)
Power
Indicator LED
Power Switch
Charging Input
Battery Charge
Level LEDs
Battery Box
Power Indicator LED/
20% charged
40% charged
60% charged
80% charged
100% charged
Green LED
Green LED
Green LED
Yellow LED
Red LED
Fig. 1