頁面 6, Nimh akln select ch: 001 – CHIAYO CT-711 User Manual
Page 6
CH: 001
725.000M
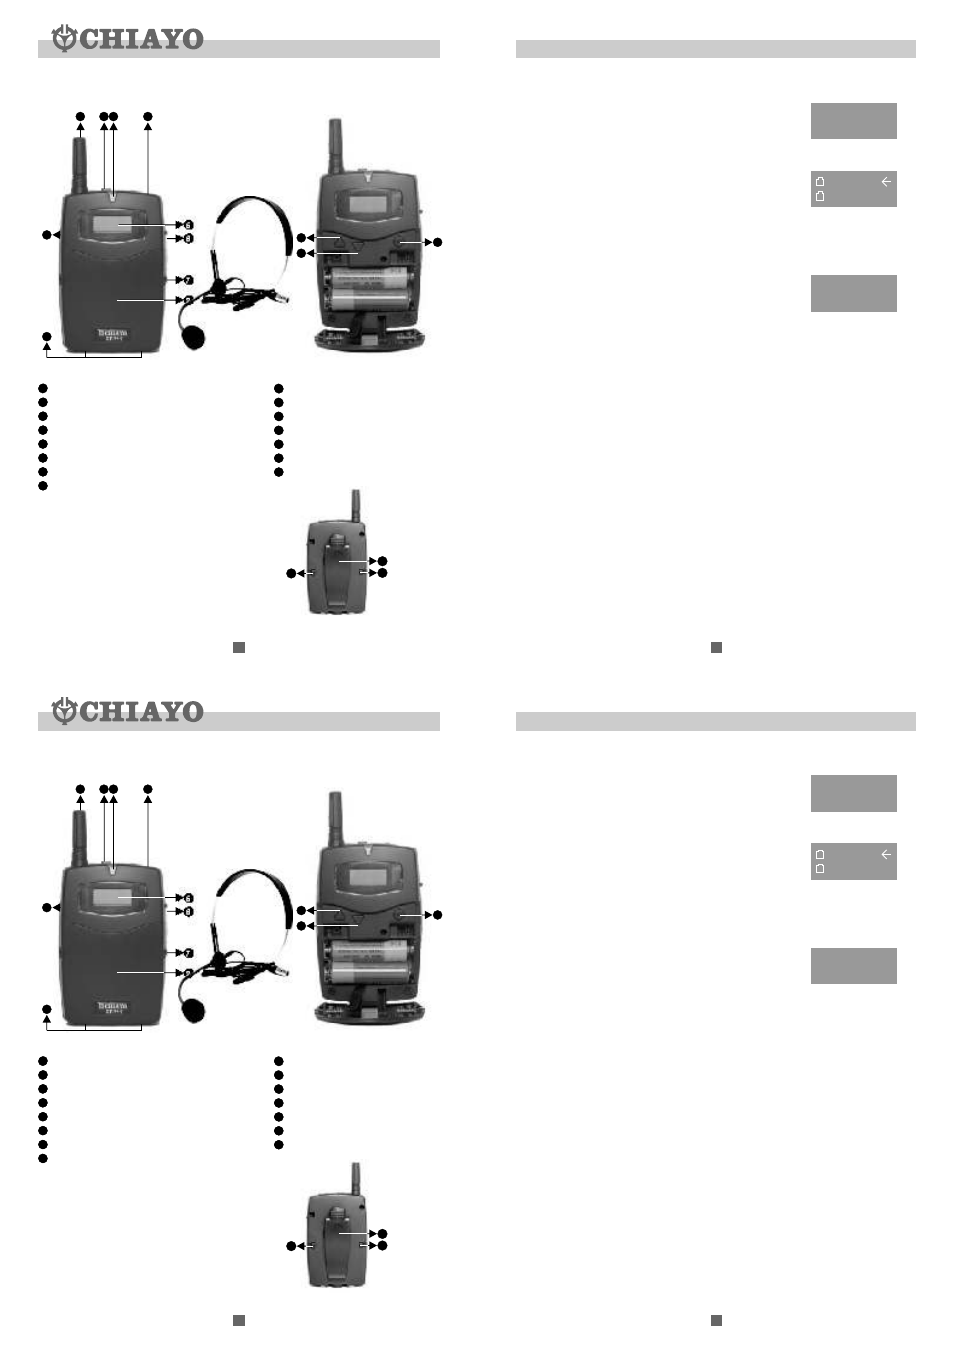
CT-711 Parts and functions
Battery installation
First, use a sm all too l to push both lock s (14 )
outw ard(1 4) on the rea r to unlock the batt ery
co mpart ment as illustrate d in ri ght pictu re.
Then push the relea se butt ons on both side s
of the tr ansm itt er to open the co ve r. CT-711
use s 2 AA batt eri es to operate .
14
14
15
6
1
2 3
4
7
8
5
9
10
13
12
11
MC-72(headset microphone)
Various setting display pages
First, press the release buttons on both sides of the transmitter to open the
battery compartment.
Press SET once to make the display roll to
This page shows the current channel and its corresponding frequency. You can
press UP and DOWN to choose a desired channel. There are 100 preset
channels for selection.
Press SET twice continuously to make the display roll to
Battery types for CT-711 include Alkaline battery (not rechargeable) and NiMH
battery (rechargeable). Please be sure to select the correct battery type
according to the batteries installed. If the types of the mode and in-use batteries
are not the same,the battery-status display may not normally reflect correct
battery status information and recharging process will not be activated.
Press SET 3 times continuously to make the display roll to
Charging the batteries
First, make sure the types of the battery mode and batteries installed are all NiMH.
Secondly, both batteries have to be of the same brand/specification.
When the battery-status LED keeps flashing, it means the batteries are weak and
recharging is thus necessary. There are 2 methods of charging, namely via
A: AC adaptor-Plug the connector of the adaptor into the DC IN jack of the
transmitter and the adaptor to a wall AC outlet.
B:Charger-Set CT-711 vertically into the charger jack and have the charging
points contact the charger correctly.
During the charging process, the battery-status indicator LED will keep flashing.
As long as the process is completed, "FULL" will be shown on the display and
the LED will stop flashing and keep lighting until this transmitter is removed from
the charger.
Belt clip
This uniquely designed belt clip(15) allows 360
rotation. Select the best
position to achieve your optimum comfort.
This programming allows users to select desired channels from those preset 100
ones. For example, if you temporarily don't need channel 2 to 5, just press UP or
DOWN to channel 2 and then press SET till DELETE shows on the LCD display,
meaning channel 2 has stopped its function. So can the other channels be
programmed accordingly. Thus only 96 channels are left for normal operation.
Of course, those deleted channels can return to function by making them
selected by the same way they were deleted.
°
Antenna
Audio on/off switch
Battery-status indicator
TMP / XLR connector
LCD display
DC-in jack / Charging port
Cover-release button
Battery compartment
1
2
3
4
5
6
7
8
1
2
3
4
5
6
7
8
Charging contacts
Power on / off
SET button
UP button
DOWN button
Lock / Unlock
Belt clip
9
10
11
12
13
14
15
9
10
11
12
13
14
15
NIMH
AKLN
SELECT
CH: 001
5
6
CH: 001
725.000M
CT-711 Parts and functions
Battery installation
First, use a sm all too l to push both lock s (14 )
outw ard(1 4) on the rea r to unlock the batt ery
co mpart ment as illustrate d in ri ght pictu re.
Then push the relea se butt ons on both side s
of the tr ansm itt er to open the co ve r. CT-711
use s 2 AA batt eri es to operate .
14
14
15
6
1
2 3
4
7
8
5
9
10
13
12
11
MC-72(headset microphone)
Various setting display pages
First, press the release buttons on both sides of the transmitter to open the
battery compartment.
Press SET once to make the display roll to
This page shows the current channel and its corresponding frequency. You can
press UP and DOWN to choose a desired channel. There are 100 preset
channels for selection.
Press SET twice continuously to make the display roll to
Battery types for CT-711 include Alkaline battery (not rechargeable) and NiMH
battery (rechargeable). Please be sure to select the correct battery type
according to the batteries installed. If the types of the mode and in-use batteries
are not the same,the battery-status display may not normally reflect correct
battery status information and recharging process will not be activated.
Press SET 3 times continuously to make the display roll to
Charging the batteries
First, make sure the types of the battery mode and batteries installed are all NiMH.
Secondly, both batteries have to be of the same brand/specification.
When the battery-status LED keeps flashing, it means the batteries are weak and
recharging is thus necessary. There are 2 methods of charging, namely via
A: AC adaptor-Plug the connector of the adaptor into the DC IN jack of the
transmitter and the adaptor to a wall AC outlet.
B:Charger-Set CT-711 vertically into the charger jack and have the charging
points contact the charger correctly.
During the charging process, the battery-status indicator LED will keep flashing.
As long as the process is completed, "FULL" will be shown on the display and
the LED will stop flashing and keep lighting until this transmitter is removed from
the charger.
Belt clip
This uniquely designed belt clip(15) allows 360
rotation. Select the best
position to achieve your optimum comfort.
This programming allows users to select desired channels from those preset 100
ones. For example, if you temporarily don't need channel 2 to 5, just press UP or
DOWN to channel 2 and then press SET till DELETE shows on the LCD display,
meaning channel 2 has stopped its function. So can the other channels be
programmed accordingly. Thus only 96 channels are left for normal operation.
Of course, those deleted channels can return to function by making them
selected by the same way they were deleted.
°
Antenna
Audio on/off switch
Battery-status indicator
TMP / XLR connector
LCD display
DC-in jack / Charging port
Cover-release button
Battery compartment
1
2
3
4
5
6
7
8
1
2
3
4
5
6
7
8
Charging contacts
Power on / off
SET button
UP button
DOWN button
Lock / Unlock
Belt clip
9
10
11
12
13
14
15
9
10
11
12
13
14
15
NIMH
AKLN
SELECT
CH: 001
5
6