4 led driver, Replacing a driver, Led driver – Daktronics MS-2013 Portable LED Scoreboard User Manual
Page 27: N 6.4 )
Scoreboard Troubleshooting
21
6.4 LED Driver
The LED driver performs the task of switching digits on and off within the scoreboard.
LED drivers are located inside of a driver enclosure. Refer to Drawing A-159887 in Appendix
A to view the location and components of the driver enclosure.
When troubleshooting driver problems, several LEDs provide diagnostic information.
The number of LEDs and their function depends on the driver type.
Note: While it is necessary to have the scoreboard powered on to check the LED
indicators, always disconnect scoreboard power before servicing.
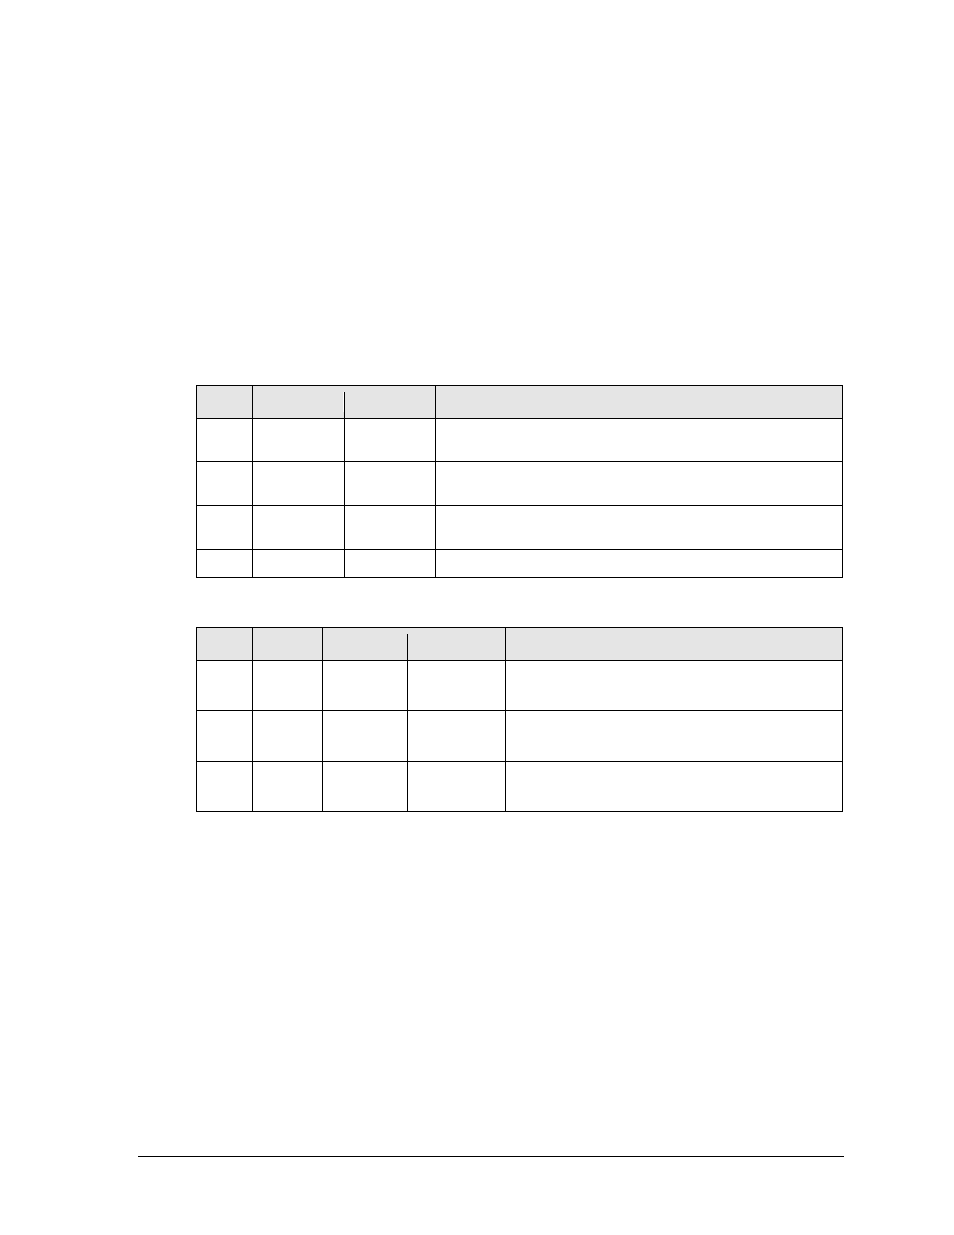
16-
Column “Gyrus” Drivers
LED
Function
Operation Summary
DS1
Radio/
RS-232 RX
Blinking
or off
DS1 will be blinking when the driver is receiving radio signal
and off when there is no signal.
DS2
Status
Blinking
DS2 will be blinking at one second intervals to indicate the
driver is running.
DS5
Signal RX
Blinking
or off
DS5 will be blinking when the driver is receiving current loop
signal and off when there is no signal.
DS8
Power
Steady on
DS8 will be on and steady to indicate the driver has power.
16-Column Drivers (prior to April 2015)
LED
Color
Function Operation
Summary
DS1
Green
Power
Steady on
DS1 will be on and steady to indicate the driver
has power.
DS2
Red
Signal RX
Steady on
or blinking
DS2 will be on or blinking when the driver is
receiving a signal and off when there is no signal.
DS3
Amber
Status
Blinking
DS3 will be blinking at one second intervals to
indicate the driver is running.
Replacing a Driver
1. Open the back panel as described in Section 6.2.
2. Remove the metal cover of the driver enclosure to expose the driver components.
3. Disconnect all connectors from the driver by squeezing together the locking tabs and
pulling the connectors free. It may be helpful to label the cables to know which cable
goes to which connector when reattaching the driver.
4. Remove the screws or nuts securing the driver to the inside of the enclosure.
5. Carefully lift the driver from the display and place it on a clean, flat surface.
6. Position a new driver over the screws and tighten the nuts.
7. Reconnect all power/signal connectors. Note that the connectors are keyed and will
attach in one way only. Do not attempt to force the connections.
8. Ensure the driver is set to the correct address (refer to Setting the Driver Address).
9. Close and secure the back panel, then power up and test the scoreboard to see if
changing the driver has resolved the problem.