Front panel controls (continued) – Drake DAV860 Digital Demodulator/Decoder NTSC Output User Manual
Page 6
6
[7] ENT/SCAN button: must be pressed to confirm channel selection, picture size, and audio mode.
Scanning: Holding the eNt button for 10 seconds initiates the scan process. the 1-digit display will display
‘swirling segments’, the 2-digit LeD will display number of channels found. At anytime, pressing the eNt and
SNR button simultaneously will stop the scan. Scanning is done automatically in ascending Rf frequency
from channel center frequency 57 to 857 mHz (8VSB) or from 57 to 861 mHz (QAm) for specified channel
range.
in the QAm mode, only the clear (unscrambled) programs will be included in the scan list. Programs having
a VCt (virtual channel table) will be displayed as their virtual major - minor channel numbers. Programs
received without a VCt will be displayed by the received Rf channel number as the major number. minor
numbers will be given in sequence as they appear in the Pmt table.
IF THE CHANNEL DATABASE IS EMPTy, THE 2-DIGIT DISPLAy WILL READ '03', THE 1-DIGIT DISPLAy
WILL READ 'E' INDICATING A SCAN IS REQUIRED. ALERTS FOR MORE DETAILS.
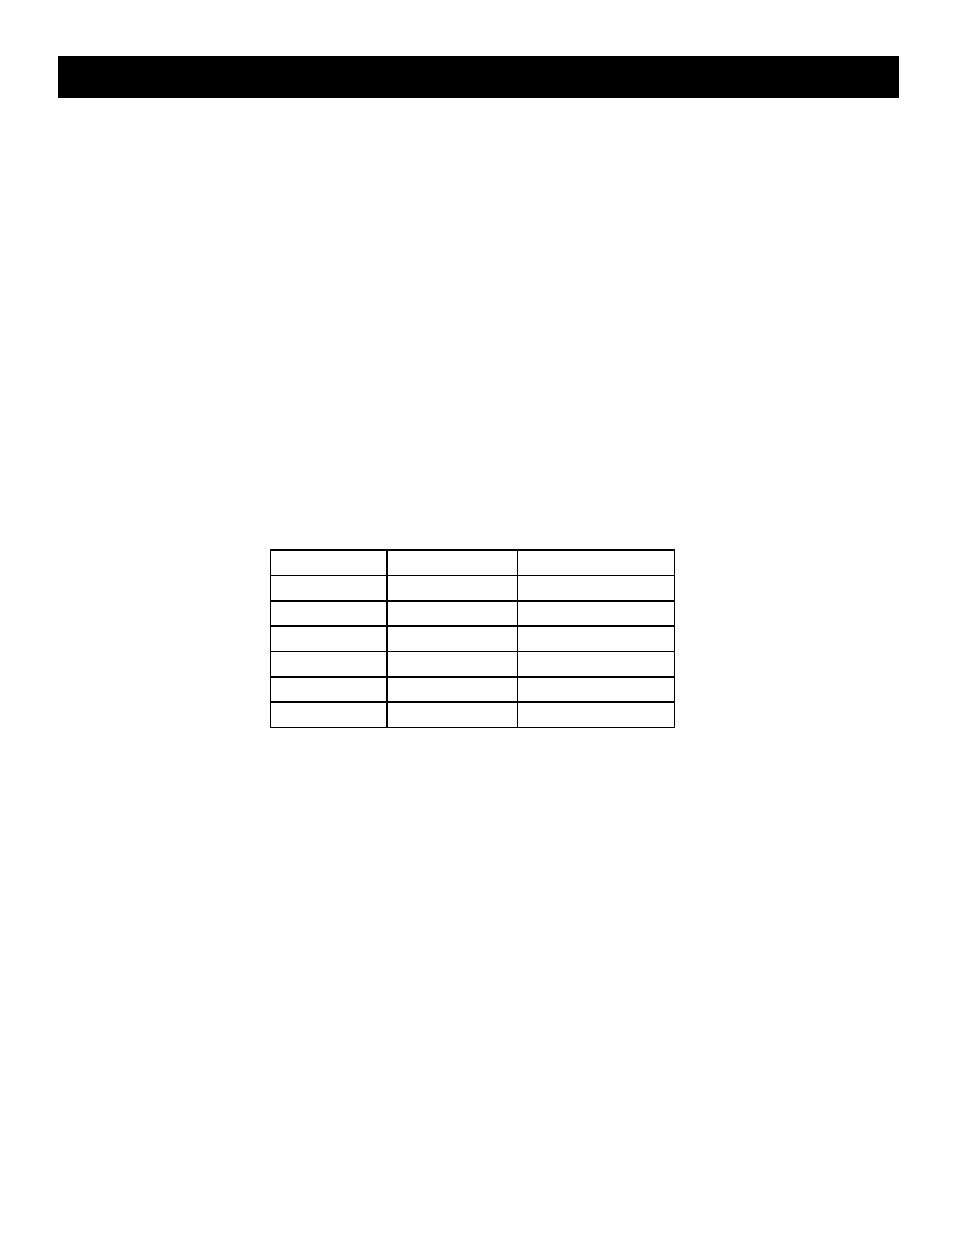
[8] PIC SIZE button: When pressed, the 2-digit and 1-digit LeD will show the current picture size mode per table
below. each additional press of the PIC SIZE button will change the mode. the displays will blink to indicate
picture size is in selection and has not been entered. Pressing the ENT button selects picture size and after
a few seconds the displays will return to indicating channel numbers. if 5 seconds pass without pressing the
ENT button, the display will return to its last programmed state and stop blinking.
Picture Size
2-digit LED
1-digit LED
AFD
AF
d
Center Cut
Pl
C
Letterbox
Pl
L
Full
Pl
F
Zoom1
Pl
1
Zoom2
Pl
2
AFD – Active Format Description - uses AfD data and will automatically switch between
Letterbox and Center Cut as defined by broadcaster. in the absence of AfD data or in the
presence of any unsupported AfD codes, the unit defaults to Center Cut.
Center Cut – manual setting to ignore AfD data and to display Center Cut. expands the picture
image to fit screen while cropping some image on the left and right without displaying any bars
on the screen.
Letterbox – manual setting to ignore AfD data and always display Letterbox. Displays the original
picture and aspect ratio while fitting to the screen by applying black bars to the top and bottom.
Full – manual setting to display entire image while fitting the picture to the screen by stretching
the image vertically. Black bars are present on the sides and there may be slight distortion of the
picture.
Zoom 1 – manual setting to partially expand the image to fit screen after horizontally cropping the
image. this mode will still show very thin black bars.
Zoom 2 – manual setting to expand the image to fit screen while cropping the image on the left
and right. this mode will display no black bars.
IT IS RECOMMENDED TO USE AFD OR CENTER CUT FOR MAxIMUM SCREEN USAGE WHEN
CONVERTING 16:9 ASPECT RATIO SIGNALS FOR VIEWING ON 4:3 TELEVISIONS,
WHICH IS THE INTENDED USE OF THE DAV860.
Front Panel Controls (continued)