Burner air shutter adjustment – Fire Magic Echelon Diamond Built-In Grill User Manual
Page 37
37
1. Follow the safety precautions and steps for
main burner removal
in the CHANGING
THE MAIN BURNER
ORIFICES section
(steps 1-4).
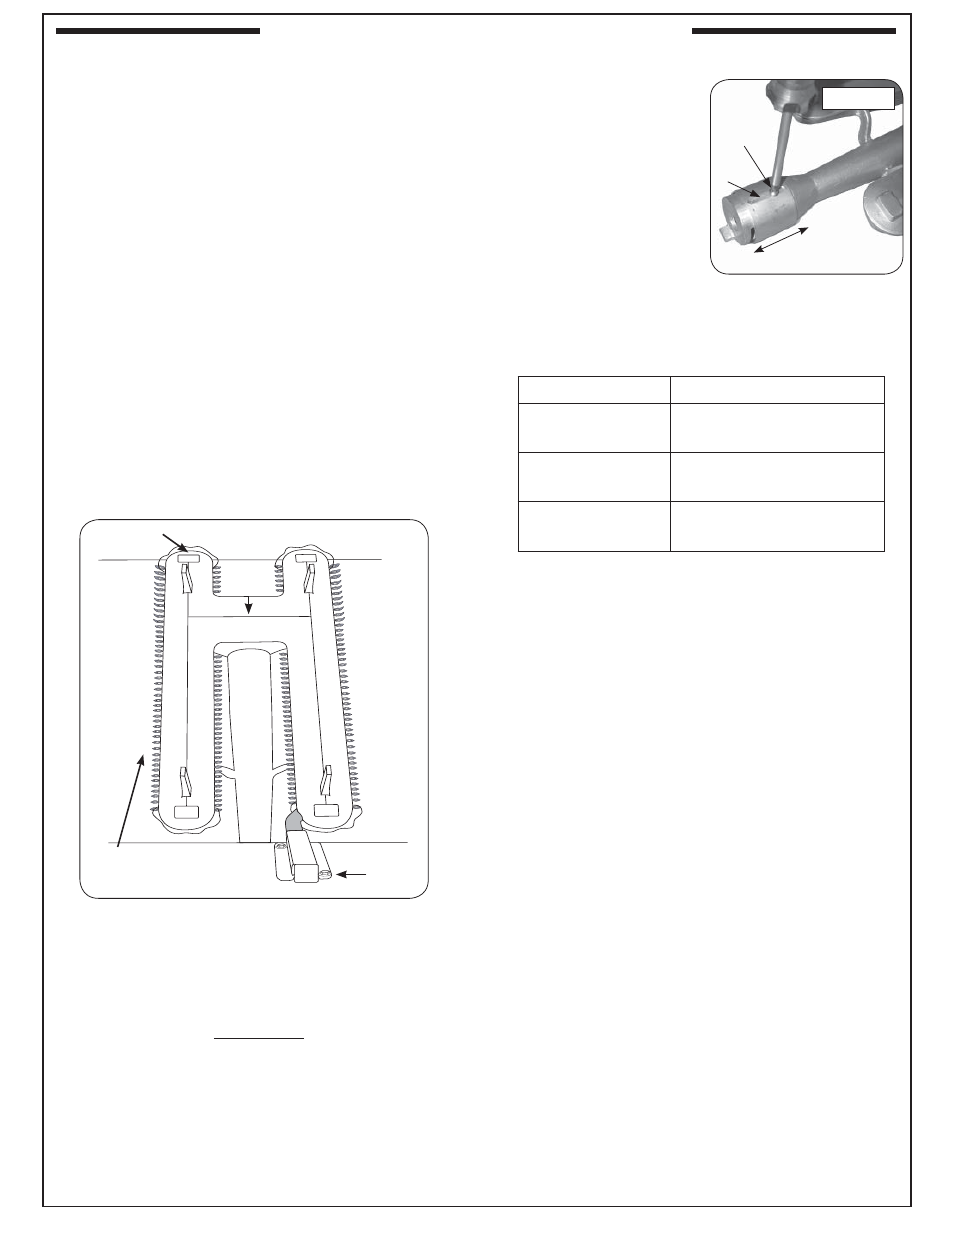
2. Adjust the air shutter
opening by loosening
the adjustment screw
with a screwdriver,
then sliding the air shutter backward or forward
to open or close the air shutter opening (see
Fig. 37-2).
Too large an air shutter opening will allow too much
air into the burner, which will cause the fl ames fi rst
to shorten and then to appear to lift up off the ports.
For the bottom of the fl ames to move closer to the
ports, close the air shutter more.
If the air shutter opening is too small or closed, the
fl ames will present consistently orange tips and
become “lazy,” slowly undulating back and forth.
For propane gas, ideal settings tend to be just
slightly open. For natural gas, which generally
requires less primary air than propane, the main
burner air shutter may be nearly closed.
3. Adjust the air shutter opening and then replace
the burner (steps 6-8 in the CHANGING THE
MAIN BURNER ORIFICES section).
4. Follow the lighting instructions in this manual to
light the burner.
5. Repeat steps 1-4 until the fl ames appear to
touch the burner ports, burning fairly steadily
and mostly blue (see Fig. 37-1).
AIR SHUTTER ADJUSTMENT
Important:
Air shutters are preset at the
factory based on the gas the grill is
built to burn. However, altitude or
other local conditions may require
air shutter adjustment for proper
combustion.
MAIN BURNER
Flames from a properly adjusted main burner with
no wind or breeze present will appear fairly steady,
consistent, and mostly blue. If the tip of a fl ame were
to turn orange, it should only do so briefl y and then
become blue again. The fl ames will appear to burn
while touching the burner ports (see Figure 37-1).
If the fl ames have orange in them and appear to
undulate slowly from side to side, or if some of them
appear to lift off the burner instead of touching it,
then adjust the air shutter, as instructed below.
CAUTION: Turn all burner control knobs to the
OFF position and turn off the gas
supply at the source before removing
or adjusting a burner.
WARNING
Wait for the burner to be cool or use heavily insulated
heat-resistant gloves when handling the burner.
Adjustment
screw
Fig. 37-2
Adj.
slot
Close
Open
Shutter Setting
Flame Condition
Open too far
Flames shorten and
lift off the burner
Ideal setting
Blue fl ames just
touching burner
Closed too far
“Lazy” fl ames with
orange in them
BURNER AIR SHUTTER ADJUSTMENT
Fig. 37-1
Blue fl ames on
burner ports
Bridge
between
burner
lobes
Lighting
tube
Carry-over
slots (on
each lobe)