First Co HX-C Cased unit with electric heat User Manual
Enclosure, Hx, cdxq, cdx-hw
ENCLOSURE
HX, CDXQ, CDX-HW
INSTALLATION INSTRUCTIONS
L2556 07/06
GENERAL
The manufacturer assumes no re-
sponsibility for equipment installed
in violation of any code require-
ment.
These instructions give information
relative to the installation of these
enclosures only. For other related
equipment refer to the proper in-
structions.
Material in this shipment has been
inspected at the factory and released
to the transportation agency in good
condition. When received, a visual
inspection of all cartons should be
made immediately. Any evidence
of rough handling or apparent dam-
age should be noted on the delivery
receipt and the material inspected
in the presence of the carrier’s
representative. If damage is found,
a claim should be fi led against the
carrier immediately.
ENCLOSURE MOUNTING
The installer must adhere strictly to
all local and national code require-
ments pertaining to the installation of
this equipment. These enclosures
are designed to be installed in the
ceiling for horizontal mounting only.
Location of the unit must be in an
area providing adequate access to
the ceiling panel since all compo-
nents must be serviced from this
area.
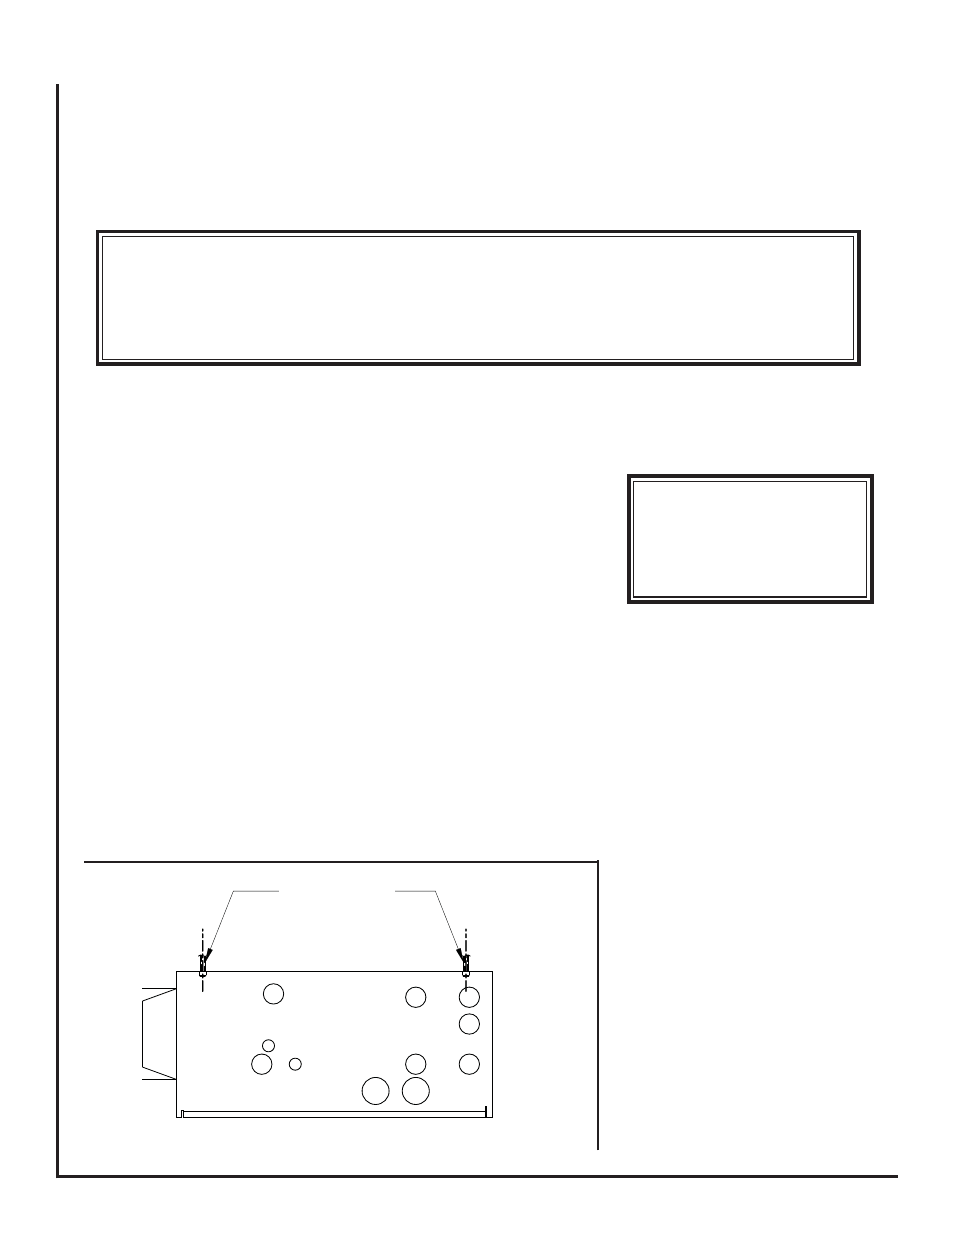
The enclosure should be lifted to
the desired location and secured
using the mounting holes located on
the top with an acceptable mounting
method (Figure 1). The enclosure
must be level in both directions to
permit proper drainage of the fan
coil.
After the enclosure is mounted a
2x2 or 2x4 frame must be installed
around the base of the enclosure
to create an air tight seal. Figure 7
shows a typical arrangement for the
framing required.
Mounting
Fasteners
Figure 1
**WARNING TO INSTALLER, SERVICE PERSONNEL AND OWNER**
Altering the product or replacing parts with non authorized factory parts voids all warranty or implied war-
ranty and may result in adverse operational performance and/or a possible hazardous safety condition to
service personnel and occupants. Company employees and/or contractors are not authorized to waive this
warning. Current Maintenance Program is available at www.fi rstco.com under “Product Information”.
****** WARNING ******
Extreme caution must be
taken that no internal damage
will result if screws or holes
are drilled into the cabinet.
INSTALLING FAN COIL
UNIT INTO ENCLOSURE
1. Ensure that the enclosure has
been installed level.
2. Remove motor/blower assembly
from the fan coil.
3. Lift coil assembly into enclosure
and place the top fl ange of the coil
onto the top surface of the mount-
ing angles at each end of the en-
closure.
4. Slide coil assembly forward until
the supply duct fl anges of the fan
coil are fully engaged into the front
of the enclosure.
NOTE: Before fastening, the fan
coil unit must be fully engaged
into the supply duct fl ange. If not,
supply air may recirculate into
the enclosure. To ensure total
engagement, push the fan coil
unit forward. Total engagement
has occurred when the front of
the top plate and the front of the
drain pan are squeezing against
the insulation.
5. Fasten the coil assembly to the