Assembly instructions, Tools, Assembly – Flowserve Nordstrom Hypregun-Plus 5G Pneumatic Valve Sealant Injector User Manual
Page 12: Handle assembly, Wheel assembly
Nordstrom Valves
Hypregun - Plus 5G FCD NVENIM2004-00-AQ 10/14
12
Assembly Instructions
Numbers in parentheses note the illustration numbers as located on pages 5
and 6 of this document. Refer to this illustration to assist in assembling your
Hypregun-Plus 5G.
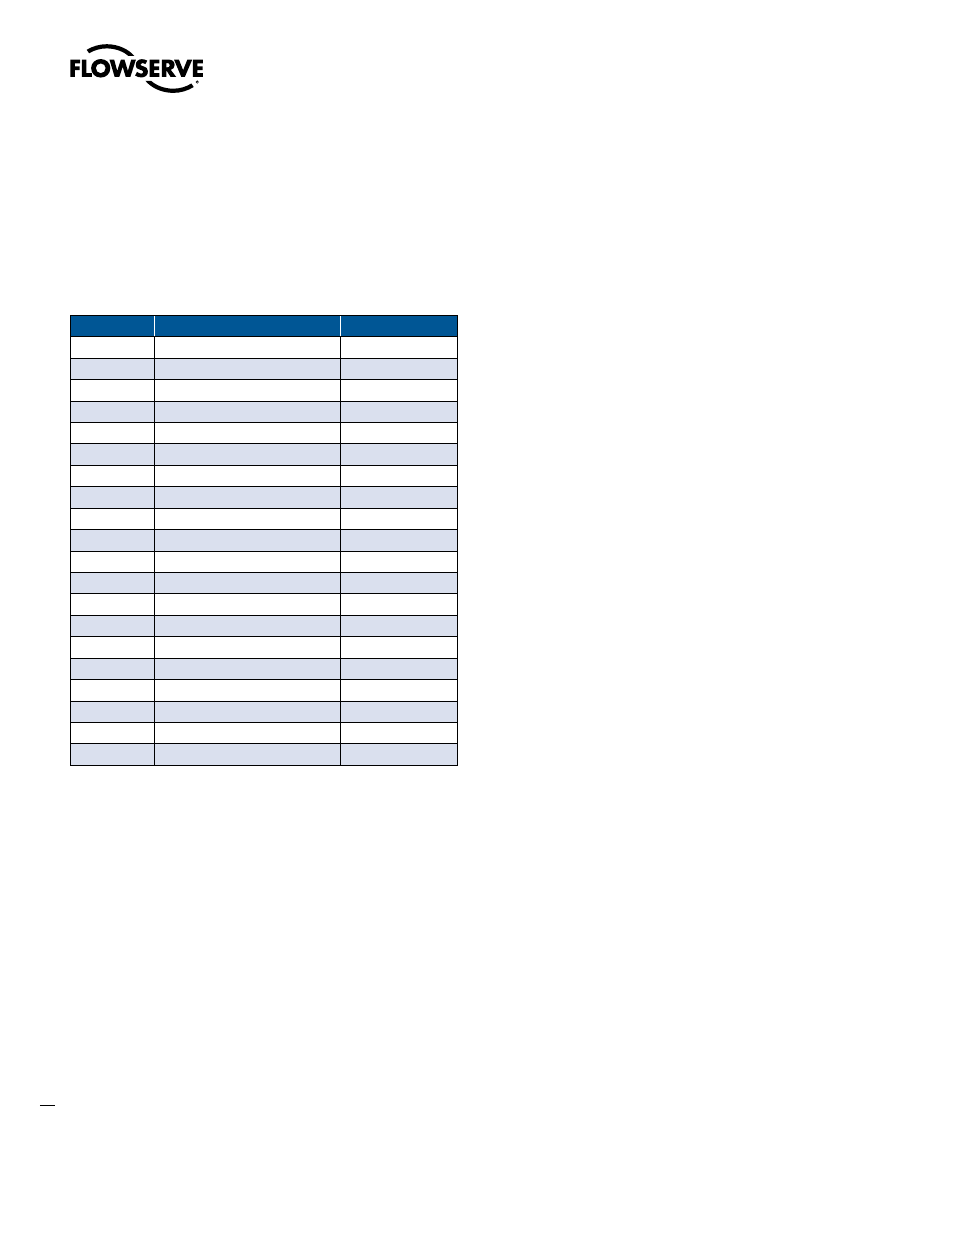
Your Hypregun-Plus 5G is shipped disassembled. The contents of the
shipping container include:
Qty.
Part Number
Illustration Number
2
Wheel
79
2
Axle
75
2
Retaining ring
77
2
Setscrew
81
1
Handle
71
2
Capscrew
31
4
Steel washer
32
2
Lock nut
90
2
Spacer
61
2
Pipe plug
88
2
Kick stand
74
2
Washer
83
1
Hex nut
85
1
Hex nut
86
1
Capscrew
87
1
Capscrew
84
1
Spring
76
1
Washer
82
1
10 Foot hose sub-assembly
1
Gun sub-assembly
Tools
Tools required for assembly of the Nordstrom Valves Hypregun-Plus
5G:
• Adjustable wrench
• 3/16” Allen wrench
• 1/2” socket (two required)
• Socket ratchet (two required)
• Socket extension (if needed)
• Pliers
Assembly
The following instructions reference the front and back of the
Hypregun-Plus 5G. The integral handle of the yoke (12) is considered
the front of the gun.
Handle Assembly
1. Locate the two drilled holes in the top of the yoke (12).
2. Remove from the parts bag two 5/16” stainless steel hex head
capscrews (31), two 5/16” stainless steel washers (32), two 5/16”
stainless steel lock nuts (90), two spacers (61), and two pipe
plugs (88).
3. Position the horseshoe-shaped handle (71) with the bend upward
and extending toward the back of the yoke (side opposite the yoke
handle).
4. Install the handle spacers (61) into the open ends of the handle.
5. Secure the handle using the parts as described in Step 2 and
as illustrated on page 5. The steel washers are to be positioned
between the head of the capscrew and the handle and the lock nut
and the yoke.
6. Tighten using the socket wrenches and socket extension.
7. Insert the pipe plugs (88) into the opens ends of the handle.
Wheel Assembly
1. Locate two wheels (79), two axles (75), two retaining rings (77),
and two setscrews (81).
2. Lay the Hypregun-Plus 5G on its back.
3. Using pliers, install the retaining ring (77) into the groove on the
end of the axle (75).
4. Place the axle through the hub of the wheel (79) making sure the
axle is inserted from the side of the wheel with the air
valve stem.
5. Insert the axle into the axle hole on the side of the base (18).
6. Insert the setscrew into the drilled and tapped hole in the bottom
of the base and tighten securely using a 3/16” hex head Allen
wrench.