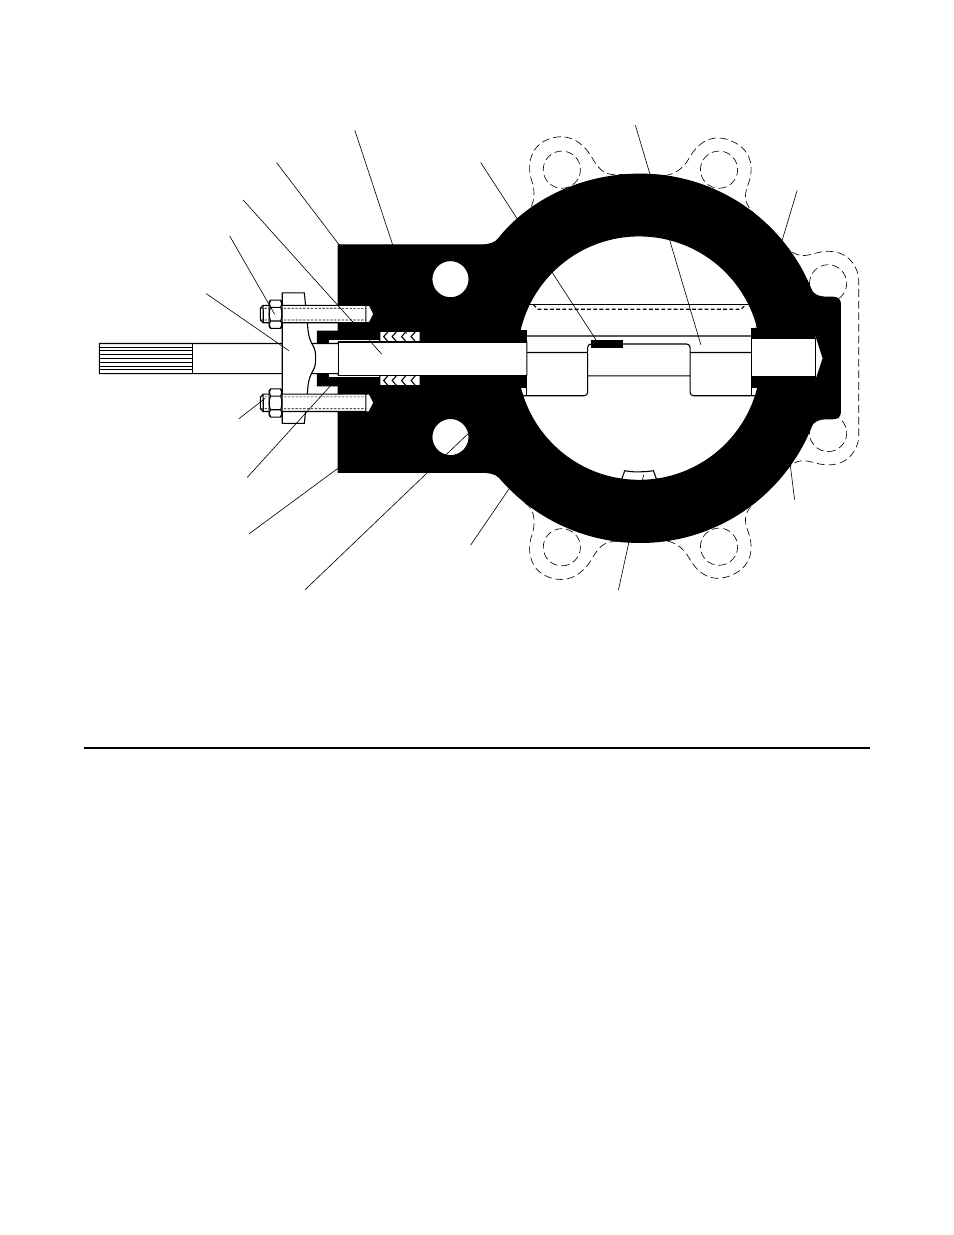
Figure 1: body assembly – Flowserve BX 150 User Manual
Page 3
37-3
Body
Packing Retainer
(Item No. 85)
Packing
(Item No. 88)
Shaft
(Item No. 51)
Packing Box Nut
(Item No. 117)
Gland Flange
(Item No. 80)
Packing Box Stud
(Item No. 109)
Packing Follower
(Item No. 87)
Shaft Bearing
(Item No. 83)
Thrust Washer
(Item No. 82)
Disc
(Item No. 50)
Disc Stop
Thrust
Washer
(Item No. 82)
Shaft
Bearing
(Item No. 84)
Taper Pin
(Item No. 1)
(Item No. 52)
Figure 1: Body Assembly
NOTE: Item numbers correspond directly to the valve’s bill of material. Refer to it for specific part numbers.
3. Clean valve and re-paint areas of severe oxidation.
4. Check packing box bolting for proper tightness.
Packing nuts should be slightly over finger-tight;
however, tighten as necessary to prevent stem
leakage.
CAUTION: Do not overtighten packing.
5. If the valve is supplied with a lubricator, check lubri-
cant supply and add lubricant if necessary.
6. If possible, stroke the valve and check for smooth,
full-stroke operation by observing the disc position
indicator plate mounted on the transfer case. Un-
steady movement of the disc could indicate an inter-
nal valve problem (jerky motion is normal whenever
Grafoil packing is used).
7. Check positioner calibration by observing the
gauges and disc position indicator plate. Make sure
positioner is calibrated to the correct range. Refer
to positioner instructions for additional preventative
maintenance.
8. If possible, depressurize the actuator, and remove
the actuator transfer case cover plate, and make
sure the positioner linkage is securely fastened.
CAUTION: Never apply air to the actuator with-
out the cover plate installed; otherwise, the un-
supported shaft may sustain damage.
9. Be certain all accessories, brackets and bolting are
securely fastened.
10. If possible, remove the air supply and observe the
position indicator plate for correct fail-safe action.
11. Spray soap solution around the cylinder retaining
ring and the adjusting screw to check for air leaks
through the O-rings.
12. Clean any dirt or other foreign material from the
exposed portion of the shaft.
13. If an air filter is supplied, check and replace the
cartridge if necessary.