Flowserve E-Series Two-Piece User Manual
E-series two-piece, flanged-end ball valves, Installation, Stem seal adjustment
1. Installation
These valves may be installed in any position
using good pipe fitting practices. Flanges con-
form to ANSI Standards B16.5 Class 150 or
Class 300.
A. Periodically check and tighten nuts (15).
(See Table 1 for torque requirements.)
a
WARNING: Extreme care must be
exercised during adjustment of stud nuts
to make sure that complete engagement
of studs with body flange is maintained.
There should be at least one thread of
stud exposed on each side of the joint.
2. Stem Seal Adjustment
If leakage is evident in stem packing area,
tighten the adjusting nut
1
/
4
turn. If leak still
persists, repeat above. Replacement of stem
seals (10) is indicated if the leak is still appar-
ent after
1
/
2
turn.
3. Disassembly
for Seal Replacement
a
WARNING
A. Begin with the valve partially open in a
depressurized line.
B. Remove flange bolts and nuts (not pro-
vided) and lift body (11) from line for
servicing.
NOTE: Care should be taken to avoid
scratching or damaging gasket surface
on flange face.
McCANNA/MARPAC Valves
WCAIM2004
(Part IM008)
E-Series Two-Piece, Flanged-End Ball Valves
2"-12" Classes 150 & 300 Regular and Full Port, Models ERP1, ERP3, EFP1, EFP3
Installation, Operation and Maintenance Instructions
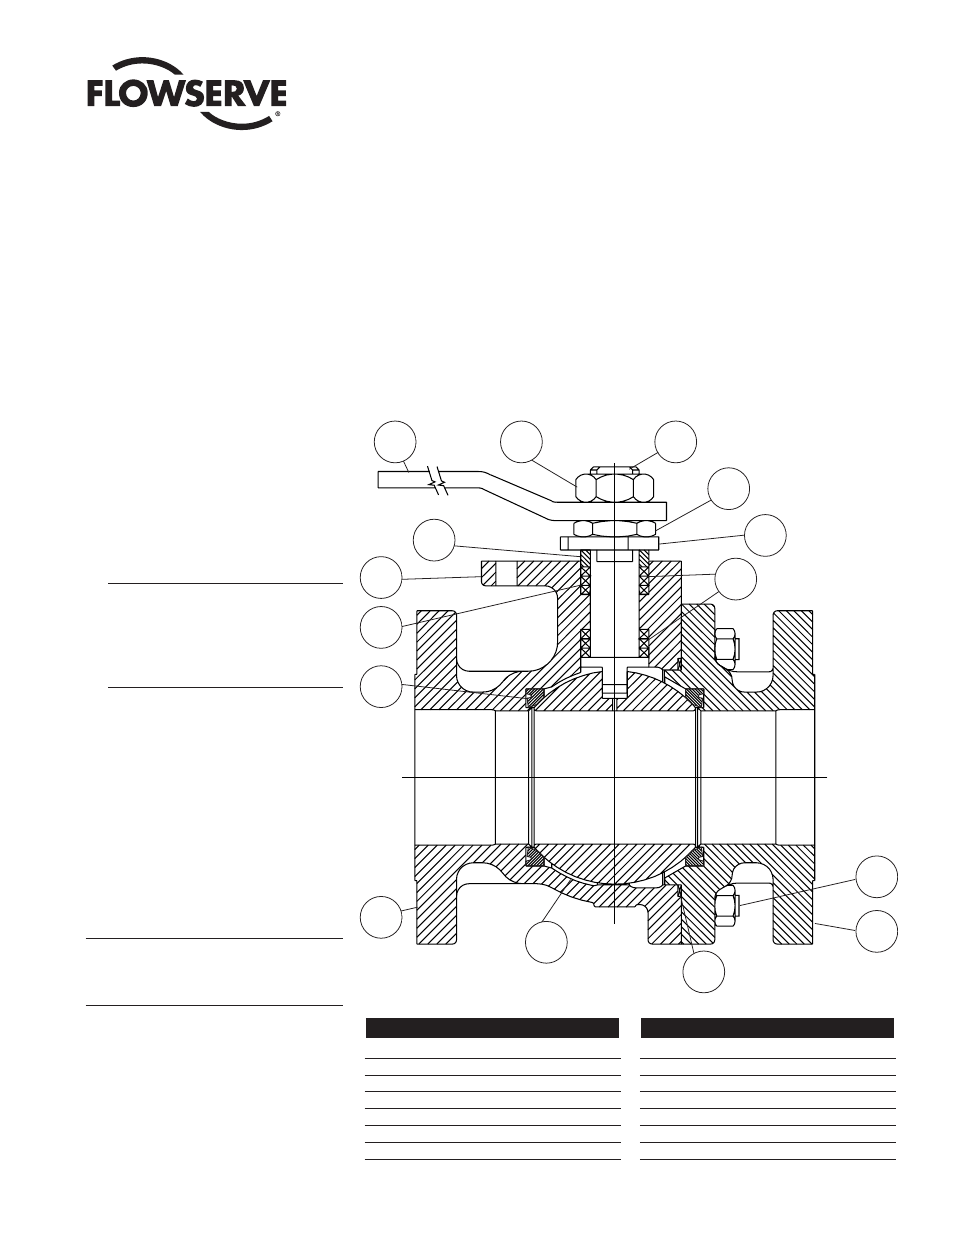
No.
Description
1
Handle
2
Stem
3
Stop Pin (not shown)
4
Handle Retainer Nut
5
Travel Stop
6
Gland Ring
7
Actuator Mounting Flange
8
Ball
No.
Description
9
Seat (2)
10
Stem Seals (Table 3)
11
Body
12
Body Seal
13
Grounding Washer
14
Adjusting Nut
15
Studs and Nuts
16
Body End
1
4
2
14
5
10
15
16
12
8
11
9
13
7
6
Figure 1