Switches (certified) – Flowserve Automax PMV DS UltraSwitch User Manual
Page 5
9
8
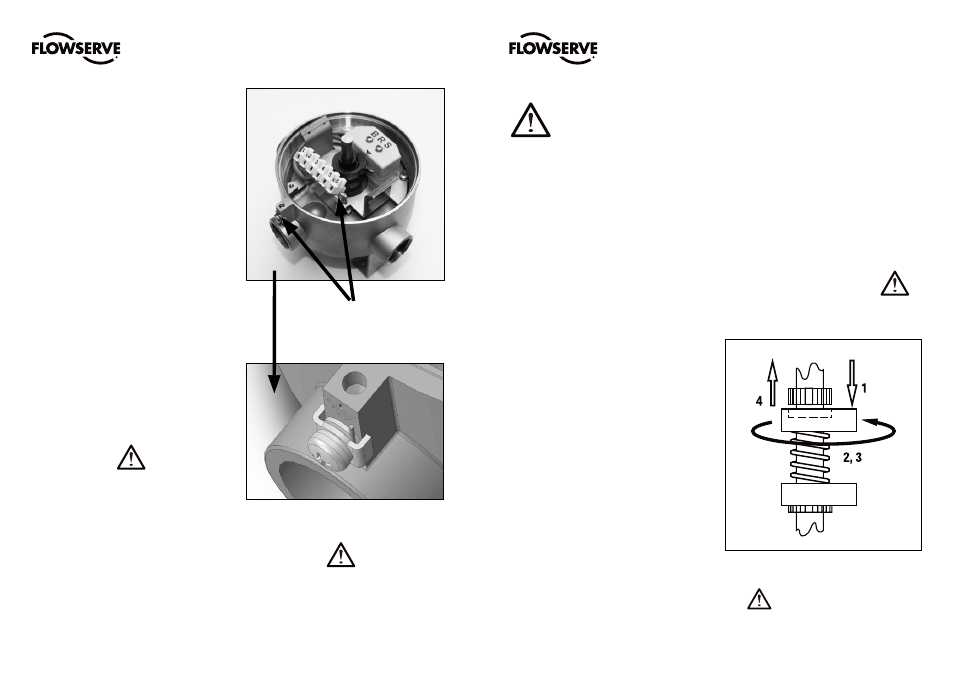
Ground terminals
6.1 Wiring instructions
DS/DM UltraSwitch™ enclosures feature pre-
wired switches. All user connections are made at a
numbered terminal strip. Both external and internal
grounding locations have been provided for use in
installation (see illustration to the right). A wiring dia-
gram is located inside the cover and indicates which
terminal numbers correspond to switch contacts:
normally open, normally closed, common, etc. Follow
the wiring diagram and electric code to connect the
switches to your system.
For field wiring: ensure that any excess wire lengths
or loops are routed away from any moving parts
and are short enough, or secured to ensure a ¼”
clearance between the wire and the inside surface of
the switchbox cover.
Solenoids may also be wired through the DS/DM
UltraSwitch™ enclosure. At least two auxiliary
terminals are included as standard. Wire the solenoid
to auxiliary terminals, then connect power leads to the
opposite terminal side. Be sure to properly ground the
solenoid at provided ground terminals.
DS/DM UltraSwitch™ DS-Series enclosures include
two 3⁄4” NPT conduit/cable entries and the DM-Series
include two M25x1.5 conduit/cable entries.
Caution!
• Proper and suitable conduit plugs must be installed
in unused conduit entries before placing the unit
into service.
• Install according to National Electric Code, local
codes, local certificates and manufacture in-
structions in all cases. Environmental seals must
be used to protect ingress of water through the
conduits. Electrical connections/plugs must
comply with relevant approval standards.
• Connecting cables must be rated for ambient
temperature above 161°C (322°F).
Note: The outside ground terminal of the Aluminum
housing has a stainless steel washer underneath
the grounding jumper. Make sure that the grounding
cable is squeezed between the washer and the
grounding jumper (see picture above).
Substitution of components may impair suitability for hazardous (classified) locations. Do not
disconnect equipment unless area is known to be non-hazardous.
To prevent ignition of flammable or combustible atmospheres, disconnect power before servicing.
7. Switches (certified)
7.2 Adjusting limit switches
UltraSwitch™ enclosures feature Quick-Set™ cams
which are used to trip the limit switches. These cams
are easily adjusted without tools.
Caution: Disconnect power before removing cover
when installed in hazardous locations.
Remove cover and set aside. Rotate actuator/valve to
full clockwise (CW) position. Adjust cam(s) associated
with CW as follows:
1. Push or pull cam against spring to disengage it
from splines.
2. Rotate cam CW breaking contact with switch (or
moving magnet away from switch).
3. Continue rotating cam CW just until switch trips.
4. Release cam and re-engage it with splines.
Rotate actuator/valve to full counter-clockwise (CCW)
position. Adjust cam(s) associated with CCW as
described in steps 1 through 4, except rotate cam(s)
CCW.
Cam adjustment
7.1 Installation in hazardous locations
Installation of this device may only be performed by authorized personnel. All wiring and other external
components used to connect this device must comply with the hazardous locations regulations.
Note: factory setting is:
Top switch = CW (closed)
Second switch = CCW (open)
Third switch = CW
Fourth switch = CCW
Special conditions for safe use
According to ATEX marking on the units indicates
WARNING: Do not open when energized. After de-energizing – delay 8 minutes before opening.
Seal within 50 mm of enclosure. Connecting cables must be rated for Tamb> 161°C / 322°F.
According to CSA marking on the units indicates
WARNING: To prevent ignition of hazardous atmospheres – disconnect before opening.
WARNING: Conduit runs must have seal fittings installed within 50 mm of the enclosure.”
FCD PMENIM0020-00 - 02/15
FCD PMENIM0020-00 - 02/15