Operation and functions, Freeplay one-year warranty, Rechargeable batteries – Freeplay Energy Tuf Radio User Manual
Page 2
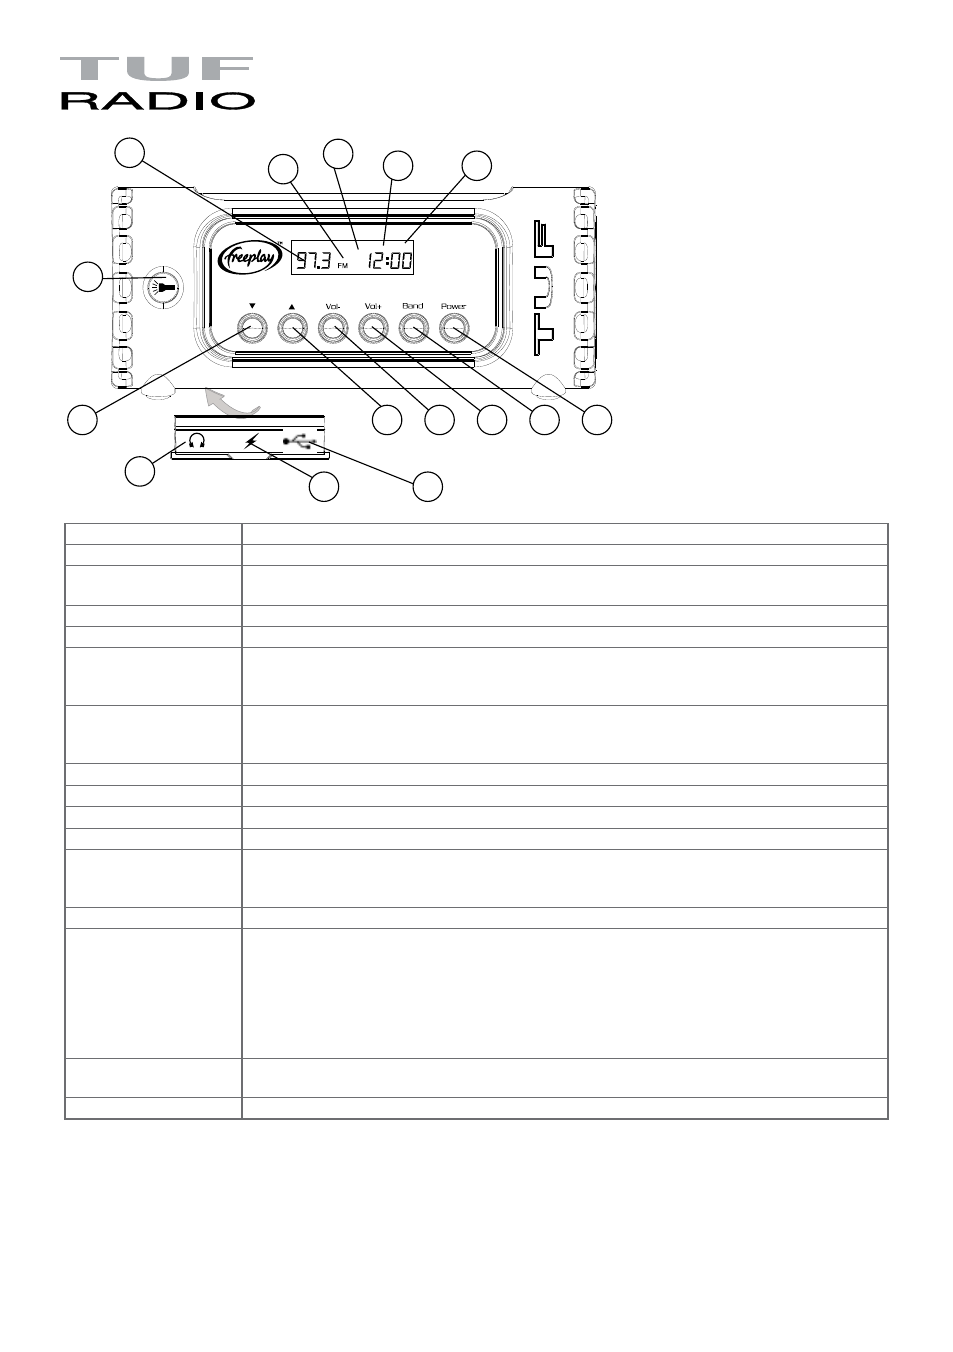
KEY
FUNCTION
1.
Power ON/OFF button.
2. BAND and MODE FM/
AM/SW/Clock set
Function button. This scrolls between FM----AM----SW----Cell Phone charging. Also used to initiate clock-set
when radio is switched off.
3. VOL+
Volume up, volume level is displayed.
4. VOL -
Volume down, volume level is displayed.
5. s SCAN UP
s
Adjust button. When the radio is off, it adjusts hour and minute; when the radio is on, short press to step up
to next frequency, long press to scan. (Note: to fast forward to factory pre-set SW positions, repeat short press
on power button whilst in SW mode)
6. t SCAN DOWN
t
Adjust button. When the radio is off, it adjusts hour and minute; when the radio is on, short press to step
down to next frequency, long press to scan. (Note: to fast forward to factory pre-set SW positions, repeat short
press on power button whilst in SW mode)
7. FLASHLIGHT
Flashlight ON/OFF.
8. RADIO FREQUENCY
Tuned frequency is displayed.
9. BAND
Selected band is displayed.
10. PHONE CHARGING
When ‘CELL’ is selected, winding the handle will charge a connected phone.
11. CLOCK
Hour and minutes are displayed. To set the clock; when radio is OFF, press “Band” button for three seconds to
initiate the clock-set function. Use st to adjust time. Use short-press “Band” to toggle between hour, minute
and 12/24hr setting.
12. BACKLIGHT
The backlight is lit while the function buttons are pressed and for 10 seconds thereafter.
13. USB OUTPUT POWER
PORT
To charge a cell phone in an emergency, use the “Band” button to select “CELL” The USB socket at the lower
rear of the radio receives a standard USB cable for charging a cell phone or other small electronic device.
Normally, winding the crank handle will charge the radio battery. When in Cell mode, winding the handle diverts
power away from the radio battery and to the USB port on the access panel. Plugging in a USB cable allows the
energy generated by cranking to charge a cellphone or other small electronic device. Cell phone charging ONLY
takes place whilst cranking the handle at a constant speed. When in Cell phone charging mode, CELL will be
displayed on bottom right hand side of LCD.
14. USB INPUT CHARGING
By inserting a USB mini plug into the socket on the lower rear of the radio, the radio battery may be charged
via a USB cable.
15. HEADPHONE SOCKET
Enables private listening, and an audio output to an external amplifier.
For further information please go to www.freeplayenergy.com
Freeplay One-Year Warranty
The manufacturer undertakes that, if within 1 (one) year of purchase, this appliance or any part thereof (antenna excluded), is proved to be
defective by reason of faulty workmanship of materials, we will, at our option, repair or replace the same free of charge for labour or materials on
condition that:
1. The original invoice or sales receipt (indicating the date of purchase,
product type and dealer’s name is presented with the defective unit.
2. The complete unit is returned, postage paid, to the manufacturer or
country distributor.
3. The unit has not been serviced, maintained, repaired, taken apart or
tampered with buy any person not authorised by the manufacturer.
4. All service work is undertaken but he manufacturer or appointed
agents.
5. Any defective unit of part shall become the property of the
manufacturer.
6. This warranty is in addition to your statutory rights.
7. The warranty excludes damage caused by misuse or neglect.
Operation and Functions
Rechargeable Batteries
Rechargeable batteries should be fully recharged before
use. This is best achieved by charging TUF overnight via
a USB cable or an adaptor. If Tuf is to be stored for a long
period of time, the battery should be fully recharged
before doing so, to prevent the clock from fully
discharging the battery.
If TUF is to be recharged by winding the handle, to
achieve full performance the following steps should
be taken.
“Exercise” the battery by a series of winding and
playing/shining cycles.
Wind at about 130rpm or more, for 30 to 60 seconds
to partially recharge the battery, and then operate the
product until it stops.
Repeat this several times. It will be noticed that as the
battery is “exercised” the play/shine time increases
for each subsequent cycle.
This process is particularly relevant if the product has
been stored for a long time, or if the battery is
completely discharged.
Play/shine time is very dependent on winding speed
(130rpm is recommended) and volume/intensity level;
the faster the winding speed the longer the operation
time, as well as the lower the volume/intensity the
longer the operation time.”
CELL
1
12
2
3
11
4
10
5
13
14
15
9
8
7
6