ikan RM8000HDMI User Manual
Uick, Tart, Uide
INTRODUCTION
Please open the box and make sure nothing has been damaged in shipment. If damage is apparent please contact the
ikan customer support department at 713-272-8822 or [email protected].
Thank you for purchasing the ikan RM8000HDMI dedicated rack-mount unit. We know you will be extremely pleased
with it’s versatility and ease of use. If you would like more information on our full line of current and up-coming products
please visit our website at: www.ikancorp.com, or call us at 713-272-8822.
PACKAGE INCLUDES
�
RM8000HDMI Dedicated Rack-mount unit
�
Captive switchable AC Power Supply
GETTING STARTED
1. Remove the RM8000HDMI and the included AC power supply from the box.
2. After assembling the AC power supply by plugging in the power cord, carefully screw the threaded power supply plug
into the threaded input on the back of the RM8000HDMI. The RM8000HDMI is powered up by switching on the power
switch located on the front of the unit. The red light located on the front upper right of the RM8000HDMI indicates
the unit has AC power connected but is not switched on. When the RM8000HDMI is switched on, the red light is off.
3. Plug the AC power adaptor into a convenient AC power receptacle. The included power supply is switchable and
functions with any input between 100 to 240 volts so with will work in most countries with the appropriate adapter,
(Check your countries voltage requirements to make certain they match the included AC adaptor).
4. The RM8000 HDMI allows you to connect your video cables directly to the rear of the monitor, with support for HDMI,
SD/HD Component, S-Video (Y/C), and Composite (A/V). The RM8000HDMI features professional BNC connectors
for your video inputs. If your equipment does not feature these connectors, you need a BNC to RCA adapters.
5. When the RM8000HDMI is rack-mounted, the unit can be tilted for a more comfortable viewing angle.
6. When desired remove the protective film from the surface of the two LCD Panels.
RM8000HDMI DIAGRAMS
Checked by
CONDITIONS OF WARRANTY SERVICE
• Free service for one year from the day of purchase if the problem is caused by manufacturing errors.
• The components and maintenance service fee will be charged if the warranty period has expired.
Free Service will not be Provided in the Following Situations:
(* Even if the product is still within the warranty period.)
• Damage caused by abuse or misuse, dismantling, or changes to the product not made by the company.
• Damage caused by natural disaster, abnormal voltage, and environmental factors etc.
Q
UICK
S
TART
G
UIDE /
RM8000HDMI
3903 Stoney Brook Dr. Houston TX 77063. 1-713-272-8822, [email protected] © 2008 iKan Corporation. All right reserved. www.ikancorp.com
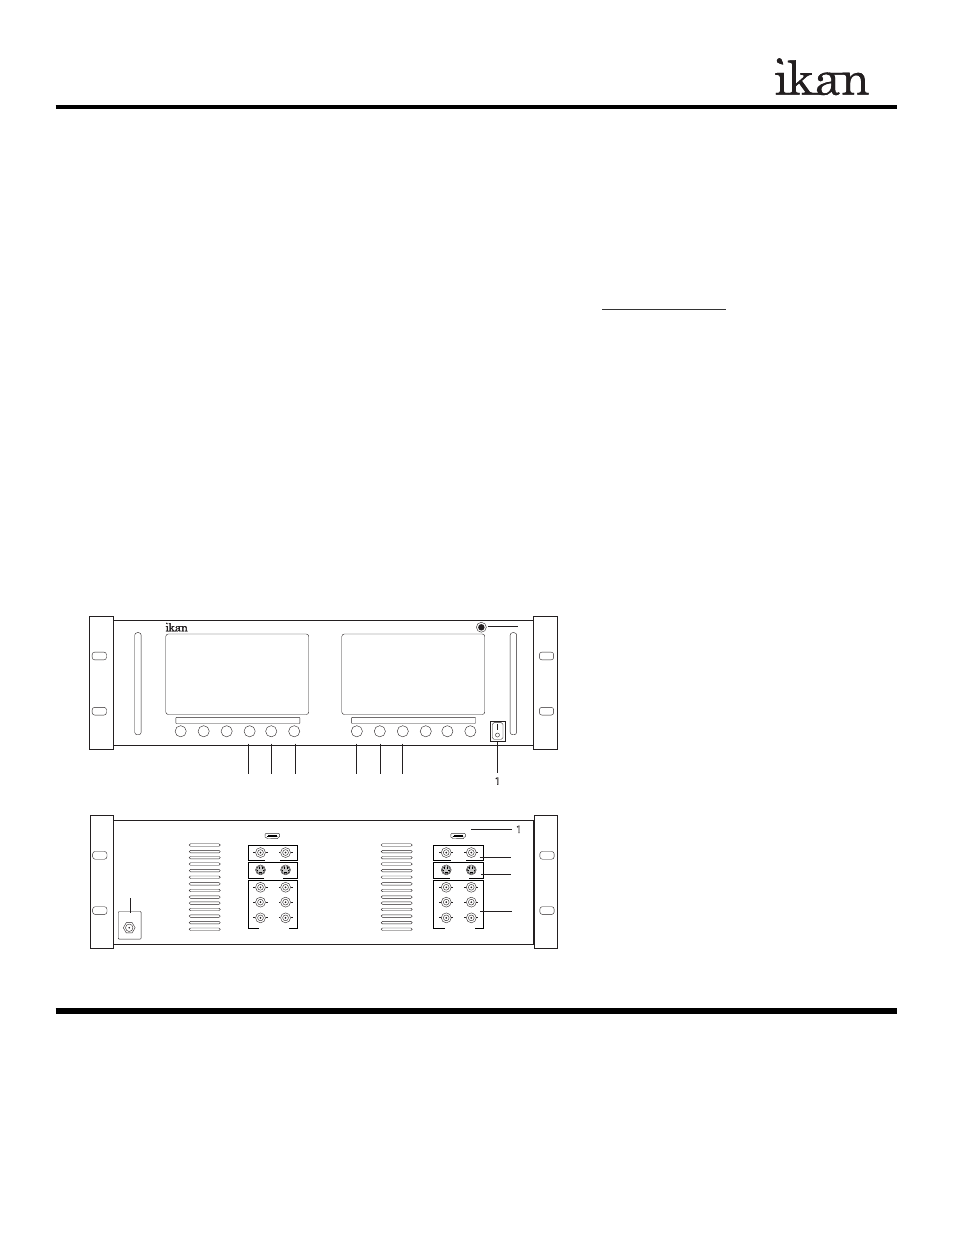
RM8000HDMI
< MENU > INPUT ASPECT GUIDE
< MENU > INPUT ASPECT GUIDE
IN OUT
POWER
VIDEO
S-VIDEO
Y
Pb
Pr
COMPONENT
HDMI
IN OUT
VIDEO
S-VIDEO
Y
Pb
Pr
COMPONENT
HDMI
1
2
3
4
5
6
7
1
2
3
4
5
8
1. POWER Power switch On / Off
2. LAMP Power signal indicator
3. >
Flip image horizontally
While in MENU mode, toggle as up adjust setting
4. MENU Access to all monitor settings: Brightness, Hue, etc.
5. <
Flip image vertically
While in MENU mode, toggle as down adjust setting
6. GUIDES On-screen guide: 4:3 or Widescreen
7. ASPECT Aspect ratio: 4:3 or Widescreens
8. INPUT Video mode: HDMI, A/V (Composite), S-Video,
SD / HD Component
1. HDMI - In for HDMI signal
2. A/V - In/Out for standard definition composite signal
3. S-Video - In/Out for standard definition S-Video signal
4. Component - In/Out for SD and HD signals
480i, 480p, 720p, 1080i and 1080p
5. DC 12V Power Connection