Shield gas, Installation of gas bottle – Kemppi Mastercool 12 User Manual
Page 7
6 – Master(tig) 2500, 2503, 3500, 3503 MLS
™
/ 0311
©
COPYRIGHT
KEMPPI
OY
Master(tig) 2500, 2503, 3500, 3503 MLS
™
/ 0311 – 7
©
COPYRIGHT
KEMPPI
OY
A
C
F
G
B
E
D
2.9. SHIELD GAS
Handle gas bottle with care. There is a risk for injury if gas bottle or bottle valve is
damaged!
Use inert gases such as argon, helium or argon-helium mixture as shield gas for TIG welding.
Make sure that the gas flow regulator is suitable for the gas type used. The flow rate is set
according to the welding current, joint form and the size of the electrode. A suitable flow rate
is normally 8 – 10 l/min. If the gas flow is not suitable the welded joint will be porous. Spark
ignition becomes more difficult if the gas flow is too high. Contact your local Kemppi dealer for
choosing gas and equipment.
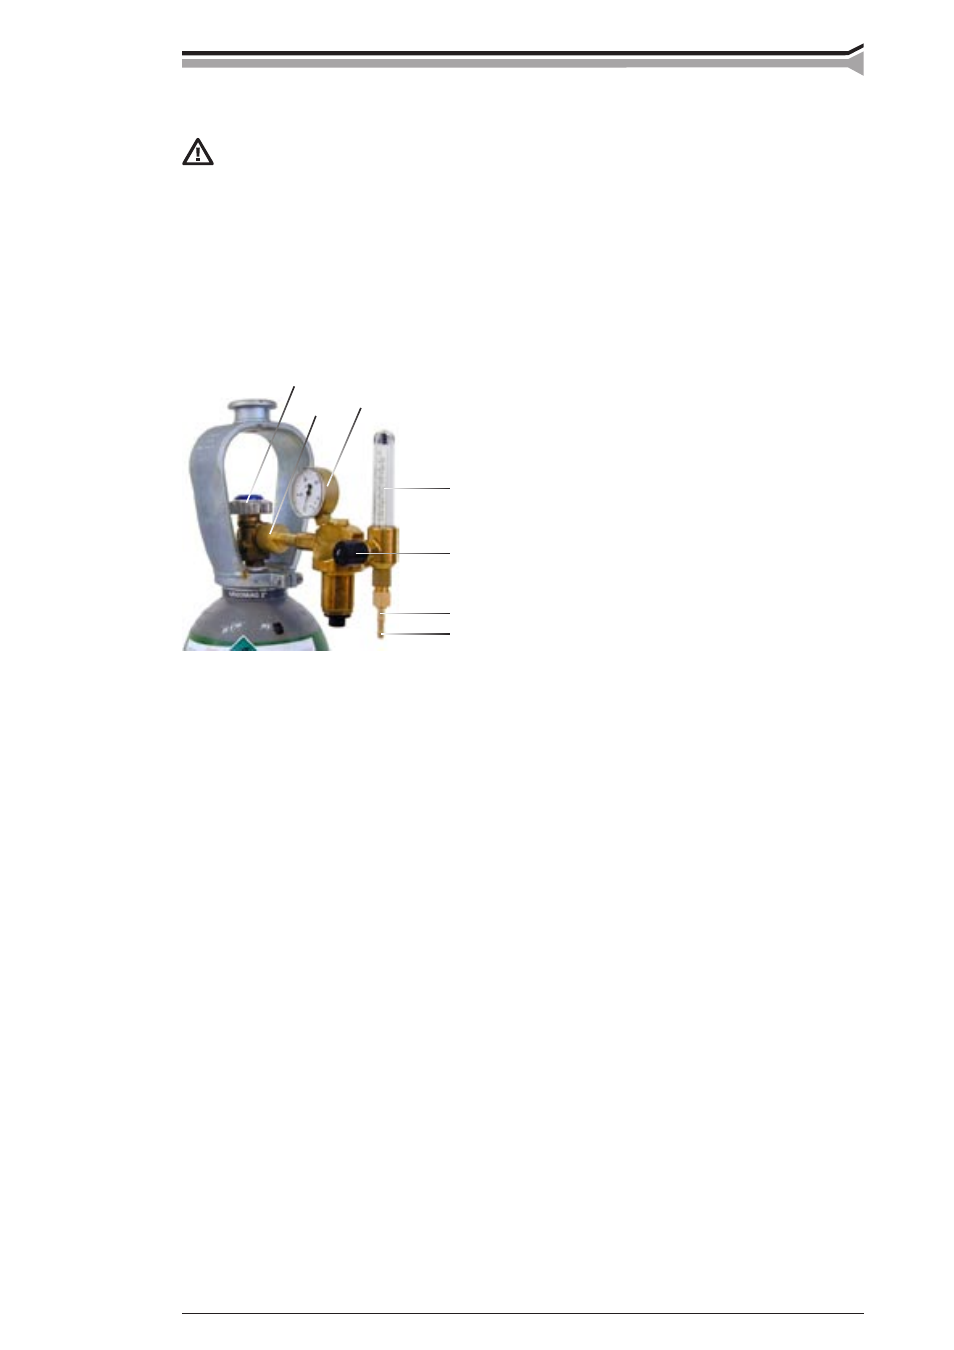
2.9.1. Installation of gas bottle
Parts of gas flow regulator
A Gas bottle valve
B Pressure regulation screw
C Connecting nut
D Hose spindle
E Jacket nut
F Gas bottle pressure meter
G Gas hose pressure meter
Always fasten gas bottle properly in vertical position in a special holder on the wall or on a
carriage. Remember to close gas bottle valve after having finished welding.
The following installation instructions are valid for most gas flow regulator types:
1. Step aside and open the bottle valve (A) for a while to blow out possible impurities
from the bottle valve. Note! Watch out for the gas flow.
2. Turn the press regulation screw (B) of the regulator until no spring pressure can be felt.
3. Close needle valve if there is one in the regulator.
4. Install the regulator on bottle valve and tighten connecting nut (C) with a wrench.
5. Install hose spindle (D) and jacket nut (E) into gas hose and tighten with hose clamp.
6. Connect one end of the hose with the regulator and the other end with the power source.
Tighten the jacket nut.
7. Open bottle valve slowly. Gas bottle pressure meter (F) shows the bottle pressure.
Note! Do not use the whole contents of the bottle. The bottle should be filled when the
bottle pressure is 2 bar.
8. Open needle valve if there is one in the regulator.
9. Turn regulation screw (B) until hose pressure meter (G) shows the required flow (or
pressure). When regulating flow amount, the power source should be switched on and
the gun switch pressed simultaneously.
Close bottle valve after having finished welding. If the machine will be out of use for a long
time, unscrew the pressure regulation screw.