La Crosse Technology B86012 User Manual
Page 2
TIDE:
The tides reflected on this station are based on the ebb and neap tides of the lunar
month. Not daily high and low tides. When it reads high, your tides will be higher than
usual, etc.
Full & new moon = spring tide (TIDE HI).
Quarter = neap tide (TIDE LO)
Other = mean water level (TIDE MID)
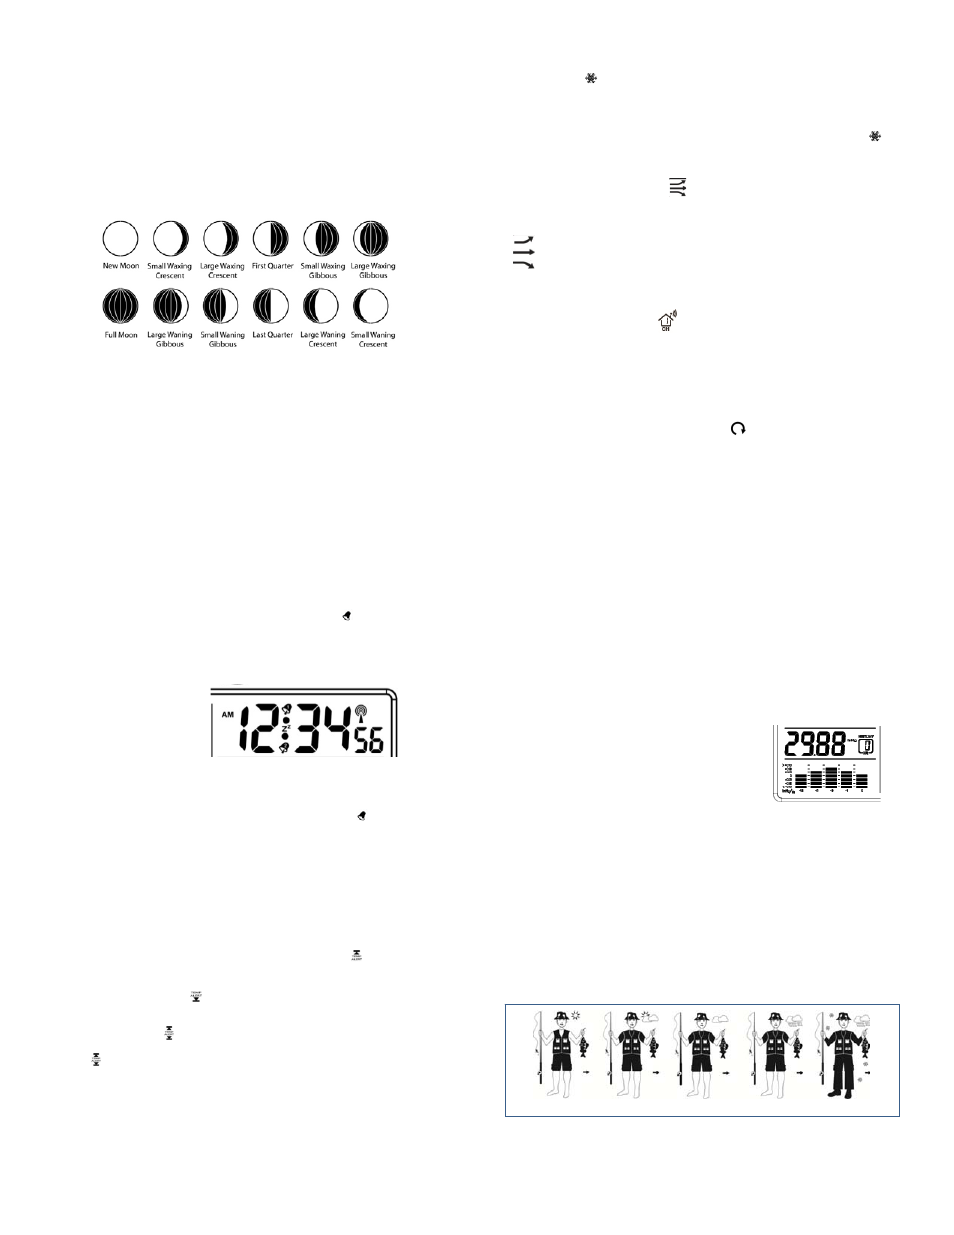
MOON PHASE:
The LCD Moon phase is divided by 6 sections, showing a total of 12 phases of the
moon.
Note: With the moon shown against a light colored background, the phases will show
opposite to a paper calendar. The segments that are highlighted will portray the part of
the moon that is lit. For instance, the moon will be blank during a new moon and dark
during a full moon.
ALARMS: This forecast station has two time alarms and up to six temperature alarms
(with additional transmitters set to different channels).
TIME ALARM: This forecast station has two individual time alarms: Press and release
the ALARM button to enter Alarm mode. Alarm 1 (A1) will show after the alarm time.
Press and release the ALARM button again and Alarm 2 (A2) will show after the alarm
time.
SET TIME ALARM 1: Press and release the ALARM button once to enter Alarm
mode. The Alarm Time and A1 will show.
1. HOUR: Hold the ALARM button for 3 seconds. The Hour will flash. Use the + or -
button to set the Hour. Be sure to set the Hour correctly for AM or PM. Press and
release the ALARM button once.
2. MINUTES: The Minutes will flash. Use the + or - button to set the Minutes. Press
and release the ALARM button once.
3. ACTIVATE: Press and release the ALARM button to enter the correct Alarm
mode. Press and release the + button and the alarm icon
will appear (above
the time, alarm 1, below the time, alarm 2). The number in the bell icon indicates
which alarm is active.
4. DEACTIVATE: Press and release the ALARM button to enter the correct Alarm
mode. Press and release the + button and the alarm icon(s) will disappear
indicating alarm 1 and/or alarm 2 is off.
SET TIME ALARM 2: Press and release the ALARM button twice to enter Alarm
mode. The Alarm Time and A2 will show. Follow steps 1-4 above to program alarm 2.
SNOOZE: When either alarm 1 or alarm 2 sounds, press the SNOOZE/LIGHT button
once to activate the snooze feature for 10 minutes. The alarm icon
and the snooze
icon Zz will flash when the snooze is active. Press any button to deactivate the snooze
feature.
OUTDOOR TEMPERATURE ALARMS: A high and low outdoor temperature alarm
may be set on the forecast station.
Note: When multiple transmitters are connected on different channels, a high and/or
low temperature may be set for each channel.
SET TEMPERATURE ALARM CHANNEL 1:
1. Press and release the CH button to select channel 1 (when multiple transmitters in
use).
2. Hold the TEMP ALERT button until the High Temp Alert icon
appears and the
temperature will flash. Use the + or - button to select your High Temp alarm value.
Press and release the SET button to move to the Low Temp alarm.
3. The Low Temp Alert icon
will appear and the temperature will flash. Use the +
or - button to select your Low Temp alarm value. Press and release the SET button
to confirm and exit to current temperature.
4. The Temp Alert icon will show in the outdoor temperature area when a
temperature alarm is active. When the temperature alarm sounds, the Temp Alert
icon and the temperature value will flash. Press any button to silence the alarm
temporarily.
SET TEMPERATURE ALARM CHANNEL 2 or 3: Use the CH button to select the
channel. Follow steps 2-4 above to set temperature alarms on other channels.
DEACTIVATE TEMPERATURE ALARM: Press and release the TEMP ALERT button
3 times to deactivate all temperature alarms. The alert icon will disappear.
FROST ALARM:
The Frost Alarm when active will sound when the outdoor
temperature drops to 34°F
~37°F (1.1 °C~2.7°C).
1. ACTIVATE: Press and release the TEMP ALERT button to activate the Frost Alarm
on all channels (when multiple transmitters in use). The FROST ALARM icon
will appear in the outdoor temperature area when active.
2. DEACTIVATE: Press and release the TEMP ALERT button until the FROST
ALARM icon no longer shows.
TEMPERATURE TREND ICONS:
The indoor and outdoor temperature trend indicators will update every 30 minutes or
less. These trends represent temperature changes over the past three hours.
Temperature rising more than 2°F /1°C in the past three hours
Temperature has not changed more than 2°F /1°C in the past three hours.
Temperature falling more than 2°F /1°C in the past three hours
The temperature trend indicators are shown next to the indoor temperature and outdoor
temperature readings.
CHANNELS-AUTO SCROLL:
Channels: The Forecast Station can receive up to 3 outdoor transmitters. Extra
TX14TH sensors may be found online or at your retailer to monitor remote
temperature in up to 3 locations within a 200 ft. wireless range of the forecast
station. When more than one transmitter is used, set each transmitter to a different
channel number then hold the CH button for 5 second to search for the transmitters.
View Channels: press the CH button to select Ch1, Ch2, Ch3 or auto-channel
scrolling ALARM.
Auto scroll-channel will show a circling arrow
below the channel number and
will rotate through each channel approximately every 3-5 seconds
ABSOLUTE BAROMETRIC PRESSURE NUMBER: Barometric Pressure is read by
the Forecast Station. The numeric pressure value adjusts automatically as the forecast
station reads changes in air pressure. Since this number is absolute pressure it may
not be the same as a local reporting station that reads in relative pressure.
Note: The number cannot be calibrated.
Absolute Pressure is measured in a vacuum without the influences of terrain,
weather, water, foliage and elevation. The air pressure it would be consistent at
every elevation and decrease as it went higher.
Relative Pressure is a combination of air pressure and altitude. Relative air
pressure will make readings in local areas relative to each other to allow for proper
forecasting.
UNIT OF MEASUREMENT: (InHg or hPa): Hold the HISTORY button for 5 seconds to
switch from InHg (inches or mercury) or hPa (Hecto Pascal) for the numeric pressure
display and the pressure graph.
PRESSURE HISTORY: Press and release the HISTORY button to view the past 12-
hours of numeric pressure history. In the small box to the right of the numeric pressure
a number from 0 to -12 will appear. 0 is current pressure. -1 through -12 reflects the
history in one-hour increments.
Note: The history graph and forecast icons will not
change while you view pressure history.
12-HOUR PRESSURE HISTORY GRAPH:
The bar chart indicates the air pressure history trend over the last 12 hours in 5 steps,
0h, -1h, -2h, -3h, -6h & -12h. The columns represent the change in ”InHg” or “hPa”
readings at specific times. The “0” in the middle of this scale is equal to the current
pressure and each bar represents how high or low in InHg or hPa the past pressure
was compared to the current pressure.
Read the graph from left to right. If the bars are rising, it means that the weather is
getting better due to the increase of air pressure. If the bars go down, it means the air
pressure has dropped and the weather is expected to get worse from the present time
(0h).
Note: The bar graph will scroll continually to prevent LCD burnout.
WEATHER FORECAST ICONS: (Sun, Slightly Cloudy, Cloudy, Rainy, or Snow).
These icons forecast the weather in the next 12-24 hours. The forecast icons displayed,
predict the weather in terms of getting better or worse and not necessarily sunny or
rainy as each icon indicates.
SUNNY SLIGHTLY CLOUDY CLOUDY RAINY SNOW
NOTE: After set up, readings for weather forecasts should be disregarded for the next
48-60 hours. This will allow sufficient time for the forecast station to collect air pressure
data at a constant altitude and therefore result in a more accurate forecast.