La Crosse Technology WS-7017U-IT User Manual
Page 2
3. Press and release the IN button to select the level you desire.
4. Press and release the SET button to confirm and advance to the
Time Zone setting.
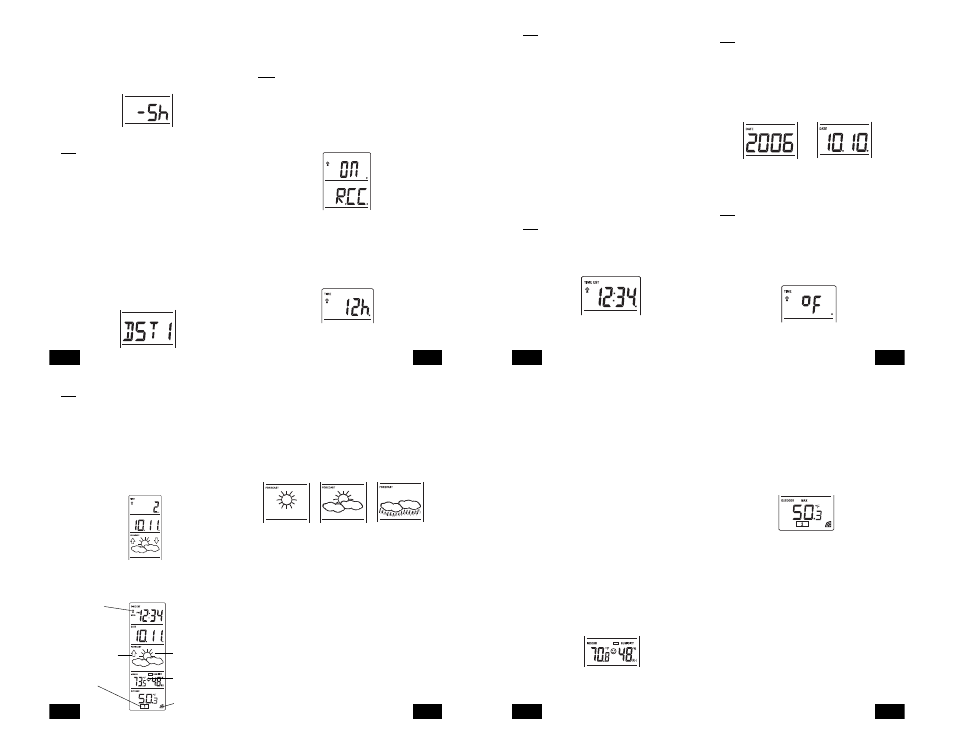
IV. TIME ZONE SETTING
1. Press and hold the SET button for 5 seconds.
2. “LCD” will show in the time LCD and the number setting will flash.
3. Press and release the SET button again.
4. The time zone will flash in the date LCD.
5. Press and release the IN button to select your time zone.
Note: When a time zone for the U.S. is selected the corresponding
abbreviation will appear above the time (please see the table on the
next page). It is possible to select any time zone from -12 GMT to +12
GMT (for example to see the time in another country)
TIME ZONES
GMT
0
ALT
Atlantic
-4
EST
Eastern
-5
CST
Central
-6
MST
Mountain
-7
PST
Pacific
-8
ALA
Alaska
-9
HAW
Hawaii
-10
6. Press and release the SET button to confirm and advance to the
Daylight Saving Time setting.
V. DAYLIGHT SAVING TIME (DST) SETTING
1. Press and hold the SET button for 5 seconds.
2. “LCD” will show in the time LCD and the number setting will flash.
3. Press and release the SET button twice.
4. “DST” will appear in the date LCD and either “1” or “0” will flash.
5. Press and release the IN button to select DST on or off.
“DST 0” indicates that the feature is off and the WWVB will not change
times automatically. “DST 1” indicates that the feature is on and the
WWVB will change times automatically.
Note: Some locations (Arizona and Hawaii) do not follow Daylight
Saving Time, and should select “DST 0.”
6. Press and release the SET button to confirm and advance to the
radio-controlled time on/off setting.
VI. RADIO-CONTROLLED TIME ON/OFF SETTING
1. Press and hold the SET button for 5 seconds.
2. “LCD” will show in the time LCD and the number setting will flash.
3. Press and release the SET button 3 times.
4. “RCC” will appear in the date LCD and “ON” or “OFF” will flash in
the time LCD.
5. Press and release the IN button to select radio-controlled time on
or off.
6. Press and release the SET button to confirm and advance to the
12/24-hour time setting.
VII. 12 OR 24 HOUR TIME SETTING
1. Press and hold the SET button for 5 seconds.
2. “LCD” will show in the time LCD and the number setting will flash.
3. Press and release the SET button 4 times.
4. “12h” or “24h” will flash in the time LCD.
5. Press and release the IN button to select 12 or 24-hour time format.
GB
P.8
GB
P.9
Note: When in the 12-hour format “P.M.” will appear to the left of the
hour in the time LCD between the hours of noon and midnight.
6. Press and release the SET button to confirm and advance to the
time setting.
VIII. TIME SETTING
There are two methods by which the time and date can be set:
A. Automatically via WWVB reception, or
B. Manually.
A. WWVB (Remote Control Time)
This method requires you to do nothing, except wait for the signal to be
received, and to select a time zone. Reception usually takes
approximately 10 minutes during optimal conditions. The best condition
for reception is at night, between midnight and 6:00 am-when there is
less atmospheric interference. To keep your time as accurate as
possible, Wireless Weather Station conducts a WWVB search every
night between these hours, and overrides any manually set time. The
WWVB tower icon (appearing in the TIME LCD) will flash when a signal-
search is in progress and a signal is being received, and will remain
steady when the signal has been received. If the WWVB time has not
been received after 10 minutes of battery installation, you may manually
set the time or leave the time function alone (reception will occur
regardless). After a successful reception, no more reception attempt
would be made until the following day.
B. MANUAL TIME SETTING
Note: When in the 12-hour format “P.M.” will appear to the left of the
hour in the time LCD between the hours of noon and midnight.
1. Press and hold the SET button for 5 seconds.
2. “LCD” will show in the time LCD and the number setting will flash.
3. Press and release the SET button 5 times.
4. The time will flash in the time LCD.
5. Press and release the IN button to advance the hours.
6. Press and release the OUT button to advance the minutes.
7. Press and release the SET button to confirm and advance to the
year setting.
IX. SETTING THE YEAR, DAY AND MONTH
Note: Reception of the WWVB signal will also set the date and day.
The reception of the signal will override any programmed date and
day.
1. Press and hold the SET button for 5 seconds.
2. “LCD” will show in the time LCD and the number setting will flash.
3. Press and release the SET button 6 times.
4. The year will flash in the date LCD.
5. Press and release the IN button to advance the year.
6. Press and release the SET button to confirm and advance to the
day/month setting.
7. The day and month will flash in the date LCD.
8. Press and release the IN button to advance the month.
9. Press and release the OUT button to advance the day.
10.Press and release the SET button to confirm and advance to the
snooze setting.
X. SETTING THE SNOOZE
Note: This is an unused function of the Wireless Weather Station and
should be disregarded. The setting has no bearing on the operation.
Please press and release the SET button to advance to select the
temperature format.
XI. SELECTING ˚F OR ˚C
1. Press and hold the SET button for 5 seconds.
2. “LCD” will show in the time LCD and the number setting will flash.
3. Press and release the SET button 9 times.
4. Either “˚F” or “˚C” will flash in the time LCD.
5. Press and release the IN button to select the temperature format.
6. Press and release the SET button to confirm and advance to the
forecast sensitivity setting.
GB
P.10
GB
P.11
XII. SETTING THE FORECAST SENSITIVITY
Note: The forecast sensitivity can be adjusted to allow for areas that
have a higher or lower sensitivity to changing air pressure (for example
coastal areas have more pressure change than areas such as southern
Arizona).
The numbers correspond to the amount of air pressure change
necessary to trigger a change in the forecast icon. Areas that tend to
have more air pressure change would set the sensitivity to 3, while
areas that experience lower than normal air pressure change would
set the sensitivity to 1.
1. Press and hold the SET button for 5 seconds.
2. “LCD” will show in the time LCD and the number setting will flash.
3. Press and release the SET button 10 times.
4. Either “1”, “2” or “3” will flash in the time LCD.
5. Press and release the IN button to select the forecast sensitivity
6. Press and release the SET button to confirm the forecast sensitivity
and complete the programming.
FEATURES OF THE WS-7017U-IT
I. WEATHER FORECAST
The weather forecasting feature is estimated to be 75% accurate and
is for the upcoming 12 to 24 hours. The weather forecast is based
solely upon the change of air pressure over time. The WS-7017U-IT
averages past air-pressure readings to provide an accurate forecast-
creating a necessity to disregard all weather forecasting for 12-24 hours
after the unit has been set-up, reset, or moved from one altitude to
another (i.e. from one floor of a building to another floor). In areas
where the weather is not largely affected by the change of air pressure,
the sensitivity setting should be set to 1.
A. WEATHER ICONS
There are 3 possible weather icons that will be displayed in the
FORECAST LCD:
Sunny-indicates that the weather is expected to improve (not that the
weather will be sunny).
Sun with Clouds-indicates that the weather is expected to be fair (not
that the weather will be sunny with clouds).
Clouds with Rain-indicates that the weather is expected to get worse
(not that the weather will be rainy).
These icons indicate the expected weather change in the next 12 to
24 hours. The icon does not give an exact prediction of the weather,
however it should be viewed as a generalization of the expected weather
change (for example a “sunny” icon indicates the weather is expected
to improve).
The weather icons change when the unit detects a change in air
pressure. The icons change in order, from “sunny” to “partly sunny” to
“cloudy” or the reverse. It will not change from “sunny” directly to “rainy”,
although it is possible for the change to occur quickly. If the symbols
do not change then the weather has not changed, or the change has
been slow and gradual.
B. WEATHER TENDENCY ARROWS
Other possible displays in the FORECAST LCD are 2 weather tendency
arrows, one that points up (on the left side of the LCD) and one that
points down (on the right side of the LCD). These arrows reflect current
changes in the air pressure. An arrow pointing up indicates that the
GB
P.12
GB
P.13
WWVB Tower Icon
(indicates time reception)
Weather Tendency Arrow
Remote Sensor
Number (Up to 3
Total)
Forecast Icon
Comfort Level
Indicator
Satellite Icon
(indicates outdoor
transmission)
air pressure is increasing and the weather is expected to improve or
remain good, an arrow pointing down indicates that the air pressure is
decreasing and the weather is expected to become worse or remain
poor.
II. INDOOR TEMPERATURE, HUMIDITY, AND COMFORT LEVEL
INDICATOR
The current indoor temperature (viewed on the left) and relative humidity
(viewed on the right) are displayed in the INDOOR LCD. The comfort
level indicator is located at the center of the INDOOR LCD. The indicator
will display a happy face icon when the temperature is between 68˚F
and 79˚F (20˚C and 25.9˚C), and the humidity is between 45% and
65%. A sad face icon will be displayed when the temperature and
humidity are outside the mentioned ranges.
III. OUTDOOR TEMPERATURE
The temperature received from the remote temperature sensor is viewed
in the OUTDOOR LCD. When there is more than one remote
temperature sensor unit in operation, a “boxed” number will appear to
the right of the temperature. This indicates which remote temperature
sensor unit (1, 2, or 3) is currently displaying its data in the OUTDOOR
LCD. (This feature is explained in further detail in section V-Adding
Remote Temperature Sensors).
IV. MINIMUM AND MAXIMUM TEMPERATURE RECORDS
The WS-7017U-IT keeps a record of the MINIMUM and MAXIMUM
temperature, and the time and date of their occurrence-for both the
indoor and outdoor modes.
A. VIEWING THE INDOOR TEMPERATURE AND HUMIDITY
RECORDS
1. Press the IN button once. “MIN” appears above the indoor
temperature and the LCD will flash, indicating that the minimum
temperature and humidity, and the time and date of occurrence of
the indoor temperature are displayed. The minimum records will
display for 30 seconds before returning to the normal display mode.
2. Press the IN button again (once while “MIN” is still displayed, twice
otherwise). “MAX” appears above the indoor temperature and the
LCD will flash, indicating that the maximum temperature and
humidity, and the time and date of occurrence of the indoor
temperature are displayed.
3. While “MAX” is still displayed press the IN button again to return to
the current data display. Or you can wait 30 seconds, during either
the minimum or the maximum readings, and the unit will
automatically return to current data readings.
B. VIEWING THE OUTDOOR TEMPERATURE RECORDS
1. Press the OUT button once. “MIN” appears above the outdoor
temperature and the LCD will flash, indicating that the minimum
temperature, and the time and date of occurrence are displayed.
The minimum records will display for 30 seconds before returning
to the normal display mode.
2. Press the OUT button again (once while “MIN” is still displayed,
twice otherwise). “MAX” appears above the outdoor temperature
and the LCD will flash, indicating that the maximum temperature
and the time and date of occurrence are displayed.
3. While “MAX” is still displayed press the OUT button again to return
to the current data display. Or you can wait 30 seconds, during
either the minimum or the maximum readings, and the unit will
automatically return to current data readings.
C. RESETTING THE MIMIMUM AND MAXIMUM RECORDS
1. All the indoor records (minimum and maximum) will be reset after
the IN button is pressed and held for 5 seconds.
2. All the outdoor records (minimum and maximum) will be reset after
the OUT button is pressed and held for 5 seconds.
V. ADDING REMOTE TEMPERATURE SENSORS (OPTIONAL)
The WS-7017U-IT is able to receive signals from 2 additional
temperature sensors. The following are instructions for the set-up of
temperature sensor units with the WS-7017U-IT. These extra sensors
can be purchased through the same dealer as this unit.
1. Remove all the batteries from the receiver and sensor(s) and wait
60 seconds. During these 60 seconds, press any button 20 times
to discharge any excess power.
2. Insert the batteries to the first temperature sensor.
3. Within 30 seconds of powering up the first sensor, insert the
batteries to the Weather Station. Once the batteries are in place,
all segments of the LCD will light up briefly. Following this the indoor
temperature and indoor humidity, time as 12:00, calendar, and
GB
P.14
GB
P.15