La Crosse Technology WS-8500TWC-IT User Manual
Page 2
Page 5 of 14
If it does not appear after 30 seconds, please
reinstall the Wireless Display batteries and try
again. Once the indoor data is displayed,
proceed to the next step.
Step 3.
Wireless Temperature Reception
After the Wireless Display is powered up, it will
start receiving wireless temperature signal from
the TX61U-IT sensor. If reception is successful,
the outdoor temperature will appear on the
Wireless Display. If this does not happen after
5 minutes, please remove the batteries from
the Wireless Display, make sure the batteries
are fresh and go back to Step 1.
Step 4.
Distance Between Units
To ensure sufficient 915 MHz wireless
communication, the final distance between the
Wireless Display and the TX61U-IT sensor
should be no greater than 200 feet (60.96
meters) open air.
TX61U-IT Sensor Power Save "STOP" Mode
If the TX61U-IT sensor is placed in a dark
environment for 24 hours, it will enter into the
"STOP" mode to save power. The LCD will turn
off and it will stop transmitting the wireless
temperature signal. If this happens, please
press the reset button on the TX61U-IT sensor
to wake it up again. Afterwards, if the voltage is
higher than 2.5V, the LCD will turn on again
and resume the transmission of the wireless
temperature signal. However, if the voltage is
lower than 2.5V, “LO” will appear on the LCD
and the sensor will enter into "IDLE" mode.
If the battery voltage is lower than 2.5V, please
relocate the TX61U-IT sensor to a brighter
environment in order to charge up the internal
rechargeable batteries to continue normal
operation.
MIN / MAX Temperature Display
Press the MIN / MAX button to view the min
and max records for IN & OUT temperature.
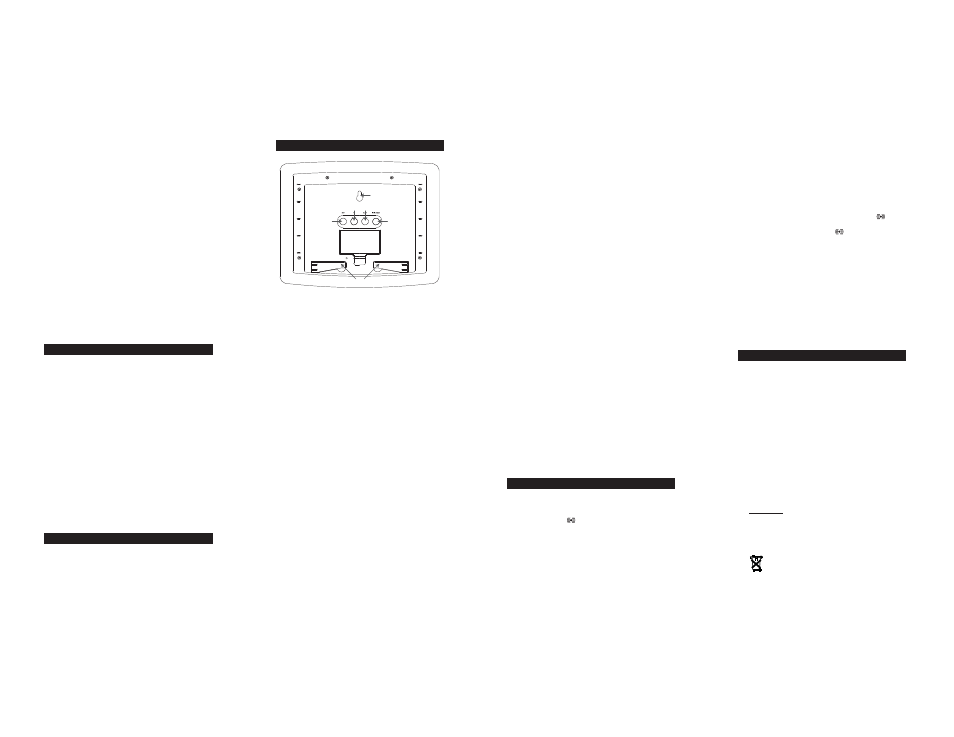
Page 6 of 14
Set the Time and Date
SET
MIN/MAX
ALM
HANGING HOLE
FOLD OUT STANDS
+
+
+
BATTERY
COMPARTMENT
Note: The "SET" button is used to enter SET
mode. The display will exit SET mode
automatically after 15 seconds of inactivity. If the
display exits SET mode, press the "SET" button
the indicated number of times to return to the
portion of the SET mode desired.
1. Set the Time Zone:
Press the “SET” button and the Time Zone
display will flash. Use the “PLUS” button to
select the correct Time Zone setting from the
available selections below:
-1,-2,-3: Other time zones
-4: ATL - Atlantic
-5: EST - Eastern (default setting)
-6: CST - Central
-7: MST - Mountain
-8: PST - Pacific
-9: ALA - Alaska
-10,-11,-12,12,11,10,9,8,7,6,5,4,3,2,1:
Other time zones
0: - Greenwich Mean Time (GMT)
(North American Time Zones are Negative
numbers)
2. Set Daylight Saving Time ON/OFF:
DST should be set to "ON". This setting will
not affect operation of the Wireless Display.
3. Set Language:
Press the “SET” button a third time and the
Language Abbreviation will flash. Press the
"PLUS" button to switch the Language to be
displayed. The three-letter abbreviation for the
Page 7 of 14
day of the week will display in the bottom of
the LCD while the setting flashes above.
US: English (default setting)
F: French (Français)
E: Spanish (Español)
4. Set Time - Hour:
Press the “SET” button a fourth time and the
Hours digits will flash. Use the “PLUS“ button
to set the correct hour.
5. Set Time - Minute:
Press the “SET” button a fifth time and the
Minutes digits will flash. Use the “PLUS“
button to set the correct minute.
6. Set Date - Year:
Press the “SET” button a sixth time and the
Year digits will flash. Use the “PLUS“ button
to set the correct year.
7. Set Date - Month:
Press the “SET” button a seventh time and
the Month digits will flash. Use the “PLUS“
button to set the correct month.
8. Set Date - Date:
Press the “SET” button an eighth time and the
Date digits will flash. Use the “PLUS“ button
to set the correct date.
9. Set Date - Day of Week:
Press the “SET” button a ninth time and the
Day of Week abbreviation will flash. Use the
“PLUS“ button to set the correct day of week.
10. Set 12 or 24 Hour Time Mode:
Press the “SET” button a tenth time and the
12 or 24 Hour Time Mode digits will flash.
Use the “PLUS“ button to set the time mode
to either a 12 or 24 hour clock.
11. Set Temperature Mode - °F or °C:
Press the “SET” button an eleventh time and
the Temperature Mode abbreviation will
flash. Use the “PLUS“ button to set the
temperature mode to °F or °C.
Setting the Time Alarm
x
To turn the alarm on:
Press the "ALARM" button. The LCD will display
the alarm icon
.
x
To set the Alarm Time - Hour: Press and hold
down the "ALARM" button for 2 seconds until the
hours digits flash. Use the “PLUS” button to set
the hour. Press the "ALARM" button to confirm
your setting and move to setting the minutes.
Page 8 of 14
x
To set the Alarm Time - Minutes: The Minutes
digits of the Alarm Time will flash. Use the “PLUS”
button to set the minutes. You can hold the
"PLUS" button in to speed up the setting of
minutes by using five minute increments. Press
the "ALARM" button to confirm your minutes
setting and to end the setting procedure.
x
To activate or deactivate the daily alarm, briefly
press the “ALARM” button once. When the alarm
is active the clock displays the alarm icon
below the word "TIME", when the alarm is
deactivated, the alarm icon
will not display.
About the Time Alarm:
x
After 15 seconds without pressing any button the
clock switches automatically from alarm setting
mode to normal clock mode.
x
The alarm will sound for 85 seconds if not
deactivated. You can deactivate it by pressing any
button. The alarm will be repeated automatically
after 24 hours.
x
The alarm uses 3 different patterns of tone,
beginning gently and increasing in intensity,
known as a "Crescendo Alarm".
Battery Replacement Information
Wireless Display
To replace the batteries in the Wireless Display:
1.
Lift up the battery compartment cover and
remove the batteries.
2.
Please take note to install the batteries with
the proper polarity as it relates to the battery
diagram inside the battery compartment (+).
The batteries will fit tightly. To avoid start-up
problems please ensure that the batteries do
not spring free.
3.
Replace compartment cover.
Please follow the "SETTING UP" steps listed in the
previous section of this manual to ensure that the
wireless temperature reception is successful.
TX61U-IT Wireless Solar-Powered Sensor
DOES NOT have replaceable batteries.
The TX61U-IT sensor consumes solar power and
automatically charges the internal Alkaline power
cell. No battery replacement is needed.
Help us to keep our environment clean.
Please take the used batteries to an
authorized depot for recycling