Sensor adjustment, Dip switch settings – Legrand CS Series 360° PIR User Manual
Page 6
SENSOR ADJUSTMENT
The sensor comes factory preset and ready for operation.
If testing of operation is desired:
• Remove the sensor’s cover (twist).
• Refer to the DIP switch settings chart below for switch configurations.
• Make sure that office furniture and fixtures are in place.
1. Restore power to the lighting circuits and turn the lights on.
• There is a one minute warm-up when power is initially restored to the
sensor before the sensor works properly.
2. Set Time Delay to minimum: DIP switches #1 through 6 set to ON
(15 secs.).
3. Set Sensitivity to maximum: DIP switches
#7 and #8 to ON.
4. Replace the sensor’s cover.
5. Move away from sensor and be still.
The lights should go off after 15 seconds.
Note: If lights remain on, move farther away or out of sight of the sensor.
If lights still remain on, set the Sensitivity to medium high by setting DIP
switches #7 to ON and #8 to OFF, or see Unwanted Sensor Activations
under Troubleshooting.
6. Set the appropriate Time Delay (DIP switches #1 through 6).
The factory preset Time Delay is 18 minutes; other suggestions are:
Offices and conference rooms: 10 minutes.
Classrooms: 10 minutes.
Warehouses: 6 minutes.
Hallways: 4 minutes.
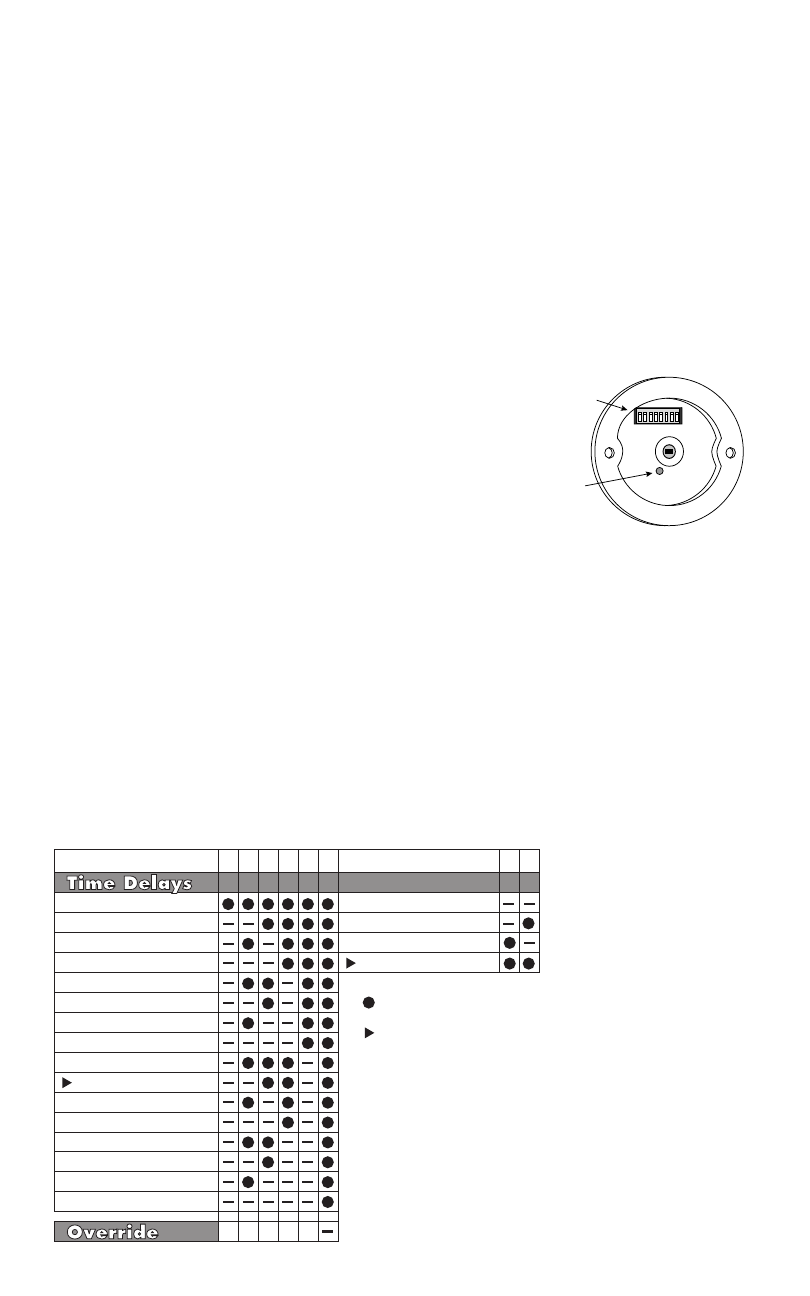
DIP SWITCH SETTINGS
LED
DIP Switch Control
for Time Delay and
Sensitivity
DIP Switch #
15 seconds
4 minutes
6 minutes
8 minutes
10 minutes
12 minutes
14 minutes
16 minutes
18 minutes
20 minutes
22 minutes
24 minutes
26 minutes
28 minutes
2 minutes
Minimum
Medium Low
Medium High
Maximum
1 2 3 4
7 8
Sensitivity
Sensitivity
5 6
30 minutes
= ON
–
= OFF
= Factory Presets