Maytag GY399LXUS Dimension Guide User Manual
Maytag Stoves
30" (76.2 cm) Slide-in Electric Range
Because Whirlpool Corporation policy includes a continuous commitment to improve
our products, we reserve the right to change materials and specifications without notice.
Dimensions are for planning purposes only. For complete details, see Installation
Instructions packed with product. Specifications subject to change without notice.
Ref. W10430949A
5/11/12
Page 1 of 2
PRODUCT MODEL NUMBERS
GY397LXU
GY399LXU
Electrical Connection
To properly install your range, you must determine the type of electrical
connection you will be using and follow the instructions provided for it
here.
●
Range must be connected to the proper electrical voltage and
frequency as specified on the model/serial number rating plate. The
model/serial rating plate is located on the side of the oven frame
behind the storage drawer or warming drawer panel. Refer to the
figures in “Product Dimensions” in the “Location Requirements”
section.
●
This range is manufactured with the neutral terminal connected to the
cabinet. Use a 3-wire, UL listed, 40- or 50-amp power supply cord
(pigtail) (see the following Range Rating chart). If local codes do not
permit ground through the neutral, use a 4-wire power supply cord
rated at 250 volts, 40 or 50 amps and investigated for use with
ranges.
Range Rating*
Specified Rating of
Power Supply Cord Kit
and Circuit Protection
120/240 Volts
120/208 Volts
Amps
8.8 - 16.5 KW
7.8 - 12.5 KW
40 or 50**
16.6 - 22.5 KW
12.6 - 18.5 KW
50
*
*The NEC calculated load is less than the total connected load listed
on the model/serial/rating plate.
**If connecting to a 50-amp circuit, use a 50-amp rated cord with kit.
For 50-amp rated cord kits, use kits that specify use with a nominal
1
³⁄₈" (34.9 mm) diameter connection opening.
●
A circuit breaker is recommended.
●
The range can be connected directly to the circuit breaker box (or
fused disconnect) through flexible or nonmetallic sheathed, copper or
aluminum cable. See the “Electrical Connection - U.S.A. Only” section.
●
Allow 2 to 3 ft (61.0 cm to 91.4 cm) of slack in the line so that the
range can be moved if servicing is ever necessary.
●
A UL listed conduit connector must be provided at each end of the
power supply cable (at the range and at the junction box).
●
Wire sizes and connections must conform with the rating of the
range.
●
The wiring diagram is located on the back of the range or behind the
storage drawer, in a clear plastic bag.
ELECTRICAL REQUIREMENTS
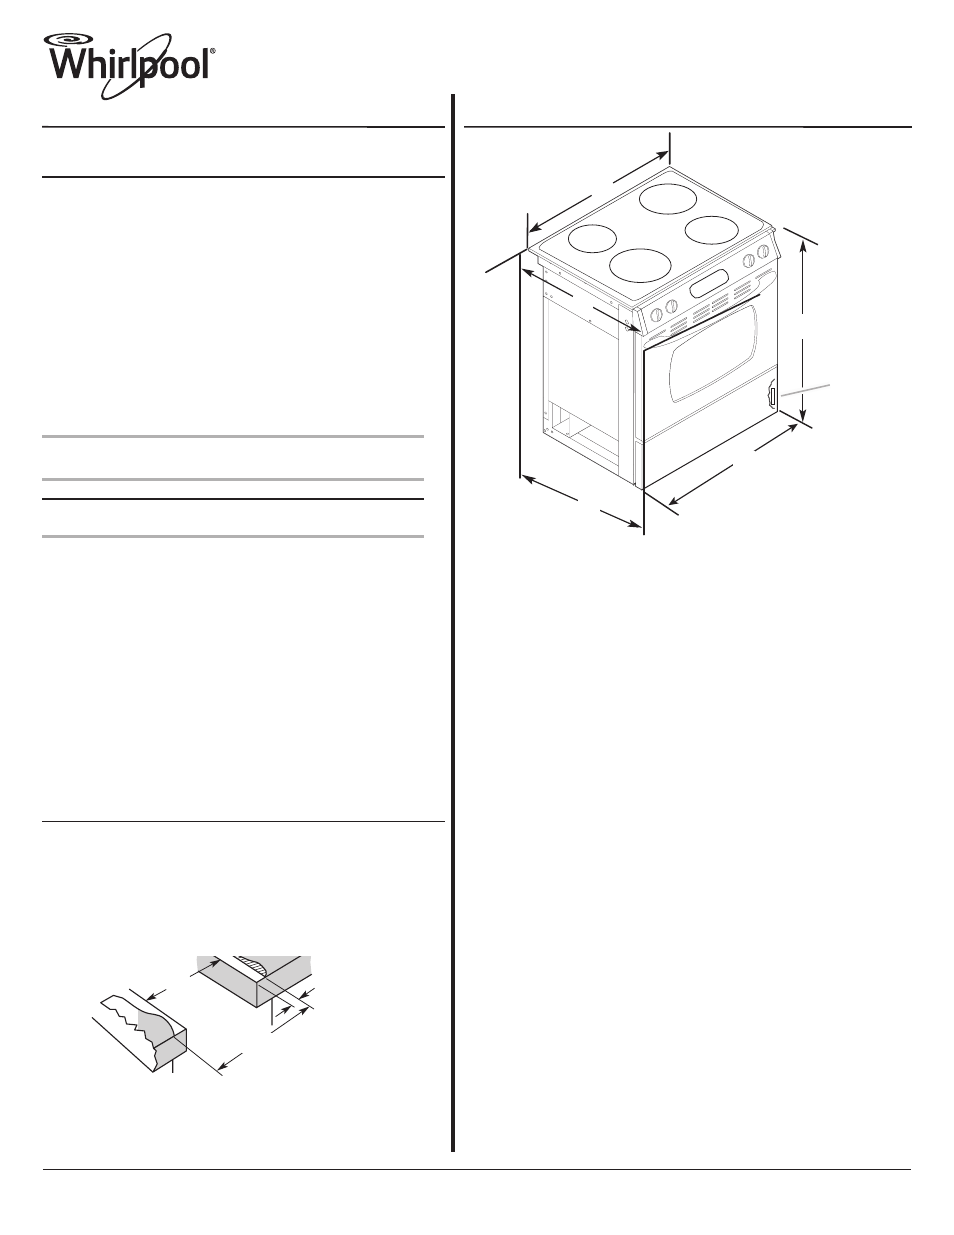
PRODUCT DIMENSIONS
A. 30 " (78.1 cm)
B. 35
³⁄₄
" (90.8 cm) height to underside
of cooktop edge with leveling legs
screwed all the way in*
C. Model/serial number plate (located
behind the storage or warming
drawer on the side of the oven frame
D. 29
⁷⁄₈
" (75.9 cm)
E. 28
⁵⁄₁₆" (71.9 cm) from
handle to standoff at back
of range**
F. 23
³⁄₄
" (60.3 cm)
countertop notch to rear
of cooktop
C
B*
A
D
E**
F
³⁄₄
*
*Range can be raised approximately 1" (2.5 cm) by adjusting the leveling
legs.
**When installed in a 24" (61 cm) base cabinet with 25" (63.5 cm)
countertop; front of oven door protrudes 2
¹⁄₂" (6.4 cm) beyond 24"
(61.0 cm) base cabinet.
The cooktop sides of the slide-in range fit over the cutout edge of your
countertop.
If you have a square finish (flat) countertop and the opening width is
30" (76.2 cm), no countertop preparation is required.
Formed front-edged countertops must have molded edge shaved flat
³⁄₈" (1.0 cm) from each front corner of opening.
Tile countertops may need trim cut back
³⁄₈" (1.0 cm) from each front
corner and/or rounded edge flattened.
If countertop opening width is greater than 30" (76.2 cm), adjust the
³⁄₈" (1.0 cm) dimension.
Countertop must be level. Place level on countertop, first side to side,
then front to back. If countertop is not level, range will not be level.
Range must be level for satisfactory baking conditions.
COUNTERTOP PREPARATION (for Slide-in Ranges Only)
30"
(76.2 cm)
30 ¾"
(78.1 cm)
³⁄₈
"
(1.0 cm)