Randall Amplifiers 667 User Manual
Page 6
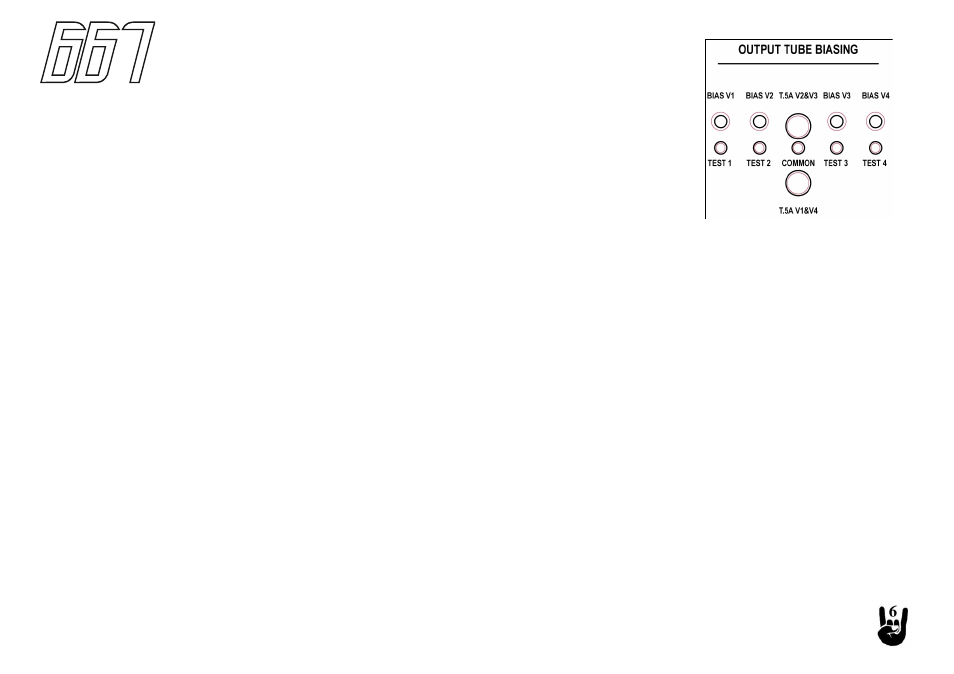
BIAS CONTROLS!
BIAS CONTROLS!
This is a powerful feature and tool for exploring more tonal possibilities with the 667 amplifier. You can mix and match
different tube types together for an almost unlimited range of tones. More on this later. Since there is individual bias
adjustment for each tube, there is no need to obtain matched tubes! 667 will accept EL34, 6CA7, KT77, 6L6, 5881,
KT66, 6550, KT88, KT90, KT100/120 type tubes and any other derivations of the above. The output power will range
from 100 to 180 watts RMS depending on the output tube selection. The added benefit of having output tubes fused in
pairs is in case of tube failure, you will be able to finish your gig. Only a small volume reduction and slight tonal
change will occur. Biasing the 667 amp is simple and does not require removal of the chassis. You will need a simple
voltmeter or digital multimeter set to the lowest DC voltage range, typically 200mV (millivolts). Please note that some meters
display may indicate 25.0 for 25 mV and others may display .025 for 25 mV. Make sure you know your meter and refer
back to the meter’s owners manual to be certain. Then follow the these directions: Unplug any cords from the INPUT,
make sure the MASTER volume control is turned all the way down, counterclockwise. Turn all the bias controls all the
way down, counterclockwise. Connect a load to the appropriate speaker jack, plug in the AC cord and turn on the
amplifier. Wait a few minutes then put the STANDBY switch in the up position. Put the black negative probe lead of your meter into the common tip jack. Place
the positive red probe lead in the red tip jack of TEST 1. Referring to the recommended bias settings below, slowly adjust the corresponding bias pot while
paying attention to its sensitivity. Make a note of your bias setting if you are using 2 or 4 of the same tubes. Repeat step 2 for TEST 2, TEST 3, & TEST 4.
Then recheck and make further adjustments as necessary. Once the bias is set, you are ready to play.
Recommended Bias Settings:
EL34/6CA7/KT77 34mV to 40mV
6L6 /5881/KT66 32mV to 38mV
6550/KT88 38mV to 45mV
KT120 45mV to 50mV
Note: The upper range of the recommended bias settings should be considered a maximum setting. Feel free to experiment within the given ranges to suit
your taste. It is normal for tubes to drift a little, especially when they are new, and will stabilize after a few hours of use. Also, bias will drift with variations in AC
line voltage. This is not a big deal so don’t get obsessed by constantly checking the bias to keep it at your chosen settings. To balance out the currents of the
output tube when using 4 of the same type of output tubes, place one meter probe (black or red) into TEST 1 red tip jack then the other meter probe into the
TEST 4 red tip jack. Then adjust either one of the corresponding bias pots to get a 0 reading on your meter. Repeat the above for TEST 2 and TEST 3. If you
are using 2 different output tube types, (e.g. 2-KT88 and 2-EL34), place the 2-KT88s in either V1 and V4 or V2 and V3 positions, then the 2-EL34s in the
remaining positions and follow the above procedure to balance out the currents.
!