Control panel – REMKO RKL 460 User Manual
Page 6
6
3
"
COMP. ON" display (compressor is running)
When the compressor is started again for a second
time, a minimum of three minutes must elapse be-
forehand for safety reasons. During this time, the
"COMP ON" display blinks.
4
"
THERMO CONTROL
"
button (temperature selection)
After the unit has been connected to the power supply
and manually switched on, the target temperature is
automatically set to 25°C. This can be changed using
the arrow buttons in 1°C increments between 20 and
30°C:
Left arrow button = Higher target temperature
Right arrow button = Lower target temperature
This is shown in display 7.
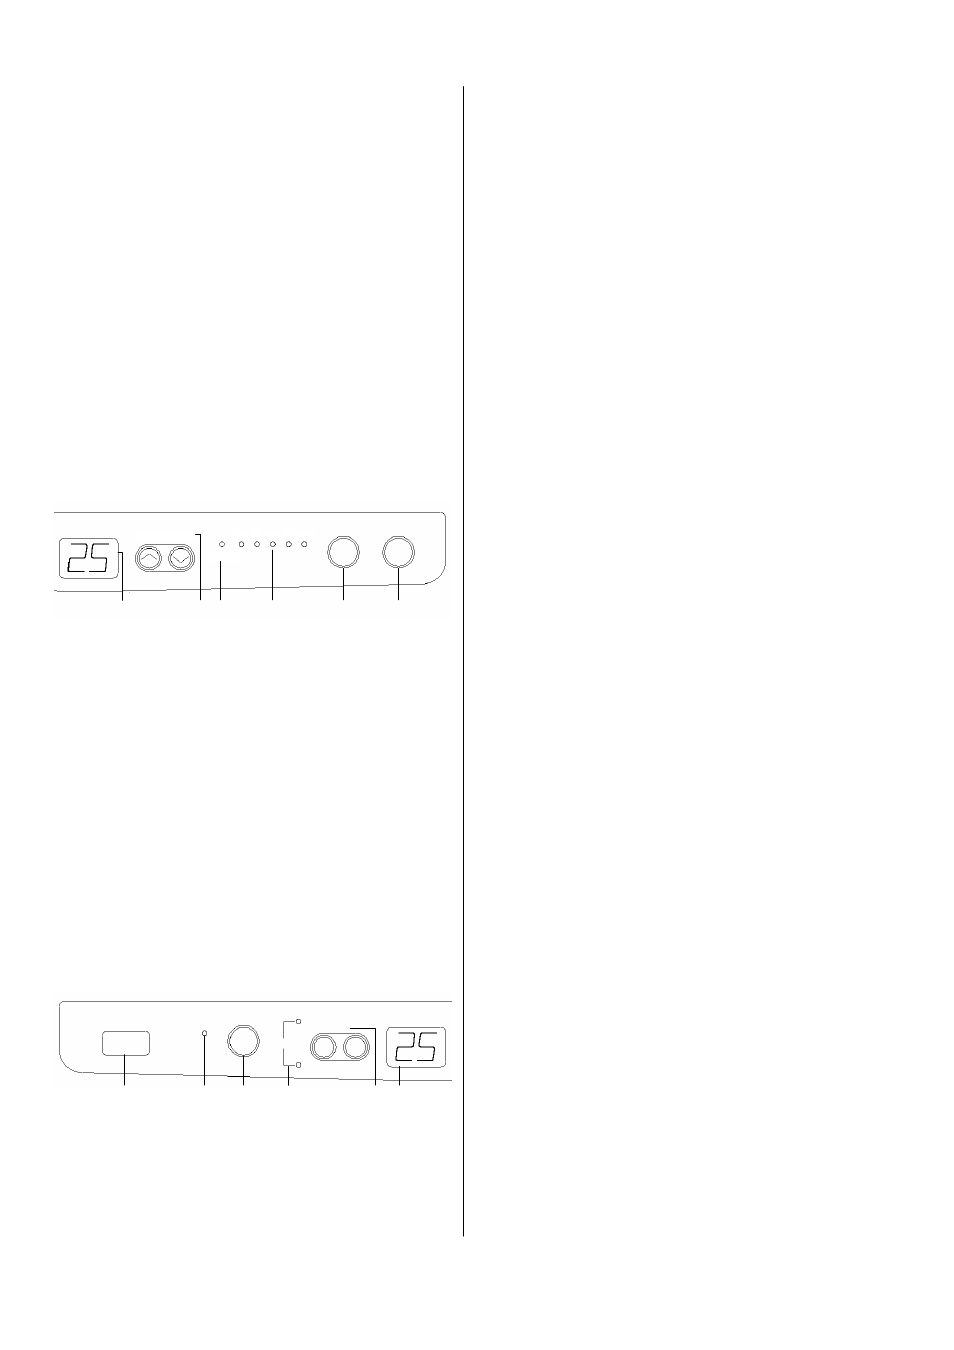
Control Panel
The unit may only be put into operation once it has been
installed following all instructions contained in the “Safety
Hints” and “Installation Instructions” sections.
1
"
On / Off
"
button
2
"
MODE
"
button (operating mode and fan setting)
There are 5 options available. Display 10 shows the
selected operating mode.
The sequence is: AUTOHIMEDLOFAN
AUTO Cooling mode, automatic fan rotation inde-
pendent of room temperature.
HI
Cooling mode, highest fan setting.
MED
Cooling mode, medium fan setting.
LO
Cooling mode, lowest fan setting.
FAN
Ventilate only, no cooling.
5
"
TIMER
"
button (timer clock)
The timer can be preset for a maximum of 24 hours.
The amount of time is shown on display 7. The timer
has two functions:
1. Unit switches on automatically
When the unit is off, using the "SET" button, the user
can enter the number of hours after which the unit is
to be switched on. Each time the button is pressed,
the number of hours is increased by 1. If this func-
tion is activated, "TIMING ON" 9 is lit up
After the timer has been activated, the operating
mode and target temperature can be set as de-
scribed above.
2. Unit switches off automatically
When the device is on, using the "SET" button, the
user can enter the number of hours after which the
device is to be switched off. Each time the button is
pressed, the number of hours is increased by 1. If
this function is activated, "TIMING OFF" 9 is lit up.
Fig.
3
FAN LO MED HI AUTO
COMP. ON
THERMO CONTROL
MODE I
/
O
2
3
4
7
10
1
TIMER
TIMING
ON
OFF
SET
RESET
AUTO
SWING
DRAIN WATER
REMOTE
5
6
11
8
7
Fig.
4
9
*
To disable the timer or change the setting, press
the "RESET" button.
Information about the timer:
◊
If the "On / Off" button is pressed when the timer is
set to switch the device off, this setting is cleared
and the unit switches off.
◊
If the "SET" button is pressed while the timer is acti-
vated, the remaining time is shown on the display.
Each time the "SET" button is pressed, the remain-
ing time is increased by one hour.
6
"
AUTO SWING
"
button
Pressing this button activates the automatic motion
of the horizontal plate fins on the air outlet grill.
Pressing this button again stops this motion.
The "AUTO SWING" function can be deactivated by
repeatedly pressing this button in quick sequence to
adjust the direction of the horizontal air outlet.
Never adjust the horizontal plate fins manually!
7 Display
Normally, the target temperature is displayed here. If
the thermo control button or the TIMER button is
pressed, the display switches for 5 seconds to the
corresponding setting.
8 REMOTE-SENSOR (sensor remote control)
The unit receives the signals sent from the infrared
remote control via the "REMOTE SENSOR".
Special accessory for RKL 460.
9 "TIMING ON" display
If this display is lit up, the unit will automatically be
switched on after a preset amount of time.
9 "TIMING OFF" display
If this display is lit up, the unit will automatically be
switched off after a preset amount of time.