Sloan 136 GEM 2 Exposed Flushometer User Manual
Page 5
5
6
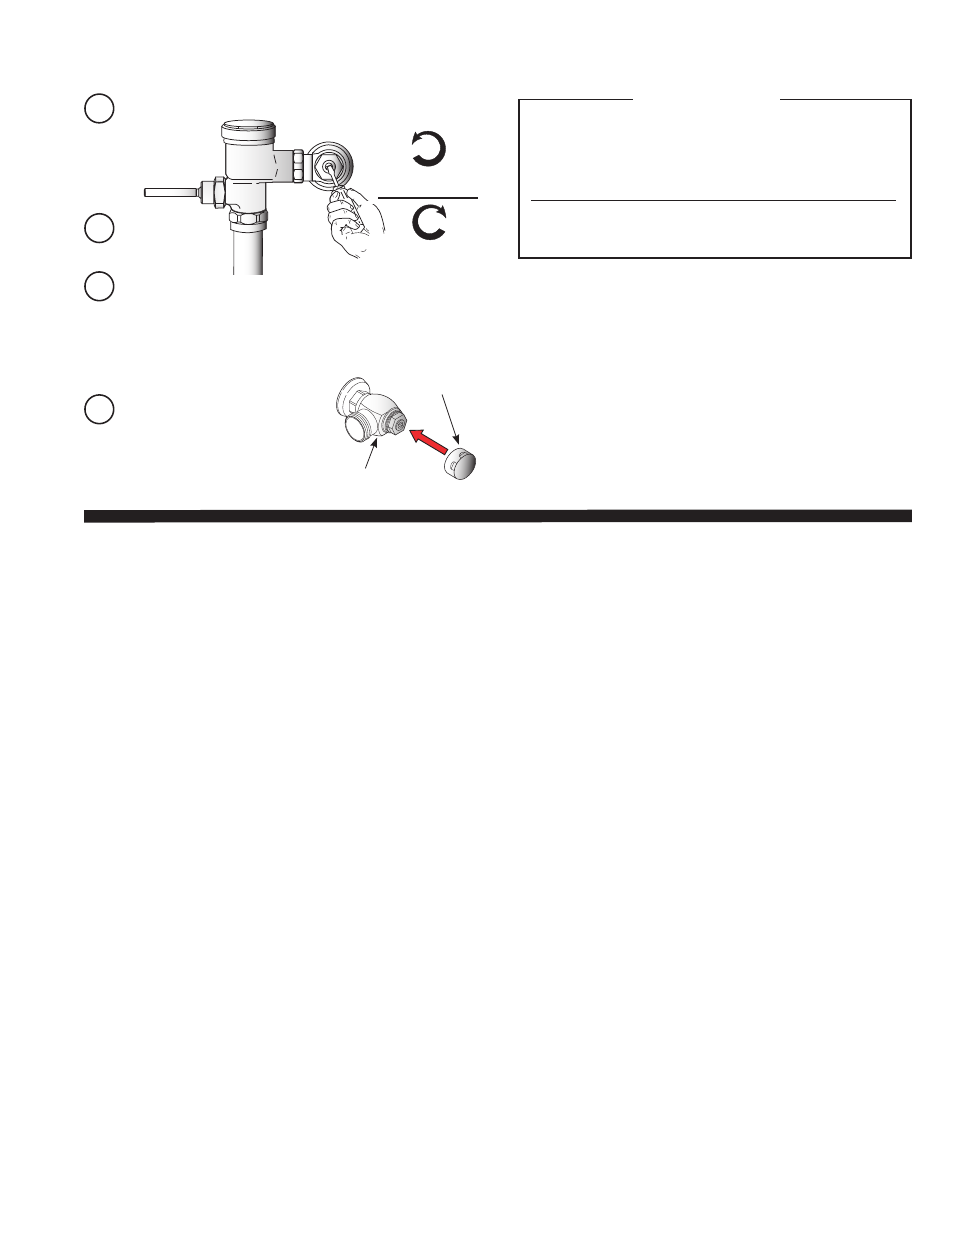
Adjust Control Stop and Install
Vandal Resistant Stop Cap
TROUBLESHOOTING GUIDE
1. Valve does not function (no flush).
A. Control Stop or Main Valve is Closed. Open Control Stop or Main Valve.
B. Handle Assembly is worn. Replace Sloan Handle Assembly (G-143-A).
C. Relief Valve is worn and sticking in UP position. Replace Piston.
2. Volume of water is not sufficient to siphon fixture.
A. Control Stop not open enough. Adjust Control Stop for desired delivery of
water.
B. Urinal Piston Parts inside a Closet Flushometer. Replace Piston Parts with
proper Closet Piston.
C. Low Consumption Flushometer installed on a non-Low Consumption fixture.
Replace with proper Piston Kit.
D. Inadequate volume or pressure at supply. Increase water pressure or supply
(flow) to Flushometer. Consult Factory for assistance.
3. Length of flush is too short (Short Flushing) or
Flushometer closes off immediately.
A. Piston Assembly is not hand-tight. Screw the assembly hand-tight.
B. Enlarged Bypass orifice from corrosion or damage. Install NEW Inside Piston
Kit to correct problem and update Flushometer.
C. Urinal Piston in Closet Flushometer. Replace Piston with proper Closet Piston.
D. Low Consumption Piston installed in non-Low Consumption fixture. Replace
Piston with proper Closet Piston.
E. Handle Assembly is worn. Replace Sloan Handle Assembly (G-143-A).
4. Length of flush is too long (Long Flushing) or fails to
close off.
A. Piston is not seating properly or Bypass orifice is clogged because of foreign
material, or Bypass orifice is closed by an invisible gelatinous film from “over-
treated” water.
Disassemble the working parts and wash thoroughly. NOTE: SIZE OF THE
ORIFICE IN THE BYPASS IS OF UTMOST IMPORTANCE FOR THE PROPER
METERING OF WATER INTO THE UPPER CHAMBER OF THE FLUSHOMETER.
DO NOT ENLARGE OR DAMAGE THIS ORIFICE. REPLACE PISTON IF CLEANING
DOES NOT CORRECT PROBLEM.
B. Line pressure has dropped and is not sufficient to force Relief Valve to seat.
Shut off all control stops until pressure has been restored, then open them
again.
C. 3.5 gpf Closet Piston has been used in a 1.0 or 1.5 gpf Urinal or on a 1.6 gpf
Toilet. Replace with proper Piston.
D. G-21 Main Seat is fouled with debris or is worn. Clean or replace G-21 Main
Seat.
5. Leaking at Handle Assembly.
A. The B-39 Seal is worn or deteriorated. Install new B-39 Seal. NOTE: The B-39
Seal will easily slide onto the Bushing if it is wet.
B. Handle gasket has been omitted. Replace Sloan Handle Assembly (G-143-A).
C. Valve Handle Bushing is worn. Replace Sloan Handle Assembly (G-143-A).
Refer to the GEM•2 Flushometer Maintenance Guide for additional
Troubleshooting and Repair Part information.
When assistance is required, please contact Sloan Valve Company Installation
Engineering Department at:
1-888-SLOAN-14 (1-888-756-2614)
CARE AND CLEANING OF CHROME AND
SPECIAL FINISHES
DO NOT use abrasive or chemical cleaners (including chlorine bleach) to
clean Flushometers that may dull the luster and attack the chrome or special
decorative finishes. Use ONLY mild soap and water, then wipe dry with clean
cloth or towel.
While cleaning the bathroom tile, protect the Flushometer from any splattering
of cleaner. Acids and cleaning fluids will discolor or remove chrome plating.
D
Install Vandal Resistant Control
Stop Cap onto Control Stop.
B
Activate
Flushometer.
A
Open Control Stop COUNTERCLOCKWISE 1/2 turn from closed
position.
C
Adjust Control Stop after each flush until the rate of flow delivered
properly cleanses the fixture.
TURN COUNTER-
CLOCKWISE TO OPEN
TURN CLOCKWISE
TO CLOSE
CONTROL STOP CAP
H-700-A BAK CHEK
®
CONTROL STOP
The Sloan Gem
•2
Flushometer is engineered for quiet operation.
Excessive water flow creates noise, while too little water flow may
not satisfy the needs of the fixture. Proper adjustment is made when
plumbing fixture is cleansed after each flush without splashing water out
from the lip AND a quiet flushing cycle is achieved.
Never open Control Stop to where the flow from the valve exceeds the
flow capability of the fixture. In the event of a valve failure, the fixture
must be able to accommodate a continuous flow from the valve.
!!! IMPORTANT !!!