SP Controls PX2-NRC-1142 User Manual
Page 9
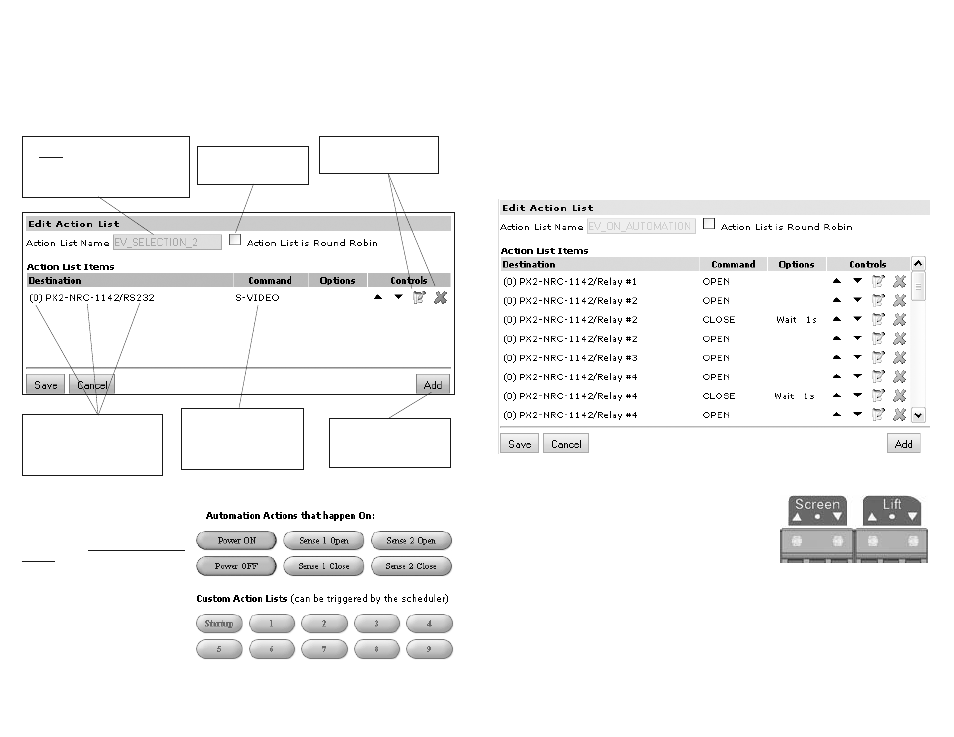
Editing Relay Actions in Action Lists
Representing relay actions in action lists is a little different than you might expect. Most action lists
with relay actions require many actions even for the simplest configurations. The image below shows
the action list that was created and populated into the Power On automation event.
Tip: It is better to assign relay events to the Power On automation event than the Power On buttons
in case the system powers on without the Power On button being pressed (through power sensing).
Most screens and lifts that use relay control expect to be wired to two relays. These screens will lower
when they detect momentary closure on the first relay, and raise when they detect momentary closure
on the second. (There are some exceptions to this rule, but in our current example, we’ll assume the
screen and lift are both typical, i.e. Da-Lite
TM
)
In the image to the right, you can see which relay corresponds
with the numbers listed in the action list above. (Relay 1 and 2
share a common ground, as do relay 3 and 4.) With that in mind,
let’s review what happens in the action list above.
Upon a Power On event, the first action is to open relay 1 and
the second is to open relay 2. (This is just to ensure that they are
open; they should already be.) The next action is to close relay
2, wait one second, then open it again. This produces the mo-
mentary closure on relay 2 that triggers the screen to lower. You
can see a similar pattern with relays 3 and 4; first they both open
(precautionary), then relay 4 closes for one second, then it
opens, providing the momentary closure necessary to lower the
lift.
Editing Action Lists
This is a very important section because EDITING AN ACTION LIST IS HOW YOU ASSIGN CON-
TROL FUNCTIONS to button presses and other events. Click on a button to bring up the Edit Action
List dialog box. In the example we’re covering in this chapter (controlling one display device, one
screen, and one lift), all of these action lists will already be populated with the appropriate actions.
See the example below for a description of what each section of the pane means.
Automation Actions
The “buttons” in this section represent
events that are not triggered by button
presses but as the name indicates, by
changes to the NRC’s state. These ac-
tion lists are functionally no different
except in that one regard.
In this example, only Power ON and
Power OFF automations will contain
action lists. Those have been popu-
lated with the relay closure and open-
ing actions that will trigger your screen
and lift to raise and lower. Editing relay
action lists is next.
1
G
N
D
2
3
G
N
D
4
15
The name of the action list represents
the event that it is assigned to; in this
example, the action list is assigned to
a button press on Input Selection 2,
hence the name “EV_SELECTION_2”
Round-robin functionality
will be discussed in Ad-
vanced Configuration
Click the pencil icon to edit
the action on that line and
click the red ‘X’ to delete it
“Destination” indicates the node
number (0), the node name
(PX2-NRC-1142), and the port
on that node (RS-232) that the
action list will be sent to
“Command” indicates the
name of the action; in this
case, the name (S-VIDEO)
was assigned in Step 5
(“Switching”)
This button will add an ac-
tion to the end of your list;
you can choose actions
from any driver on any port
14