Amped Wireless AP600EX - High Power Wireless-N 600mW Pro Access Point User Manual
Setup guide, Dap600ex, Setup summary open your web browser
1
2
Find a location for installation
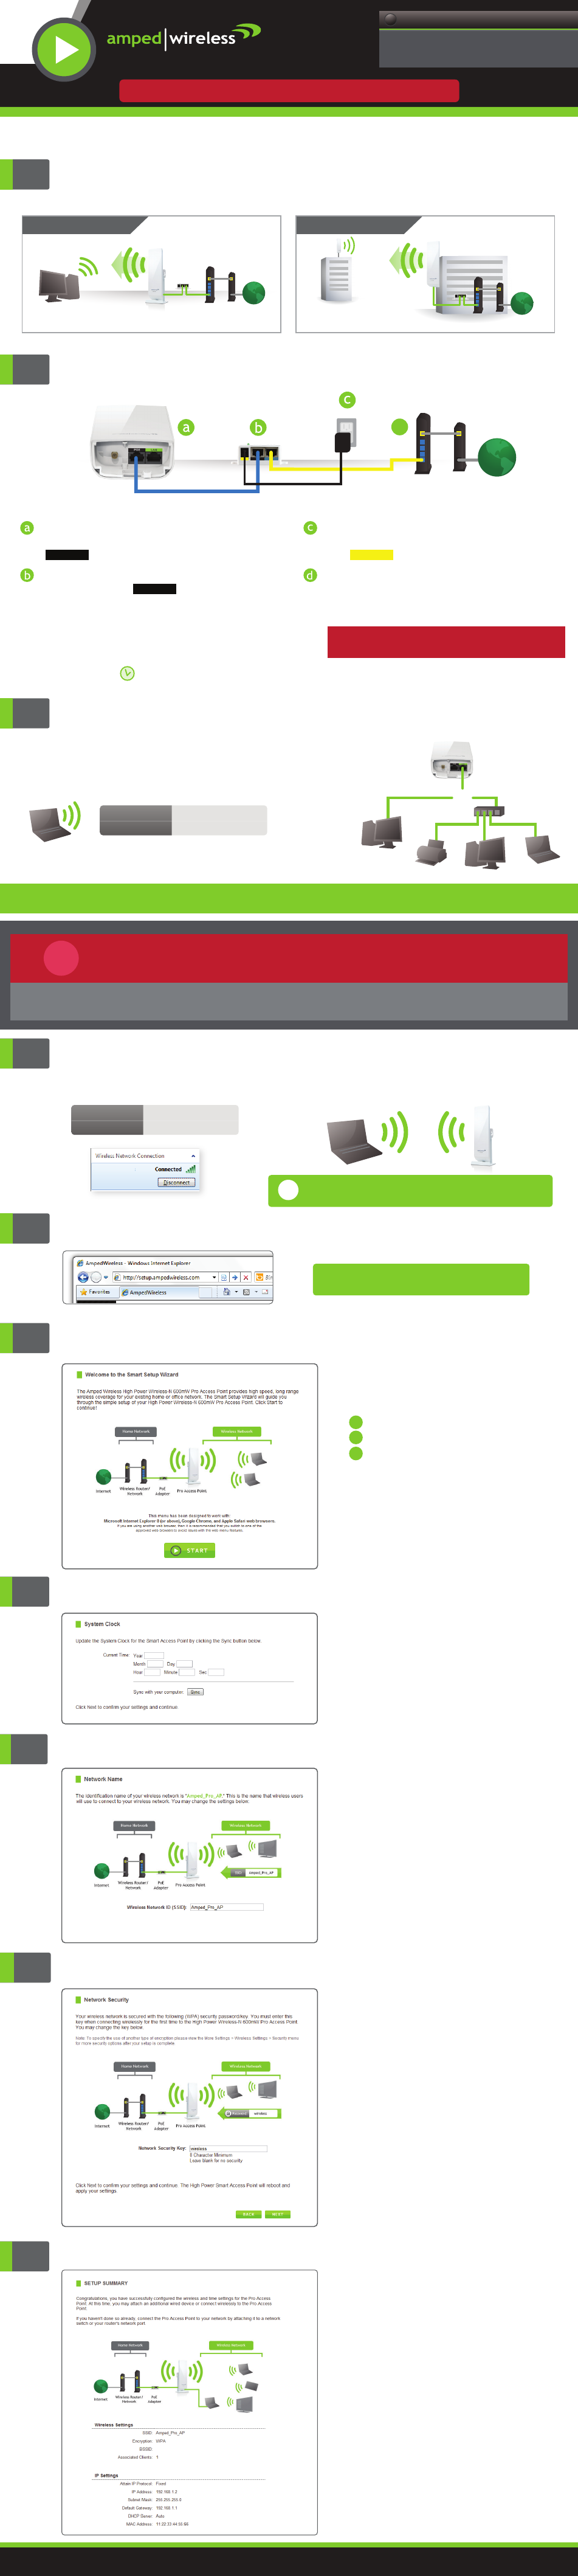
Connect the Pro Access Point to your Router or Network Switch
Open the lid of the Pro Access Point and check
that the PoE cable is securely fastened to the
port.
Locate the PoE Adapter and connect the 30 ft
PoE cable to the port on the PoE
adapter.
AP
Locate the power adapter and connect one
end to a power outlet and the other end to
the port on the PoE adapter.
Locate the shorter network cable and connect
one end to the port on the PoE adapter and
the other to your router's network (LAN) port,
or a network switch.
PWR
AP
NETWORK
Internet
Modem
Router
(LAN Port)
d
AP600EX
Allow up to two (2) minutes for the Pro Access Point to
automatically configure itself to your network.
Note: If your network uses static IP address assignments, you will need to manually configure the settings for your
Pro Access Point. See the instructions on the back to access the configuration menu of the Access Point.
The instructions below are optional. You may now use your Pro Access Point without any additional
configurations. However, if you wish to change any settings (such as network ID and security) for the Pro
Access Point, follow the instructions below to access the configuration menu of the Access Point.
!
7
Setup Summary
Open your Web Browser
If the URL fails to open, then try: http://192.168.1.240
http://setup.ampedwireless.com
Enter the setup web address into your browser:
2
6
Wireless Network Security
The default Security Key (WPA) of your
wireless network is:
wireless
To change it, enter a new key in the Security Key
field. The key must be at least 8 characters long.
Click
Next
to apply your settings.
The Pro Access Point will reboot. This
process may take up to 2 minutes. The
page will automatically reload after the
countdown. If it does not, you may need
to reconnect to the Access Point and
refresh the page manually.
4
Set the System Clock Time
The System Clock is used for system logs
and setting schedules for Internet access.
Click
Sync
to synchronize the System Clock
with the time on your computer.
Click
Next
to continue.
The Setup Summary provides you with
information regarding your current settings.
If you have wired network devices, you may
attach them to the wired ports on the back
of the Pro Access Point for additional wired
connectivity.
If you have any questions during the setup process
please contact Amped Wireless support department:
Phone:
888-573-8820
Email:
Web:
www.ampedwireless.com/support
The ID of your Wireless Network is:
Amped_Pro_AP
To change it, enter a new name in the SSID field.
Users connecting wirelessly to the Pro Access Point
will use this ID to identify your wireless network.
Click
Next
to continue.
5
Wireless Network ID
3
Welcome to the Smart Setup Wizard
The Smart Setup Wizard will guide you
through the following settings:
System Clock
Wireless Network SSID
Wireless Network Security Key
Click
Start
to begin.
1
2
3
1
Optional Configurations: Accessing the Settings Menu
Scan for available wireless networks on your
PC and connect to the following network:
NETWORK ID:
Amped_Pro_AP
PASSWORD:
wireless
Amped_Pro_AP
If you do not wish to connect wirelessly, you may also use a wired
connection between the Access Point (LAN Port) and your computer to
access the Settings Menu.
!
3
Connect your Computer to the Pro Access Point
Wired Connections:
Wireless Connections:
Scan for available wireless networks on your
PC and connect to the following network:
Attach any
Wired Devices
to the
Pro Access Point using an
Ethernet cable.
NETWORK ID:
Amped_Pro_AP
PASSWORD:
wireless
or
Network Switch
CONGRATULATIONS, YOU’RE DONE!
INDOOR SETUP
Indoor range will be limited.
Internet
Modem
Router
(LAN Port)
Pro Access Point
OUTDOOR SETUP
Internet
Modem
Router
(LAN Port)
Pro Access Point
See back side for mounting instructions.
View the package insert for instructions on how to optimally position the Pro Access Point.
POE
POWER
Note: If you plan to use your own network cable, ensure
that the cable is a Non-PoE cable to avoid power conflict issues.
— R E A D F I R S T —
SETUP GUIDE
High Power Wireless-N 600mW Pro Access Point
Need Help? Give us a call.
Phone: 888-573-8820
Email: [email protected]
Web: www.ampedwireless.com/support
?